There are few aromas as inviting as the fragrant spices of Thai cuisine, and among its many delights, Thai Chicken Satay holds a special place in my heart and kitchen. It is a dish that effortlessly marries savory, sweet, tangy, and nutty flavors, creating an irresistible experience. Today, I am thrilled to share my ultimate guide to crafting the most delicious Thai Chicken Satay with Peanut Sauce right in your home. This comprehensive journey will not only provide you with a tried-and-true recipe for perfectly tender chicken skewers and a rich, balanced peanut sauce but also reveal a unique technique for enhanced flavor and texture that will elevate your cooking.
Why You’ll Love This Recipe
I genuinely believe this Thai Chicken Satay recipe will become a treasured favorite in your collection, especially thanks to a secret twist I am excited to share. I brush the grilled or seared chicken satay with a touch of unsweetened coconut cream in the last minute of cooking for extra richness and subtle tropical aroma. This simple step makes an incredible difference.
The coconut cream, when lightly caramelized on the hot chicken, works wonders. It enhances the chicken’s juiciness, ensuring every bite is moist and tender. It also promotes a beautiful golden-brown finish, activating the Maillard reaction for irresistible color and texture. This delicate, rich, and naturally sweet coconut flavor perfectly complements the traditional Thai profile without making the dish greasy. It boosts the visual appeal of the skewers, making them look as amazing as they taste.
Beyond this unique technique, you will love this recipe for its incredible versatility. It is perfect as an appetizer for gatherings or as a satisfying main course for a weeknight meal. The flavor profile is an exquisite balance of savory, nutty, tangy, and sweet notes that tantalize the palate. Plus, I have included multiple cooking methods including grilling, baking, and skillet cooking, so you can enjoy this dish regardless of your kitchen setup or the weather outside.
Ingredients Needed

Here is everything you will need to create this amazing Thai Chicken Satay with Peanut Sauce in your kitchen.
- 2 pounds chicken breasts or thighs* (sliced into 1 1/2″ wide strips by 3-5″ long )
- 3 tablespoons olive oil
- 1/4 cup coconut milk plus more as needed ((may sub water))
- 1/3-1/2 cup smooth peanut butter
- 12-15 skewers
- Marinade/Sauce:
- 1/4 cup low sodium soy sauce
- 1/4 cup packed brown sugar
- 1 tablespoon chili paste ((like Sambal Oelek))
- 1 1/2 tablespoons lime juice
- 1 1/2 tablespoons fish sauce
- 1 teaspoon dried basil
- 1 teaspoon ground coriander
- 1/2 teaspoon ground ginger
- 1/2 teaspoon garlic powder
- 1/2 teaspoon ground turmeric
Ingredient Notes & Substitutions
When selecting your chicken, you have a choice between chicken breasts and chicken thighs. While chicken breasts are lean and quick-cooking, chicken thighs typically offer more moisture and a richer flavor, which I often prefer for satay.
For the peanut butter, the type you choose significantly impacts your sauce’s consistency and flavor. Natural smooth peanut butter, often containing just peanuts and salt, tends to be runnier and its oils can separate, requiring thorough stirring. Processed smooth peanut butter, with added sugars and stabilizers, offers a creamier, more stable texture. I recommend using a good quality, creamy processed peanut butter for the most consistent and velvety peanut sauce, unless you specifically prefer the natural variety and are prepared to adjust the liquid content.
The coconut milk listed is crucial for the richness of the peanut sauce. I recommend using full-fat canned coconut milk for the best creamy texture. This is also the unsweetened coconut cream you will use for my unique twist at the end, providing that extra richness.
Both low sodium soy sauce and fish sauce are essential for the umami depth in this recipe. For a gluten-free alternative, you can substitute coconut aminos for the soy sauce. The dish will remain dairy-free with these ingredients.
Chili paste, such as Sambal Oelek, adds a wonderful kick. You can easily adjust the amount to suit your personal heat preference, adding more for a spicier satay or less for a milder taste.
Regarding skewers, you can use either bamboo skewers or metal skewers. Bamboo skewers are readily available and disposable, but they absolutely must be soaked in water for at least 30 minutes before use to prevent them from burning during cooking. Metal skewers are reusable and conduct heat well, cooking the chicken from the inside out, but they will be hot to handle.

How to Make Thai Chicken Satay with Peanut Sauce
Creating this Thai Chicken Satay with Peanut Sauce is a rewarding culinary journey. Follow these steps for delicious results.
Prepare the Marinade and Marinate the Chicken
First, I whisk together all the Marinade/Sauce ingredients in a medium bowl. This aromatic blend will infuse our chicken with incredible Thai flavor. From this mixture, I remove 1/3 cup to a freezer-size bag and whisk in the 3 tablespoons of olive oil. This reserved portion is specifically for the chicken marinade. I then add the sliced chicken to the bag and toss it thoroughly to ensure every strip is evenly coated. Marinating is critical for both flavor profile and juiciness, so I refrigerate it for a minimum of 6 hours, or ideally, overnight. Remember to refrigerate the remaining marinade/sauce separately, as this will become the rich base of your creamy Peanut Sauce.
Prepare Skewers and Chicken for Cooking
When I am ready to cook, I start by soaking my wooden skewers in water for at least 30 minutes. This expert tip prevents them from burning on the grill or in the oven. Meanwhile, I remove the marinated chicken from the refrigerator to bring it closer to room temperature for about 30 minutes. This step is key for more even cooking. Then, I carefully thread the chicken strips onto the skewers. I gently dab any excess marinade off with paper towels, which helps prevent burning and promotes better searing.
Cooking Method: Oven Baking
If baking, I preheat my oven to 350 degrees F. I line two baking sheets with foil and lightly spray them with nonstick cooking spray to prevent sticking. I evenly divide the chicken skewers between the baking sheets, making sure not to overcrowd them, which can lead to steaming instead of baking. I bake them for 15-20 minutes, or until the chicken is cooked through and reaches an internal temperature of 165 degrees F. It is important not to overcook the chicken, as it will lose its tender texture. The chicken will look opaque and slightly golden when ready.
Cooking Method: Grilling
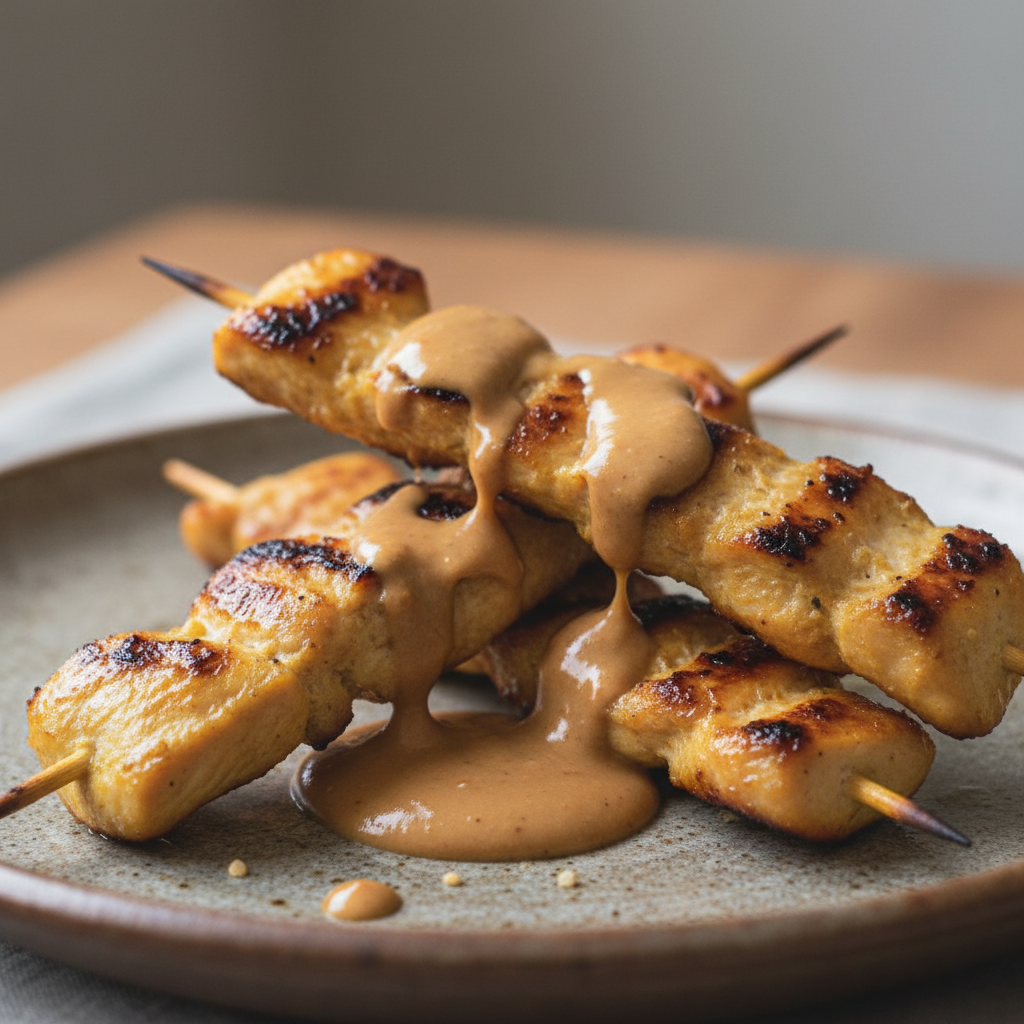
For grilling, I grease an indoor or outdoor grill and heat it to high heat. Once it is hot, I add the chicken skewers, then reduce the heat to medium. I cover the grill and cook the chicken for 3-4 minutes per side, or until it is cooked through, reaching an internal temperature of 165 degrees F. For ideal char marks, make sure your grill grates are clean and well-oiled, and resist moving the chicken too soon. In the last minute or two of grilling, I brush the skewers with a touch of unsweetened coconut cream. This unique twist not only adds a delicate richness but also helps achieve that beautiful golden color and boosts the overall flavor.
Cooking Method: Skillet Searing
When using a skillet, I heat 1 1/2 tablespoons of olive oil in a large non-stick skillet over medium-high heat. I work in batches to avoid overcrowding the skillet, which is crucial for achieving a proper sear rather than steaming the chicken. I add the skewers and cook them for 2-3 minutes per side until they are cooked through and reach an internal temperature of 165 degrees F. Just like with grilling, in the final minute of skillet cooking, I brush the chicken with unsweetened coconut cream for added richness and enhanced browning. This skillet cooking method is excellent for a quick stovetop preparation.
Craft the Creamy Peanut Sauce
Now it is time to transform our reserved sauce base into the star Peanut Sauce. I add the refrigerated reserved sauce to a small saucepan along with 1/4 cup of coconut milk (or 3 tablespoons of water if preferred). I bring it to a boil, then immediately reduce the heat and simmer for just 1 minute. I remove it from the heat and stir in 1/3 cup of smooth peanut butter until it is completely combined and beautifully creamy. For a thicker or more nutty sauce, I can add additional peanut butter. For a thinner sauce, I gradually add more water or coconut milk, 1 tablespoon at a time, until I reach my desired consistency. Finally, I taste it and adjust the flavor balance. If I want a spicier sauce, I add a bit more chili sauce.
Serve Your Homemade Satay
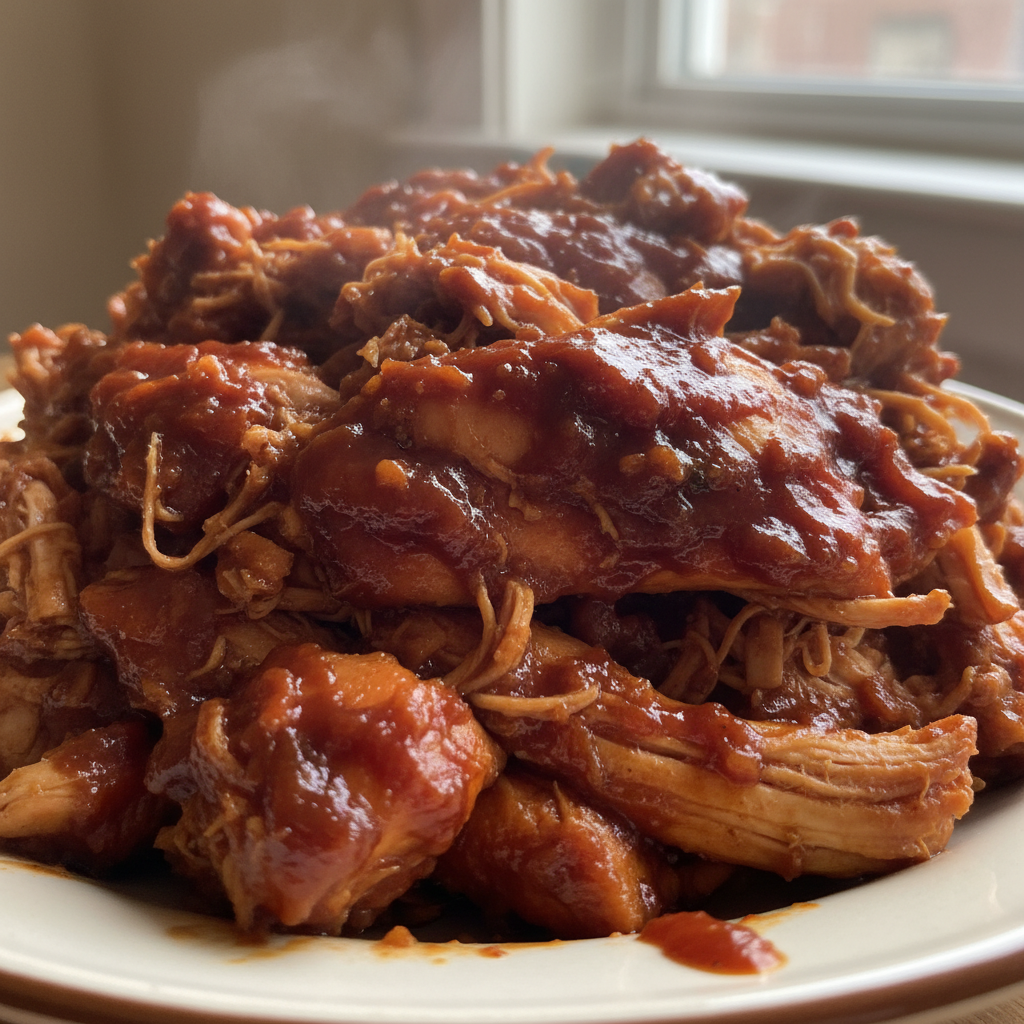
Once the chicken is perfectly cooked and the peanut sauce is luscious, I serve the chicken warm with the creamy Peanut Sauce. It makes an incredible appetizer, or I often serve it alongside fragrant jasmine rice or coconut rice and stir-fried vegetables for a fantastic main course. The aroma, the colors, and the flavors of this completed dish are truly a delight.
Mastering Your Peanut Sauce: Consistency & Flavor
The peanut sauce is truly the heart of any good Thai Chicken Satay. Achieving the perfect consistency and flavor balance is key, and I have learned a few tricks over the years.
When choosing your smooth peanut butter, consider that natural peanut butter often has a thinner consistency due to oil separation. This might require you to use less liquid in your sauce, or to whisk it vigorously to re-emulsify the oils. Processed peanut butter, on the other hand, usually yields a thicker, more stable, and consistently creamy sauce. Experiment to find which type you prefer, but be mindful of their differing impacts on sauce consistency and flavor.
Troubleshooting common peanut sauce issues is simple. If your sauce separates or curdles, it can often be re-emulsified by whisking vigorously over low heat, or by blending it with an immersion blender. If the sauce is too thick, simply thin it with a tablespoon or two of warm water or coconut milk until it reaches your desired consistency. If it is too thin, you can simmer it gently to reduce it, or incorporate a bit more peanut butter.
Adjusting the seasoning for different palates is part of the fun. If you prefer a sweeter sauce, add a bit more brown sugar. For a saltier or more umami-rich flavor, a splash more fish sauce or low sodium soy sauce will do the trick. If you crave more zing, extra lime juice provides that essential tang. And for those who love heat, additional chili paste like Sambal Oelek can be stirred in to achieve your preferred spice level.
If you find your sauce is just not thickening enough, an optional cornstarch slurry can be your best friend. To make one, simply whisk together 1 teaspoon of cornstarch with 1 tablespoon of cold water until smooth. While your peanut sauce is simmering, slowly drizzle in the slurry, whisking constantly, and allow it to cook for 1-2 minutes until it reaches your desired thickening agent effect. This is a great way to control the exact thickness of your sauce.
Achieving Perfect Satay: Grill Marks & Doneness
Cooking the chicken perfectly is just as important as the sauce, ensuring juicy, flavorful skewers every time. My goal is always that beautiful char and caramelization.
For ideal char marks during grilling, preparation is key. Make sure your grill is preheated to high heat and the grates are thoroughly cleaned and well-oiled. When you place the chicken, let it sear without moving it for a few minutes before flipping. This allows those coveted grill marks to form. Reducing the heat after the initial sear helps prevent burning while still allowing the chicken to cook through.
To achieve char without burning the marinade, reduce the heat to medium after the initial high-heat sear. This allows the chicken to cook more gently. And, of course, my unique twist of brushing the chicken with unsweetened coconut cream in the final minute helps immensely. It not only enhances browning but also protects the chicken and adds a layer of richness.
Ensuring juiciness means avoiding overcooking the chicken. The best way to do this is by using an instant-read thermometer. Always aim for an internal temperature of 165 degrees F in the thickest part of the chicken. Pulling the chicken off the heat as soon as it reaches this temperature is a collective wisdom expert tip that prevents dry, tough satay.
For even cooking results, take care when threading chicken onto skewers. Try to make the pieces relatively uniform in size and thread them in a somewhat wavy pattern to ensure even exposure to heat. Also, bringing your chicken to room temperature for about 30 minutes before cooking allows for more consistent heat penetration and helps prevent unevenly cooked spots.
Pro Tips & Troubleshooting
Through my years in the kitchen, I have gathered some expert tips and identified common pitfalls that I want to share with you, ensuring your Thai Chicken Satay is a triumph every time.
Pro Tips
Always soak your wooden skewers for at least 30 minutes before threading the chicken. This simple step prevents them from catching fire or charring excessively during cooking.
Marinating longer for flavor truly makes a difference. Aim for a marinating time of 6 hours up to overnight (24 hours) to allow the flavors to deeply penetrate the chicken, resulting in maximum flavor and juiciness.
Bring your chicken to room temperature for about 30 minutes before cooking. This ensures more even results, preventing the outside from cooking too quickly while the inside remains undercooked.
Do not overcrowd your cooking surface, whether it is the grill, baking sheets, or skillet. Overcrowding leads to steaming instead of searing or baking, preventing desirable caramelization and even cooking.
Always use an instant-read thermometer to ensure your chicken reaches an internal temperature of 165 degrees F. This is the foolproof way to avoid overcooking and keep your satay deliciously juicy.
Finally, remember my signature twist: the coconut cream finish. Apply unsweetened coconut cream in the last minute of cooking for enhanced flavor, juiciness, and that beautiful golden-brown finish.
Common Mistakes to Avoid
One of the most common mistakes is not soaking wooden skewers. Neglecting this step can lead to your skewers burning or catching fire, which nobody wants in their kitchen.
Overcooking the chicken is another frequent pitfall. This results in dry, tough satay. Always stress monitoring the internal temperature with a thermometer to prevent this.
Under-marinating the chicken will lead to bland results. Less than 6 hours will not give the marinade enough time to work its magic, so emphasize the importance of time here.
It is important not to expect an American-style peanut butter and jelly flavor profile for your Thai Peanut Sauce. Thai Peanut Sauce has complex savory, nutty, tangy, and spicy notes, which is a delightful departure from purely sweet peanut butter.
Overcrowding your cooking surface, whether it is the grill, oven, or skillet, is a common error. This leads to steaming instead of searing or baking, preventing those desirable char marks and even cooking.
Serving & Storage
Once your Thai Chicken Satay with Peanut Sauce is ready, the possibilities for enjoying it are endless.
Serving Ideas
Traditionally, I love serving this dish hot with the rich Peanut Sauce as an appetizer. However, it also makes a fantastic main course when paired with fluffy jasmine rice or aromatic coconut rice and a side of vibrant stir-fried vegetables.
For creative meal transformations, consider deconstructing your satay into delicious rice bowls, perhaps with some crisp cauliflower rice for a lighter option. You can even create unique Thai Chicken Tacos or experiment with Thai Chicken Pizza for a fusion delight.
If you want to offer variety, consider alternative dipping sauces like a classic hoisin sauce, a zesty Asian sweet chili sauce, or even a homemade sriracha mango honey dip.
For an impressive presentation, garnish your dish with fresh cilantro, a sprinkle of crushed peanuts for texture, and a lime wedge for a burst of citrusy brightness.
Storage and Make-Ahead
This recipe is excellent for meal prep. The marinade can be made in advance and stored in the refrigerator for up to 3 days. The peanut sauce can also be prepared ahead of time and kept in an airtight container in the fridge for up to 5 days.
For safe storage guidelines, cooked chicken satay and peanut sauce should be refrigerated separately in airtight containers for up to 3-4 days. Always ensure they are cooled completely before storing.
You can also freeze various components. Raw marinated chicken can be frozen in the freezer bag for up to 3 months. Cooked chicken satay can be frozen without the skewers in an airtight container for up to 2 months. The peanut sauce freezes beautifully as well; portion it into smaller containers or freezer bags for up to 3 months. Thaw frozen components overnight in the refrigerator before reheating.
For reheating instructions, you can gently warm cooked chicken satay in the oven at 300 degrees F for 10-15 minutes, on the stovetop in a skillet over medium-low heat until warmed through, or quickly in the microwave. Reheat the peanut sauce gently on the stovetop over low heat, adding a splash of water or coconut milk to restore its creamy consistency if needed.
Conclusion
Mastering Thai Chicken Satay at home is a truly rewarding experience, offering an authentic flavor profile, incredibly tender chicken, and a rich, satisfying Peanut Sauce. My secret coconut cream twist elevates this dish, making the chicken extra juicy and beautifully golden. With these tips and techniques, you can confidently create a restaurant-quality meal in your own kitchen.
Do not hesitate to customize the seasonings to your preference and explore the various serving ideas I have shared. I encourage you to share your creations with friends and family, and perhaps even explore more Thai cuisine recipes. For more culinary adventures and expert tips, consider signing up for my newsletter!
FAQ
Here are answers to some frequently asked questions about Thai Chicken Satay with Peanut Sauce.
1. Is Thai Chicken Satay a healthy meal option, and how can I make it healthier?
Thai Chicken Satay can be a healthy meal, especially when made at home. Chicken breasts are a lean protein source, and peanut butter provides healthy fats. To make it healthier, you can use chicken breasts over thighs to reduce fat, lessen the brown sugar in the sauce, and thin the sauce with more water or light coconut milk instead of adding more peanut butter for thickness. Serving it with cauliflower rice and plenty of stir-fried vegetables instead of traditional jasmine rice also reduces calorie and carbohydrate content.
2. How can I ensure my Thai Chicken Satay and Peanut Sauce are gluten-free and dairy-free?
To ensure your Thai Chicken Satay and Peanut Sauce are gluten-free, substitute low sodium soy sauce with gluten-free tamari or coconut aminos. Most of the other ingredients, like fish sauce, chili paste, and spices, are naturally gluten-free. This recipe is naturally dairy-free as it uses coconut milk, which is a plant-based alternative. Always double-check ingredient labels for hidden gluten or dairy.
3. What are the best cooking methods for Chicken Satay (grill, oven, skillet), and how long do they take?
All three methods yield delicious results. Grilling offers the best char and smoky flavor, cooking in about 6-8 minutes total. Baking in the oven is hands-off and takes about 15-20 minutes. Skillet cooking is fast and convenient for stovetop preparation, taking approximately 4-6 minutes total. Regardless of the method, always ensure the chicken reaches an internal temperature of 165 degrees F.
4. What is the ideal marinating time for chicken satay, and what does it taste like?
The ideal marinating time for chicken satay is 6 hours up to overnight (12-24 hours). This allows the complex flavors of the marinade to fully penetrate and tenderize the chicken. The resulting flavor profile is a harmonious blend of savory from the soy and fish sauces, nutty from the spices, tangy from the lime, sweet from the brown sugar, and aromatic from the ginger, garlic, and turmeric.
5. How do I achieve the perfect consistency and flavor balance for Thai Peanut Sauce?
To achieve the perfect consistency, you can add more peanut butter for a thicker sauce or thin it out with a tablespoon or two of coconut milk or water. For flavor balance, taste and adjust as you go. Add more lime juice for tang, more brown sugar for sweetness, extra fish sauce or soy sauce for umami and saltiness, and more chili paste like Sambal Oelek for additional spice. A cornstarch slurry can also be used to thicken the sauce if needed.
6. What are the best serving suggestions and pairing ideas for Thai Chicken Satay with Peanut Sauce?
Classic pairings include jasmine rice, coconut rice, and stir-fried vegetables. For creative serving ideas, consider making rice bowls with your favorite toppings, using the chicken in Thai-inspired tacos, or even on a unique Thai chicken pizza. Fresh cilantro, crushed peanuts, and lime wedges make excellent garnishes.
7. How do you pronounce the word satay?
Satay is pronounced “SAH-tay.”
8. Is satay spicy?
The spice level of satay is entirely adjustable. The recipe includes chili paste (like Sambal Oelek) in both the marinade and the sauce. You can add more for a spicier kick or reduce it for a milder flavor to suit your preference.
Thai Chicken Satay with Peanut Sauce: Your Ultimate Guide
Ingredients
Equipment
Method
- Whisk together all the Marinade/Sauce ingredients in a medium bowl.
- Remove 1/3 cup of this mixture to a freezer-size bag and whisk in the 3 tablespoons of olive oil. This reserved portion is specifically for the chicken marinade.
- Add the sliced chicken to the bag and toss it thoroughly to ensure every strip is evenly coated.
- Marinate by refrigerating for a minimum of 6 hours, or ideally, overnight.
- Remember to refrigerate the remaining marinade/sauce separately, as this will become the rich base of your creamy Peanut Sauce.
- When ready to cook, start by soaking wooden skewers in water for at least 30 minutes to prevent them from burning.
- Remove the marinated chicken from the refrigerator to bring it closer to room temperature for about 30 minutes for more even cooking.
- Carefully thread the chicken strips onto the skewers.
- Gently dab any excess marinade off with paper towels, which helps prevent burning and promotes better searing.
- If baking, preheat your oven to 350 degrees F.
- Line two baking sheets with foil and lightly spray them with nonstick cooking spray to prevent sticking.
- Evenly divide the chicken skewers between the baking sheets, making sure not to overcrowd them.
- Bake them for 15-20 minutes, or until the chicken is cooked through and reaches an internal temperature of 165 degrees F. Do not overcook.
- For grilling, grease an indoor or outdoor grill and heat it to high heat.
- Once hot, add the chicken skewers, then reduce the heat to medium.
- Cover the grill and cook the chicken for 3-4 minutes per side, or until it is cooked through, reaching an internal temperature of 165 degrees F.
- In the last minute or two of grilling, brush the skewers with a touch of unsweetened coconut cream for added richness and a beautiful golden color.
- When using a skillet, heat 1 1/2 tablespoons of olive oil in a large non-stick skillet over medium-high heat.
- Work in batches to avoid overcrowding the skillet.
- Add the skewers and cook them for 2-3 minutes per side until they are cooked through and reach an internal temperature of 165 degrees F.
- Just like with grilling, in the final minute of skillet cooking, brush the chicken with unsweetened coconut cream for added richness and enhanced browning.
- Add the refrigerated reserved sauce to a small saucepan along with 1/4 cup of coconut milk (or 3 tablespoons of water if preferred).
- Bring it to a boil, then immediately reduce the heat and simmer for just 1 minute.
- Remove it from the heat and stir in 1/3 cup of smooth peanut butter until it is completely combined and beautifully creamy.
- For a thicker or more nutty sauce, add additional peanut butter. For a thinner sauce, gradually add more water or coconut milk, 1 tablespoon at a time, until desired consistency is reached.
- Finally, taste it and adjust the flavor balance; add more chili sauce for a spicier sauce.
- Serve the chicken warm with the creamy Peanut Sauce.
- Enjoy as an incredible appetizer, or serve alongside fragrant jasmine rice or coconut rice and stir-fried vegetables for a fantastic main course.
Notes
Printable Recipe Card
Want just the essential recipe details without scrolling through the article? Get our printable recipe card with just the ingredients and instructions.