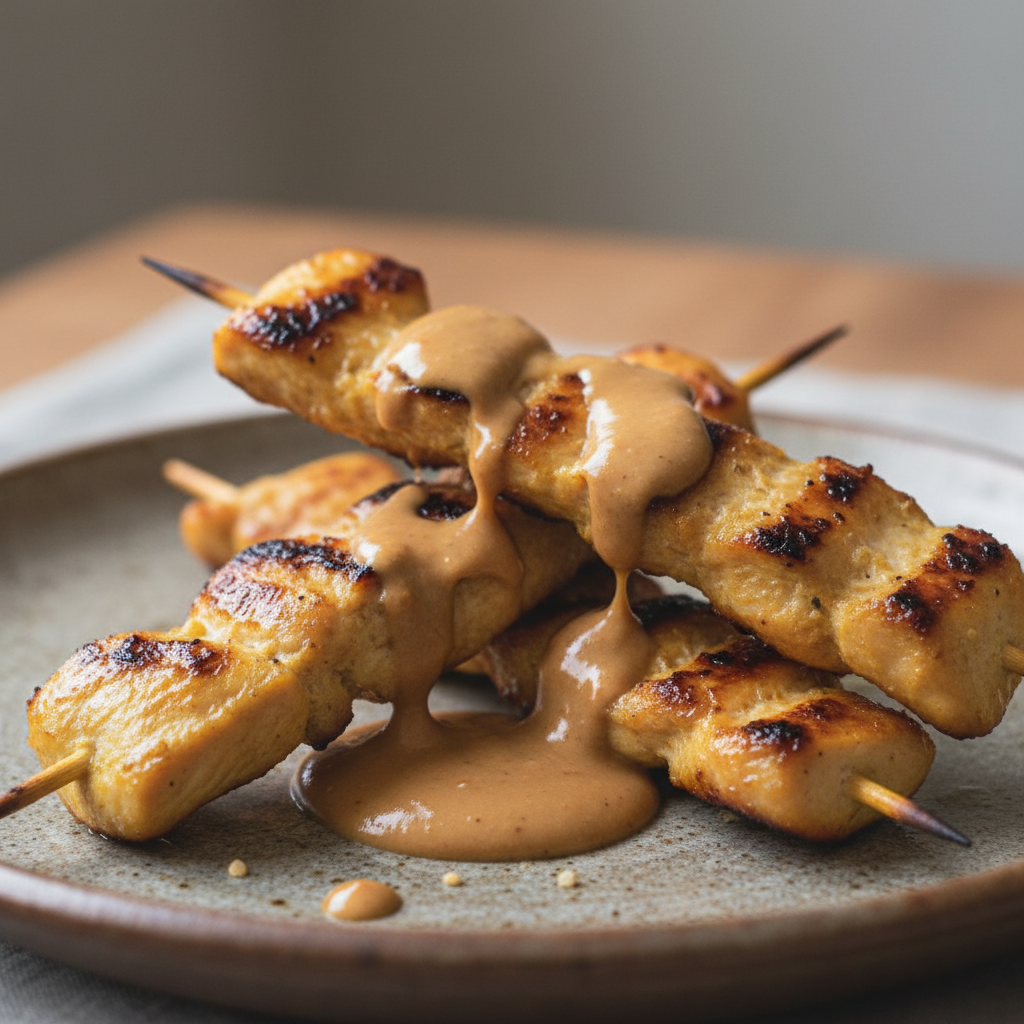
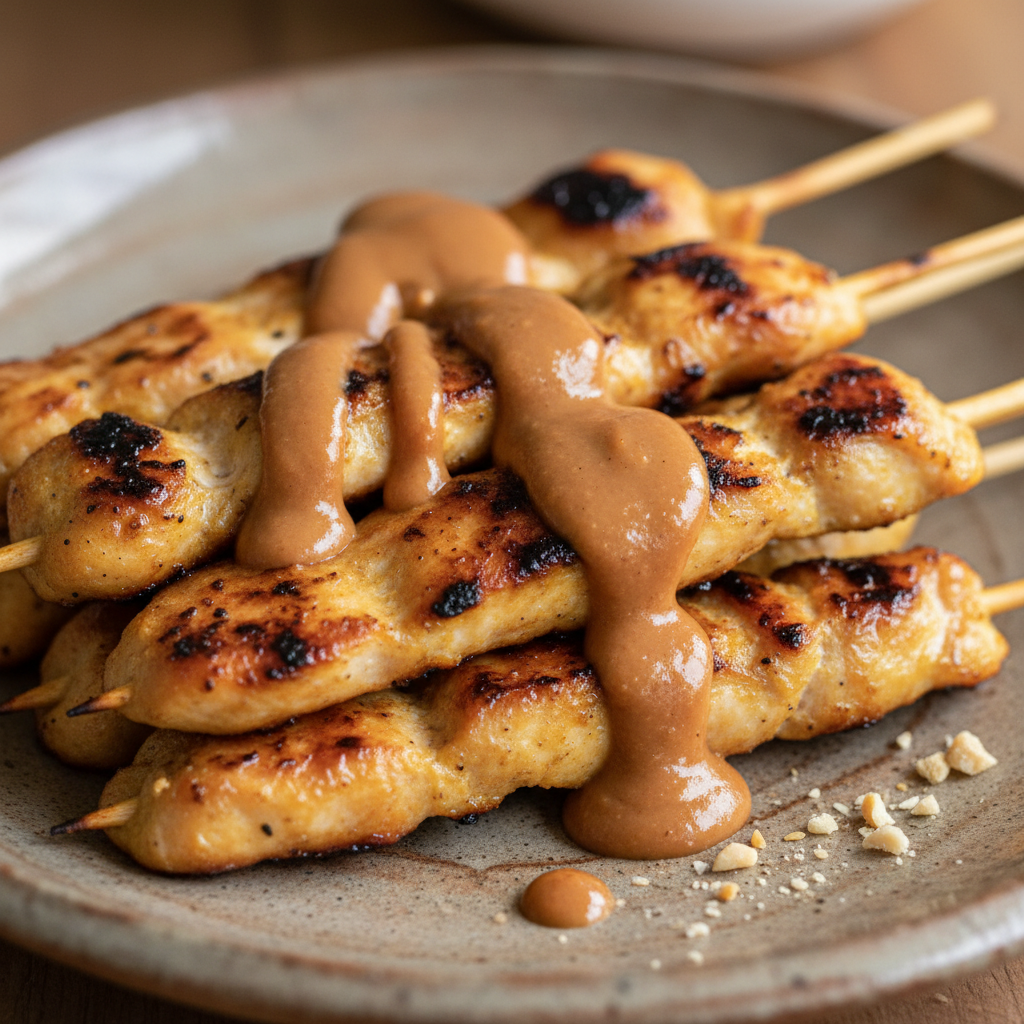
Welcome to my kitchen, where today we are embarking on a flavor journey to Thailand. There is nothing quite like the irresistible aroma and taste of perfectly grilled Thai Chicken Satay with Peanut Sauce. This dish is a true crowd-pleaser, beloved for its tender chicken skewers and rich, creamy peanut dipping sauce. Whether you are a seasoned cook or just starting your culinary adventure, this recipe is designed to bring authentic Thai flavors to your home with unique techniques and comprehensive tips. Get ready to create a memorable meal that will transport your taste buds.
Why You’ll Love This Recipe
I truly believe this Thai Chicken Satay with Peanut Sauce recipe stands out, offering an experience beyond your usual takeout. It is the special touches that elevate it to extraordinary.
The Aromatic Paste. My unique twist begins with a quick-blended aromatic paste. Incorporating one tablespoon of freshly grated galangal or ginger and two tablespoons of finely minced lemongrass into the marinade dramatically enhances the flavor profile. This fresh paste brings a brighter, more authentic Thai aromatic depth that powdered spices simply cannot achieve, adding a layer of freshness and complexity that truly shines.
The Basting Glaze. Another game-changer is the basting glaze. Towards the end of cooking, I instruct you to baste the chicken skewers with a glossy glaze. This glaze is made by simmering a quarter cup of reserved peanut sauce base with one tablespoon of additional coconut milk and one teaspoon of palm sugar or honey. It promotes superior caramelization, thanks to the Maillard reaction, creates a beautiful glossy finish, and adds an extra layer of moisture and flavor during the last two minutes of cooking. This prevents dryness and ensures every bite is succulent.
Unforgettable Flavor. The combination of sweet, savory, tangy, and a hint of spice creates a multi-dimensional taste experience. This truly captures the essence of Thai cuisine.
Perfectly Juicy Chicken. Thanks to the optimal marinating time and the innovative basting glaze technique, you will achieve perfectly juicy and tender chicken every single time. No more dry chicken satay.
Versatile & Crowd-Pleasing. This recipe is incredibly versatile. It is ideal for a delightful family dinner, impressing guests at a gathering, or even for convenient meal prep throughout the week. It is easily adaptable for various dietary needs too.
Ingredients Needed

Here are the ingredients you will need to create this amazing Thai Chicken Satay with Peanut Sauce.
2 pounds chicken breasts or thighs* (sliced into 1 1/2″ wide strips by 3-5″ long )
3 tablespoons olive oil
1/4 cup coconut milk plus more as needed ((may sub water))
1/3-1/2 cup smooth peanut butter
12-15 skewers
Marinade/Sauce:
1/4 cup low sodium soy sauce
1/4 cup packed brown sugar
1 tablespoon chili paste ((like Sambal Oelek))
1 1/2 tablespoons lime juice
1 1/2 tablespoons fish sauce
1 teaspoon dried basil
1 teaspoon ground coriander
1/2 teaspoon ground ginger
1/2 teaspoon garlic powder
1/2 teaspoon ground turmeric
Ingredient Notes & Substitutions
Let’s talk about some key ingredients and how to choose or adapt them for the best results.
Chicken: For your chicken satay, you can choose between chicken breasts or chicken thighs. Chicken breasts offer a leaner option, while chicken thighs provide more juiciness and flavor. Ensure you slice your chosen chicken into 1 1/2-inch wide strips, about 3 to 5 inches long, for even cooking.
Peanut Butter: I recommend using a natural, smooth, unsweetened peanut butter for the most authentic and savory flavor profile in your peanut sauce. Avoid brands with excessive added sugars. For an even fresher taste, you could blend raw unsalted peanuts with a little coconut milk to create your own.
Fresh Aromatics (Galangal & Lemongrass): These are crucial for the authentic Thai flavor of your chicken satay. Fresh galangal offers a more pungent, citrusy, and piney taste than ginger, while lemongrass provides a bright, lemony, and slightly floral note. You can often find these in Asian markets. If fresh galangal is unavailable, fresh ginger is an acceptable substitute.
Fish Sauce & Chili Paste: For optimal flavor, choose a quality fish sauce; look for brands that list anchovy extract as the primary ingredient. For the chili paste, I specifically recommend Sambal Oelek. It offers a clean, bright heat without overwhelming other flavors.
Soy Sauce: I suggest using low sodium soy sauce to better control the saltiness of the dish. If you need a gluten-free alternative, coconut aminos work wonderfully and offer a similar savory depth.
Coconut Milk: Full-fat coconut milk is best for the peanut sauce, as it provides a rich, creamy texture. This ingredient also makes the recipe naturally dairy-free.
Palm Sugar: Palm sugar is traditionally used in Thai cuisine and helps achieve a beautiful caramelization in the basting glaze. If you cannot find palm sugar, honey is a perfectly suitable substitute that will still deliver a lovely glossy finish.
Skewers: If you are using wooden skewers, remember to soak them in water for at least 30 minutes before threading the chicken. This prevents them from burning during cooking. Metal skewers do not require soaking.

How to Make Thai Chicken Satay with Peanut Sauce
Follow these steps carefully, and you will have incredible Thai Chicken Satay with Peanut Sauce ready to enjoy.
Step 1: Prepare the Marinade & Marinate the Chicken
In a medium bowl, whisk together the low sodium soy sauce, packed brown sugar, chili paste, lime juice, fish sauce, dried basil, ground coriander, ground ginger, garlic powder, and ground turmeric. This is your flavorful base for both the chicken marinade and the peanut sauce. Remove one third cup of this mixture and set it aside in a freezer-size bag. Whisk three tablespoons of olive oil into this smaller portion. Now, here is where our unique twist comes in: add one tablespoon of freshly grated galangal or ginger and two tablespoons of finely minced lemongrass into this marinade mix. Add your sliced chicken to the bag and toss to evenly coat all the pieces. Marinate the chicken in the refrigerator for a minimum of six hours, or ideally, overnight, up to 24 hours. The longer marination time allows the chicken to absorb all those fragrant, aromatic flavors, ensuring maximum tenderness and juiciness. Refrigerate the remaining marinade/sauce separately; this will become the delicious base of your peanut sauce.
Step 2: Skewer the Chicken
When you are ready to cook, if using wooden skewers, soak them in water for at least 30 minutes. Meanwhile, remove the marinated chicken from the refrigerator and let it sit at room temperature for about 30 minutes. This helps the chicken cook more evenly. Carefully thread the marinated chicken strips onto the skewers, ensuring there is even spacing between each piece so they cook properly. Lightly dab any excess marinade off the chicken with paper towels.
Step 3: Choose Your Cooking Method (Oven, Grill, or Skillet)
Before you begin cooking, ensure your chicken has come to room temperature for about 30 minutes for the most even doneness. Remember, the goal is an internal temperature of 165 degrees F to keep it juicy and tender; avoid overcooking at all costs.
OVEN Method: Preheat your oven to 350 degrees F. Line two baking sheets with foil and lightly spray them with nonstick cooking spray. Evenly divide the chicken skewers between the baking sheets, ensuring they are not too crowded, which could cause them to steam instead of bake. Bake for 15-20 minutes, or until the chicken is cooked through. The chicken should look golden and lightly caramelized.
GRILL Method: Grease an indoor or outdoor grill generously and heat it to high heat. Once hot, place the chicken skewers on the grill, reduce the heat to medium, and cover. Grill the chicken for 3-4 minutes per side, or until the chicken is cooked through. You should hear a satisfying sizzling sound and see those beautiful charred marks developing.
SKILLET Method: Heat one and a half tablespoons of olive oil in a large non-stick skillet over medium-high heat. Working in batches to avoid overcrowding the pan, add the skewers and cook for 2-3 minutes per side. Turn the skewers until all sides are nicely seared and the chicken is cooked through.
During the last 2 minutes of grilling, baking, or skillet cooking, baste the chicken skewers generously with the prepared basting glaze until glossy and slightly caramelized. This step is key for that beautiful finish and extra burst of flavor.
Step 4: Prepare the Peanut Sauce
While your chicken is cooking, prepare the rich peanut sauce. Add the reserved sauce base (the one you set aside from the marinade in Step 1) to a small saucepan along with one quarter cup of coconut milk or three tablespoons of water. Bring this mixture to a boil, then reduce the heat and simmer for one minute, allowing the flavors to meld and the sauce to thicken slightly. Remove the saucepan from the heat. Stir in one third cup of smooth peanut butter until it is completely combined and the sauce is creamy. If you prefer a thicker, more nutty sauce, you can add additional peanut butter, a tablespoon at a time. For a thinner, more pourable consistency, whisk in more coconut milk or water, one tablespoon at a time, until it reaches your desired texture. Taste the sauce and adjust the spice level as needed by stirring in additional chili sauce for a spicier kick. The finished sauce should be creamy, rich, and offer a multi-dimensional balance of sweet, savory, and tangy flavors.
Step 5: Serve Warm
Serve the chicken satay skewers warm with the creamy peanut sauce on the side. This makes a fantastic appetizer, or you can serve it as a main course alongside jasmine rice, coconut rice, or your favorite stir-fried vegetables.
Understanding Thai Flavors & Dietary Adaptations
Thai cuisine is all about balance and fresh, vibrant ingredients. Let’s delve deeper into what makes this dish so special and how you can tailor it to your needs.
The Magic of Fresh Aromatics: Galangal & Lemongrass
The fresh aromatics, galangal and lemongrass, are truly the secret weapons in authentic Thai cooking. While the base recipe includes dried spices for accessibility, the quick-blended paste of fresh galangal and lemongrass in our marinade twist takes the flavor profile to an entirely new level. Galangal, often mistaken for ginger, offers a sharper, more citrusy, and slightly piney note that is distinctively Thai. Lemongrass brings a bright, lemony, and subtly floral essence. These fresh ingredients provide a nuanced, layered depth that dried powders simply cannot replicate. As the chicken cooks, these aromatics, combined with the sugars in the marinade and basting glaze, contribute to a fantastic Maillard reaction, developing complex, irresistible browned flavors on the surface of the chicken. It is this fresh vibrance that truly makes your satay sing.
Customizing Your Satay’s Spice Level
One of the great joys of cooking Thai food at home is being able to customize the spice level to your exact preference. Chili paste, like Sambal Oelek, is your best friend here.
Mild: If you prefer a very mild flavor, you can reduce the amount of chili paste in the marinade or even omit it entirely. You can always offer a small dish of chili paste or Sriracha on the side for those who want to add heat individually.
Medium: The recipe’s recommended amount of chili paste will give you a pleasant, medium level of spice that complements the other flavors without overpowering them.
Spicy: For those who love the heat, feel free to add an extra half or full tablespoon of chili paste to both the marinade and the peanut sauce, tasting as you go. You can also have Sriracha available at the table for an extra kick.
Nutritional Insights & Dietary Adaptations
It is wonderful to enjoy delicious food that also aligns with your health goals. Let’s look at the nutritional aspects and how to adapt your chicken satay.
Is Chicken Satay Healthy?: Chicken satay can certainly be a healthy dish. It is a good source of lean protein, especially if you use chicken breasts. The peanut sauce and coconut milk provide healthy fats. To keep it balanced, be mindful of the portion sizes and consider accompanying it with nutrient-dense sides like cauliflower rice or plenty of stir-fried vegetables. Always check your specific brands for added sugars or sodium in ingredients like soy sauce or peanut butter.
Making it Gluten-Free & Dairy-Free: This recipe is very easy to adapt for dietary restrictions.
Gluten-Free: To ensure your chicken satay is gluten-free, use a low sodium soy sauce that is specifically labeled gluten-free. Alternatively, you can substitute coconut aminos for soy sauce, which is naturally gluten-free and provides a similar savory umami flavor. The remaining ingredients in the marinade and peanut sauce are typically naturally gluten-free.
Dairy-Free: You will be happy to know that both the marinade and the peanut sauce are naturally dairy-free. We use coconut milk for creaminess and olive oil, making this a fantastic option for those avoiding dairy.
Lower Fat & Other Protein Swaps: For a leaner option, simply choose chicken breasts instead of thighs. The wonderful flavors of satay also lend themselves well to other proteins. You could easily make steak satay, pork satay, shrimp satay, or even tofu satay for a vegetarian option. Just remember that cooking times will vary depending on the protein you choose.
Pro Tips & Troubleshooting
Even the most experienced chefs use a few tricks to make their dishes perfect. Here are my best tips and common pitfalls to avoid for your chicken satay.
Pro Tips for Perfect Satay
Marinate for Flavor: Seriously, do not skimp on the marinating time for your chicken satay. A minimum of six hours, and ideally 24 hours, will result in the most tender and flavorful chicken. It truly makes all the difference.
Soak Skewers: Always soak wooden skewers in water for at least 30 minutes before threading chicken onto them. This simple step prevents them from catching fire or burning on the grill or in the oven.
Even Sizing: Cut your chicken pieces uniformly, aiming for 1 1/2-inch wide strips. This ensures that all the chicken cooks evenly and at the same rate.
Room Temperature Chicken: For more even doneness, let your marinated chicken sit at room temperature for about 30 minutes before you start cooking. This relaxes the meat fibers and helps with consistent heat distribution.
Master the Basting Glaze: Our unique basting glaze is a secret weapon. Apply it generously in the last two minutes of cooking for superior caramelization, a beautiful glossy finish, and an extra layer of delicious flavor.
Peanut Sauce Consistency: The ideal consistency for your peanut sauce is personal preference. Start with one third cup of peanut butter and adjust to your desired thickness. Thin it with a tablespoon of coconut milk or water at a time for a pourable sauce, or add more peanut butter for a richer, thicker dip.
Garnish for Presentation: Do not underestimate the power of a good garnish. A sprinkle of chopped cilantro, a few fresh basil leaves, a scattering of crushed peanuts, and a swirl of Sriracha not only add flavor but also make your chicken satay look incredibly inviting and professional.
Common Mistakes to Avoid
Overcooking Chicken: This is the most common mistake with chicken satay. Overcooked chicken becomes dry and tough. Use a food thermometer to ensure your chicken reaches an internal temperature of 165 degrees F, then remove it immediately from the heat to keep it juicy and tender.
Not Soaking Skewers: Forgetting to soak wooden skewers will almost guarantee they will burn and potentially splinter while cooking. A little prep time saves a lot of hassle.
Insufficient Marinating Time: A short marinating time means the chicken will not fully absorb the wonderful flavors of the marinade, resulting in a less impactful dish. Plan ahead for that minimum of six hours.
Expecting Plain Peanut Butter Taste: Authentic Thai peanut sauce is a complex balance of savory, sweet, tangy, and sometimes spicy flavors, far beyond the taste of plain peanut butter. Embrace the depth of flavor.
Sauce Splitting: If your peanut sauce base separates, it is often due to overheating or not whisking enough. Whisk vigorously over low heat to recombine. Ensure you incorporate the peanut butter smoothly once off the direct heat.
Chicken Sticking: Always properly grease your grill grates or use enough olive oil in your skillet to prevent the chicken from sticking. This ensures easy flipping and beautiful browning.
Marinating in Lime Juice Too Long: While lime juice is essential for flavor, marinating chicken in it for excessively long periods (over 24 hours) can begin to ‘cook’ the chicken due to its acidity, potentially leading to a mushy texture. Stick to the overnight maximum.
Serving & Storage
Now that you have mastered your Thai Chicken Satay, let us talk about the best ways to enjoy it and keep it fresh.
Serving Ideas
Thai Chicken Satay is incredibly versatile and can be enjoyed in many ways.
Traditional Pairings: For a classic experience, serve your chicken satay as an appetizer with the peanut sauce. If you are making it a main course, pair it with fluffy jasmine rice or creamy coconut rice. For a lighter meal, cauliflower rice is an excellent option. Fresh stir-fried vegetables like pineapple, bell peppers, red onions, zucchini, and mushrooms, or a refreshing Asian salad, complement the rich flavors perfectly.
Creative Meal Ideas: Get creative with your leftovers or turn your satay into a full meal. Think chicken satay rice bowls topped with fresh herbs, a drizzle of Sriracha, and crunchy vegetables. You could even create chicken satay tacos with a refreshing pineapple slaw or enjoy it in chicken satay quesadillas for a fusion twist.
Alternate Dipping Sauces: While our peanut sauce is phenomenal, sometimes variety is fun. Offer alternate dipping sauces like hoisin sauce, sweet chili sauce, a tropical pineapple sweet and sour, or a mango honey dip for a different flavor profile.
Garnishing: Always finish with fresh garnishes. Chopped cilantro, fresh basil leaves, and a sprinkle of crushed peanuts not only add texture and flavor but also make your dish look restaurant-quality. A swirl of Sriracha can add visual appeal and a customizable kick.
Recommended Drink Pairings: To complement the rich, complex flavors of Thai Chicken Satay, I recommend refreshing beverages. Thai iced tea is a classic pairing. For alcoholic options, a crisp light lager, or a dry Riesling or Sauvignon Blanc will cut through the richness of the peanut sauce beautifully.
Storage and Make-Ahead
This recipe is fantastic for meal prep and planning ahead, making your busy weeknights much easier.
Make-Ahead Prep: Both the marinade (before adding chicken) and the peanut sauce can be prepared up to 3-4 days in advance and stored separately in airtight containers in the refrigerator. You can also marinate your chicken overnight for maximum flavor, ready to skewer and cook the next day.
Storing Cooked Satay: Leftover cooked chicken satay skewers can be stored in an airtight container in the refrigerator for 3-4 days. Separate the chicken from the peanut sauce for best results.
Reheating: To reheat cooked skewers without drying them out, I recommend using an oven or a skillet on low heat. A low oven (around 300 degrees F) for 10-15 minutes or a gently heated skillet will warm them through while keeping them tender.
Freezing: This dish is freezer-friendly, allowing you to enjoy homemade satay whenever you like.
Marinade & Peanut Sauce: Both the prepared marinade (without chicken) and the finished peanut sauce freeze well. Store them separately in airtight freezer-safe containers for up to 3 months.
Cooked Chicken Satay: Cooked chicken satay can be frozen for up to 2-3 months. For best results, freeze the skewers flat on a baking sheet until solid, then transfer them to a freezer bag to prevent them from sticking together.
Thawing: Thaw any frozen components safely in the refrigerator overnight before reheating or using.
Conclusion
There you have it—my complete guide to creating the most authentic and utterly delicious Thai Chicken Satay with Peanut Sauce right in your own kitchen. This recipe, with its unique aromatic paste and the glossy basting glaze, truly captures the vibrant, complex flavors of Thai cuisine. By following these detailed instructions and incorporating my expert tips, you can confidently recreate a restaurant-quality dish that is bursting with flavor, regardless of your cooking experience level. Do not be afraid to experiment with the suggested variations and serving ideas to make this dish truly your own.
I encourage you to try this recipe, savor the incredible flavors, and share your delicious creation with friends and family. Explore more of my Thai-inspired dishes to continue your culinary adventure!
FAQ
What is Thai Chicken Satay and where does it come from?
Thai Chicken Satay is a popular street food and appetizer from Southeast Asia, particularly Thailand and Indonesia. It features marinated and grilled chicken skewers, traditionally served with a rich peanut dipping sauce.
How do you pronounce ‘satay’ and what does it typically taste like? Is it spicy?
‘Satay’ is pronounced “SAH-tay”. It typically tastes like a delightful balance of savory, sweet, tangy, and slightly spicy notes from the marinade and the accompanying peanut sauce. The spice level is adjustable; you can make it as mild or as fiery as you like using chili paste.
Is Chicken Satay a healthy dish, and how can it be adapted for dietary restrictions (gluten-free, dairy-free, lower fat)?
Chicken Satay can be a healthy dish, offering lean protein and healthy fats. For a lower fat option, use chicken breasts. It can be made gluten-free by using gluten-free soy sauce or coconut aminos. The marinade and peanut sauce are naturally dairy-free thanks to coconut milk and olive oil.
What are the best methods for cooking Chicken Satay (grilling, baking, skillet)?
All three methods are excellent. Grilling imparts a delicious smoky flavor, baking offers ease and even cooking, and skillet cooking is quick and convenient for smaller batches, achieving a nice sear. Detailed instructions for each method are provided in the “How to Make” section.
What are the best serving suggestions and popular pairings for Thai Chicken Satay?
Thai Chicken Satay is excellent as an appetizer or a main course. Popular pairings include jasmine rice, coconut rice, or cauliflower rice, along with fresh stir-fried vegetables or an Asian salad. You can also get creative with chicken satay rice bowls or tacos.
How should I store, reheat, and freeze Chicken Satay and Peanut Sauce?
Cooked chicken satay lasts 3-4 days in the refrigerator in an airtight container. Reheat gently in the oven or skillet to prevent drying. The marinade and peanut sauce can be made ahead and stored for 3-4 days in the fridge, or frozen separately for up to 3 months. Cooked skewers can also be frozen for 2-3 months.
Do I have to use chicken for Satay?
While chicken is traditional, you certainly do not have to use it. Steak satay, pork satay, shrimp satay, or even tofu satay are all delicious alternatives. Remember to adjust cooking times as needed for different proteins.
Does the oil go in the marinade or the sauce?
In this recipe, olive oil is whisked into the portion of the marinade reserved for the chicken. Coconut milk (or water) is added to the separate reserved sauce base, which then becomes your creamy peanut sauce.
Authentic Thai Chicken Satay with Peanut Sauce
Ingredients
Equipment
Method
- In a medium bowl, whisk together the low sodium soy sauce, packed brown sugar, chili paste, lime juice, fish sauce, dried basil, ground coriander, ground ginger, garlic powder, and ground turmeric. This is your flavorful base for both the chicken marinade and the peanut sauce.
- Remove one third cup of this mixture and set it aside in a freezer-size bag. Whisk three tablespoons of olive oil into this smaller portion. Add one tablespoon of freshly grated galangal or ginger and two tablespoons of finely minced lemongrass into this marinade mix.
- Add your sliced chicken to the bag and toss to evenly coat all the pieces. Marinate the chicken in the refrigerator for a minimum of six hours, or ideally, overnight, up to 24 hours. Refrigerate the remaining marinade/sauce separately; this will become the delicious base of your peanut sauce.
- When you are ready to cook, if using wooden skewers, soak them in water for at least 30 minutes. Meanwhile, remove the marinated chicken from the refrigerator and let it sit at room temperature for about 30 minutes. This helps the chicken cook more evenly.
- Carefully thread the marinated chicken strips onto the skewers, ensuring there is even spacing between each piece so they cook properly. Lightly dab any excess marinade off the chicken with paper towels.
- Before you begin cooking, ensure your chicken has come to room temperature for about 30 minutes for the most even doneness. Remember, the goal is an internal temperature of 165 degrees F to keep it juicy and tender; avoid overcooking at all costs.
- OVEN Method: Preheat your oven to 350 degrees F. Line two baking sheets with foil and lightly spray them with nonstick cooking spray. Evenly divide the chicken skewers between the baking sheets, ensuring they are not too crowded. Bake for 15-20 minutes, or until the chicken is cooked through. The chicken should look golden and lightly caramelized.
- GRILL Method: Grease an indoor or outdoor grill generously and heat it to high heat. Once hot, place the chicken skewers on the grill, reduce the heat to medium, and cover. Grill the chicken for 3-4 minutes per side, or until the chicken is cooked through. You should hear a satisfying sizzling sound and see those beautiful charred marks developing.
- SKILLET Method: Heat one and a half tablespoons of olive oil in a large non-stick skillet over medium-high heat. Working in batches to avoid overcrowding the pan, add the skewers and cook for 2-3 minutes per side. Turn the skewers until all sides are nicely seared and the chicken is cooked through.
- During the last 2 minutes of grilling, baking, or skillet cooking, baste the chicken skewers generously with the prepared basting glaze until glossy and slightly caramelized. This step is key for that beautiful finish and extra burst of flavor.
- While your chicken is cooking, prepare the rich peanut sauce. Add the reserved sauce base (the one you set aside from the marinade in Step 1) to a small saucepan along with one quarter cup of coconut milk or three tablespoons of water. Bring this mixture to a boil, then reduce the heat and simmer for one minute, allowing the flavors to meld and the sauce to thicken slightly. Remove the saucepan from the heat.
- Stir in one third cup of smooth peanut butter until it is completely combined and the sauce is creamy. If you prefer a thicker, more nutty sauce, you can add additional peanut butter, a tablespoon at a time. For a thinner, more pourable consistency, whisk in more coconut milk or water, one tablespoon at a time, until it reaches your desired texture. Taste the sauce and adjust the spice level as needed by stirring in additional chili sauce for a spicier kick. The finished sauce should be creamy, rich, and offer a multi-dimensional balance of sweet, savory, and tangy flavors.
- Serve the chicken satay skewers warm with the creamy peanut sauce on the side. This makes a fantastic appetizer, or you can serve it as a main course alongside jasmine rice, coconut rice, or your favorite stir-fried vegetables.
Notes
Printable Recipe Card
Want just the essential recipe details without scrolling through the article? Get our printable recipe card with just the ingredients and instructions.