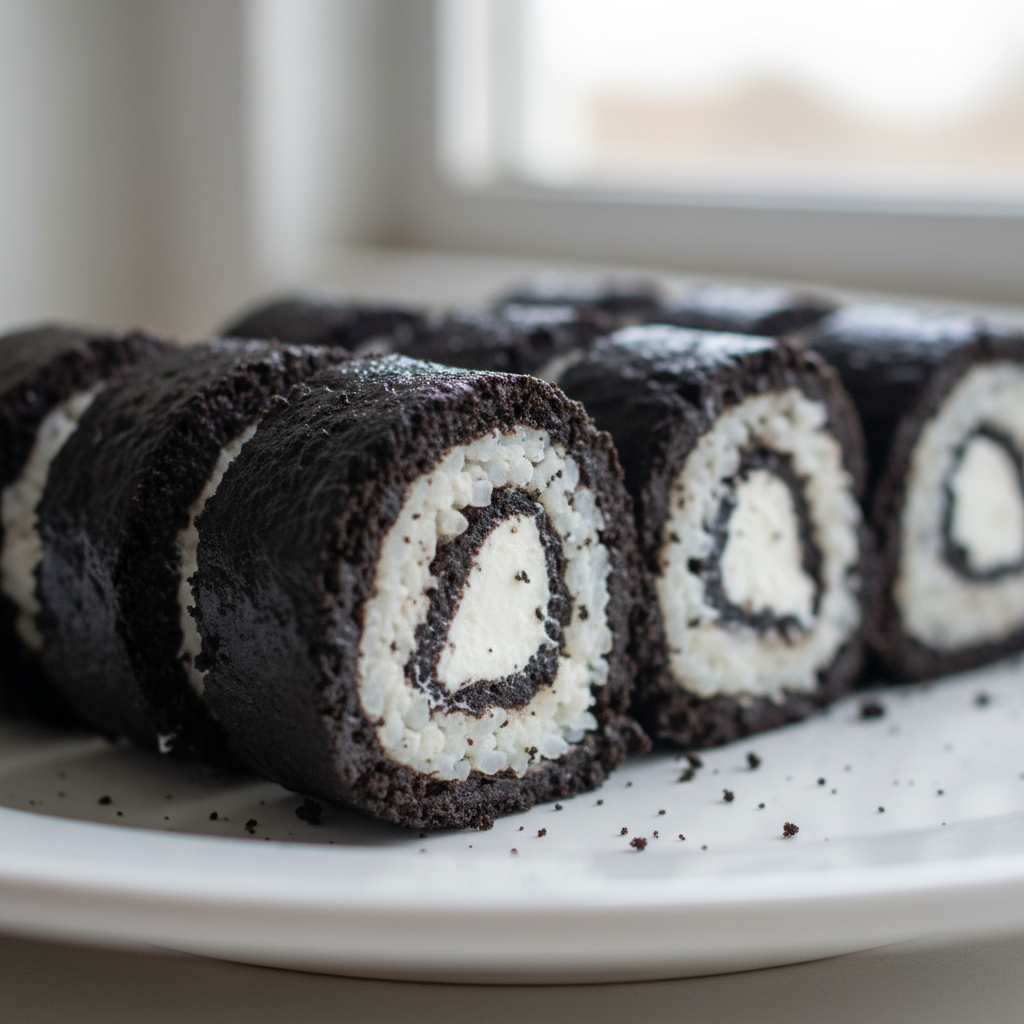
I remember scrolling through my social media feed one evening when a captivating video flashed before my eyes: “Oreo sushi.” It was an instant hit, quickly becoming a viral TikTok trend for a reason. This playful dessert isn’t just visually appealing; it is incredibly fun and surprisingly easy to make. As a professional chef, I am always seeking creative spins on popular dishes, and this delightful treat, often called sweet sushi or dessert sushi, is no exception. Get ready to master this no-bake dessert with my expert tips, including a unique twist that will make your Oreo sushi truly unforgettable. Even if you are a beginner in the kitchen, you will confidently create perfectly shaped, delicious rolls.
Why You’ll Love This Recipe
My secret to truly elevated Oreo sushi lies in enriching the Oreo cream filling. I blend in 1-2 tablespoons of softened cream cheese before spreading it onto the cookie base. This unique twist is a game-changer for several reasons.
Taste: The cream cheese adds a richer, slightly tangy flavor that perfectly balances the intense sweetness of the Oreo cookies. It prevents the dessert from being cloyingly sweet, creating a more sophisticated and satisfying taste experience.
Texture and Stability: The added fat content from the cream cheese makes the filling incredibly stable. This means your Oreo sushi will be less prone to squishing during rolling and slicing, resulting in beautifully structured and perfectly round pieces. The cream cheese improves the overall texture and integrity, especially after chilling.
Beyond the delicious twist, this is an incredibly easy dessert and a fantastic no-bake option, perfect for when you need a quick treat without turning on the oven. It is a wonderfully kid-friendly recipe, making it a fun activity for children in the kitchen or a playful party treat. The sweet, creamy, chocolatey, and soft texture is universally loved, and it is versatile enough for various occasions. With a few simple swaps, you can even make a vegan option or use gluten-free cookies.
Ingredients Needed

- 24 oreos (separated (one package))
- 1/4 cup milk
Ingredient Notes & Substitutions
Oreos: For this recipe, I specifically use 24 separated Oreo cookies. While a standard US package might contain 36 cookies, we only need the 24 for the base and the cream from those. Classic Oreos work best for the authentic flavor and texture. However, feel free to experiment with other flavored Oreos, such as mint or peanut butter, or even use any cream sandwich cookie you prefer for a fun variation.
Milk: I find that whole or 2% dairy milk provides the best consistency and richness for the cookie dough. If you are looking to make this a vegan option, non-dairy milk like almond milk or oat milk works wonderfully and is an excellent substitute.
Cream Cheese (for the twist): For the best flavor and stability in your filling, always use softened, full-fat cream cheese. It is crucial that the cream cheese is at room temperature to ensure it blends smoothly and seamlessly with the Oreo cream, preventing any lumps.

How to Make Oreo Sushi
Let’s dive into making this delightful no-bake treat. I will guide you through each step, ensuring you create perfect Oreo sushi every time.
-
Prepare the Oreo Crumb Base
First, take your 24 separated Oreo cookies. Place the dark cookie wafers into a food processor. Blitz the Oreos until they become fine, even crumbs. If you do not have a food processor, you can place the cookies in a ziplock bag and crush them thoroughly with a rolling pin or the bottom of a sturdy bottle. Next, add 3 tablespoons of milk to the food processor and continue to blitz until the cookies combine with the milk to form a cohesive ball of dough. The dough should be pliable and hold together without being sticky.
-
Roll Out the Dough
Take the ball of Oreo dough and gather it together on a sheet of plastic wrap. Gently press the dough down into a rough square shape. Use a rolling pin to roll everything into an even layer, aiming for about 1/4 inch thick. For extra clean edges, you can trim off the sides to create a perfect square shape.
-
Create the Cream Cheese Enriched Filling
Now for our unique twist! Take the separated Oreo cream from your 24 cookies and place it in a mixing bowl. Add 2 teaspoons of milk and 1-2 tablespoons of softened cream cheese to the bowl. Mix everything together until it is smooth and creamy. The cream cheese adds that delightful tangy richness and contributes significantly to the filling’s stability, making it less likely to squish when you roll and slice.
-
Spread the Cream Filling
Evenly spread the cream cheese enriched Oreo cream onto your rolled-out Oreo square. For a super smooth and consistent layer, I recommend using an offset spatula. Alternatively, you can place another sheet of plastic wrap over the cream and gently spread it with your hands or a rolling pin, then peel off the top plastic wrap.
-
Roll the Oreo Sushi
This step is where your Oreo sushi comes to life. Gently and slowly roll up the Oreo dough, using the plastic wrap underneath to help you guide and tighten the roll. Aim for an even and tight roll to ensure beautiful, round “sushi” pieces. For extra clean rounds and easier slicing, wrap up the entire roll tightly in plastic wrap and place it in the fridge for a couple of minutes to firm it up. This chilling time is crucial for structural integrity.
-
Slice & Enjoy
Once your roll is firm, unwrap it from the plastic wrap. Using a very sharp knife, slice the roll into individual “sushi” pieces. Remember to use a gentle slicing motion, pushing down slightly while moving the knife forward, instead of just pushing straight down. This technique prevents squishing and helps maintain the perfect circular shape. If you find your roll is still a bit squishy, simply pop it back into the fridge for a little longer. Now, enjoy your delicious and perfectly crafted Oreo sushi!
Creative Toppings & Serving Ideas
This Oreo sushi recipe is already a showstopper, but a few creative additions can elevate it even further. Think beyond the basic and turn your dessert sushi into a true work of art.
Dessert Garnishes
Classic: A sprinkle of colorful sprinkles or mini chocolate chips adds a playful touch and extra texture.
Drizzles: Melted chocolate ganache or melted white chocolate can be drizzled over the top for an elegant finish. You can even tint white chocolate with food coloring for a vibrant pop.
Playful ‘Wasabi’: For a truly fun and unique presentation, try mimicking wasabi. A small dollop of green-tinted fruit puree, like kiwi or honeydew, or even a bit of green frosting, makes for a delightful visual surprise.
Fruit: Fresh berries or thinly sliced fruit, such as strawberries or bananas, offer a refreshing contrast to the rich chocolate and cream flavors.
Serving Occasions
Oreo sushi is a fun, easy dessert or sweet snack that is incredibly versatile. It is perfect for parties, adding a whimsical element to any dessert table, or as a engaging activity for kids during playdates or movie nights. I love serving it with a simple glass of milk or a hot cup of coffee for a comforting treat. Each roll typically yields about 8-12 “sushi” pieces, depending on how thick you slice them, making it easy to portion for a crowd or a small gathering.
Pro Tips & Troubleshooting
Even though this is an easy dessert, a few expert tips can ensure your Oreo sushi is absolutely perfect. I also want to share solutions to common mistakes so you can troubleshoot like a pro.
Pro Tips
Rolling Technique: When rolling the dough, take your time. Roll slowly, evenly, and tightly, using the plastic wrap to assist and guide you. This ensures a uniform shape and prevents the filling from escaping.
Chilling for Clean Slices: This is perhaps the most important tip. Always stress the importance of chilling the entire roll, wrapped in plastic wrap, for at least 15-30 minutes (or even longer) in the fridge. This firms it up, leading to perfectly round, clean cuts when slicing.
Slicing Method: Use a very sharp knife. Instead of pushing straight down, employ a gentle sawing or slicing motion. This technique minimizes squishing and helps maintain the integrity of each individual piece.
Oreo Crumb Consistency: A food processor makes the finest crumbs, which creates the smoothest dough and is the easiest method. However, if you do not have one, a ziplock bag and a rolling pin work well; just ensure your crumbs are as fine as possible for a cohesive dough.
Cream Spreading: An offset spatula is my go-to tool for spreading the cream cheese enriched filling smoothly and evenly. If you do not have one, you can place another layer of plastic wrap over the cream and gently smooth it out with your hands or a rolling pin before peeling it off.
The Cream Cheese Twist Advantage: Remember, the cream cheese is not just for flavor. It significantly contributes to a more stable, less squishy filling, making the entire rolling and slicing process much easier and more forgiving.
Common Mistakes to Avoid
Squished Oreo Sushi: This typically happens if the cookie base or filling is too warm, or if too much milk was added to the base, making it overly soft. The fix: Chill the entire roll thoroughly in the refrigerator for a longer period until it is very firm before attempting to slice it.
Crumbly Oreo Dough: If your cookie dough is falling apart, it usually means there is not enough milk. Solution: Add a tiny bit more milk, about a teaspoon at a time, and mix until the dough holds its shape and is pliable without being sticky.
Sticky Dough: Conversely, too much milk can make the dough excessively sticky. If it is just slightly sticky, a brief chill can help. If it is very sticky, you can try adding a few more finely crushed Oreo crumbs to absorb some of the moisture, but it is best to add milk gradually to avoid this.
Uneven Rolls: This often occurs if you roll too quickly or with inconsistent pressure. Advise slow and steady rolling, making sure you apply even pressure throughout the entire process to ensure a consistent thickness and perfectly round shape for your sweet sushi.
Storage & Make-Ahead
One of the best things about Oreo sushi is how easy it is to store and prepare in advance. This makes it a perfect dessert for busy schedules or party planning.
Storage Recommendations
Refrigeration: Once sliced, store your Oreo sushi in an airtight container in the refrigerator. It will stay fresh and delicious for up to 3-5 days. Chilling is essential as it helps maintain the structure of both the cookie base and the cream filling.
Uncut Rolls: If you are making this recipe ahead of time, I highly recommend storing the uncut, plastic-wrapped roll in the fridge. This not only keeps it fresh but also allows for effortless slicing just before you are ready to serve, ensuring perfectly neat pieces.
I advise against freezing Oreo sushi. The texture of the cookie base can become somewhat crumbly, and the cream filling may separate or become grainy after thawing, diminishing the overall quality.
Make-Ahead Tips
This recipe is incredibly well-suited for making ahead, which is a huge plus for entertaining. You can prepare the Oreo cookie dough base and keep it tightly wrapped in plastic wrap in the fridge for up to 24 hours. The full roll, completely assembled but before slicing, can be made and chilled for several hours or even overnight. This makes party preparation a breeze, allowing you to slice and serve your fresh “sushi” right when your guests arrive.
Conclusion
There you have it: a delightful and surprisingly simple recipe for Oreo sushi that will charm everyone. This fun, easy dessert is not only a treat to look at but also incredibly delicious. My unique cream cheese twist elevates the flavor profile, adding a balancing tang and ensuring a more stable, perfect texture for your rolls. With the expert tips I have shared, you can confidently create perfectly shaped, delightful Oreo sushi, even if you are just starting your culinary journey. I encourage you to experiment with the suggested variations, toppings, and serving ideas to make this sweet sushi truly your own. Please share your delightful creations on social media, print out this recipe for your collection, or explore other fantastic no-bake dessert recipes on my site!
FAQ
What exactly is Oreo sushi and where did this trend come from?
Oreo sushi is a creative, no-bake dessert made by crushing Oreo cookies to form a “rice” base, spreading the cream filling, rolling it up, and slicing it like traditional sushi. It gained immense popularity as a viral TikTok trend due to its playful nature and ease of preparation.
How can I ensure my Oreo sushi rolls are perfectly round and don’t squish when sliced?
To ensure perfectly round rolls, make sure to roll the dough tightly and evenly. Most importantly, thoroughly chill the entire roll, wrapped in plastic wrap, in the refrigerator for at least 15-30 minutes. When slicing, use a sharp knife and a gentle slicing motion rather than pushing straight down, which can cause squishing.
What are some common mistakes when making Oreo sushi, and how can I fix them?
Common mistakes include the dough falling apart (fix by adding a tiny bit more milk, one teaspoon at a time) or the rolls being squishy (fix by chilling the roll longer and ensuring you do not add too much milk initially). Uneven rolls can be prevented by rolling slowly and steadily with even pressure.
Can I use different types of cookies, flavored Oreos, or dietary milk for Oreo sushi?
Absolutely! While classic Oreos are recommended, you can certainly experiment with any cream sandwich cookie or other flavored Oreos, such as mint or peanut butter. For dietary needs, non-dairy milk like almond or oat milk works perfectly to make the recipe vegan, and gluten-free cookies can be used for a gluten-free option.
Do I need special equipment like a food processor or rolling pin to make Oreo sushi?
A food processor makes the process of blitzing the Oreo cookies into fine crumbs the easiest and most efficient. However, it is not strictly necessary. You can crush the Oreos by placing them in a ziplock bag and using a rolling pin or the bottom of a sturdy bottle. A rolling pin is helpful for flattening the dough, but you can also use a clean, straight-sided bottle.
How should I store Oreo sushi, and how long does it typically last?
Oreo sushi should be stored in an airtight container in the refrigerator. When stored correctly, it typically lasts for 3-5 days. It is best served chilled to maintain its firm structure and delicious texture.
How many Oreos are in one package for this recipe?
For this specific recipe, we use 24 separated Oreos. It is worth noting that while some standard US packages of Oreo cookies may contain around 36 cookies, you only need to use 24 for the cookie base and their corresponding cream filling.
Is Oreo sushi vegan/gluten-free?
Classic Oreos are often considered vegan by many, but always check the specific ingredients for confirmation. To make this Oreo sushi recipe vegan, ensure you use non-dairy milk. For a gluten-free version, use certified gluten-free cream sandwich cookies in place of traditional Oreos.
Can kids make Oreo sushi?
Yes, Oreo sushi is a fantastic kid-friendly recipe and a fun activity for children. The no-bake aspect is great for little hands. Adult supervision is recommended, especially for the slicing step with a sharp knife.
Oreo Sushi Recipe: The Viral No-Bake Treat with a Cream Cheese Twist
Ingredients
Equipment
Method
- First, take your 24 separated Oreo cookies. Place the dark cookie wafers into a food processor and blitz until they become fine, even crumbs. If you don't have a food processor, crush the cookies thoroughly in a ziplock bag with a rolling pin or sturdy bottle. Next, add 3 tablespoons of the milk to the food processor and continue to blitz until the cookies combine with the milk to form a cohesive ball of pliable dough.
- Take the ball of Oreo dough and gather it together on a sheet of plastic wrap. Gently press the dough down into a rough square shape. Use a rolling pin to roll everything into an even layer, aiming for about 1/4 inch thick. For extra clean edges, you can trim off the sides to create a perfect square shape.
- Now for our unique twist! Take the separated Oreo cream from your 24 cookies and place it in a mixing bowl. Add 2 teaspoons of the remaining milk and 1-2 tablespoons of softened cream cheese to the bowl. Mix everything together until it is smooth and creamy. The cream cheese adds that delightful tangy richness and contributes significantly to the filling's stability.
- Evenly spread the cream cheese enriched Oreo cream onto your rolled-out Oreo square. For a super smooth and consistent layer, use an offset spatula. Alternatively, place another sheet of plastic wrap over the cream and gently spread it with your hands or a rolling pin, then peel off the top plastic wrap.
- This step is where your Oreo sushi comes to life. Gently and slowly roll up the Oreo dough, using the plastic wrap underneath to help you guide and tighten the roll. Aim for an even and tight roll to ensure beautiful, round "sushi" pieces. For extra clean rounds and easier slicing, wrap up the entire roll tightly in plastic wrap and place it in the fridge for a couple of minutes to firm it up. This chilling time is crucial for structural integrity.
- Once your roll is firm, unwrap it from the plastic wrap. Using a very sharp knife, slice the roll into individual "sushi" pieces. Remember to use a gentle slicing motion, pushing down slightly while moving the knife forward, instead of just pushing straight down. This technique prevents squishing and helps maintain the perfect circular shape. If you find your roll is still a bit squishy, simply pop it back into the fridge for a little longer. Now, enjoy your delicious and perfectly crafted Oreo sushi!
Notes
Printable Recipe Card
Want just the essential recipe details without scrolling through the article? Get our printable recipe card with just the ingredients and instructions.