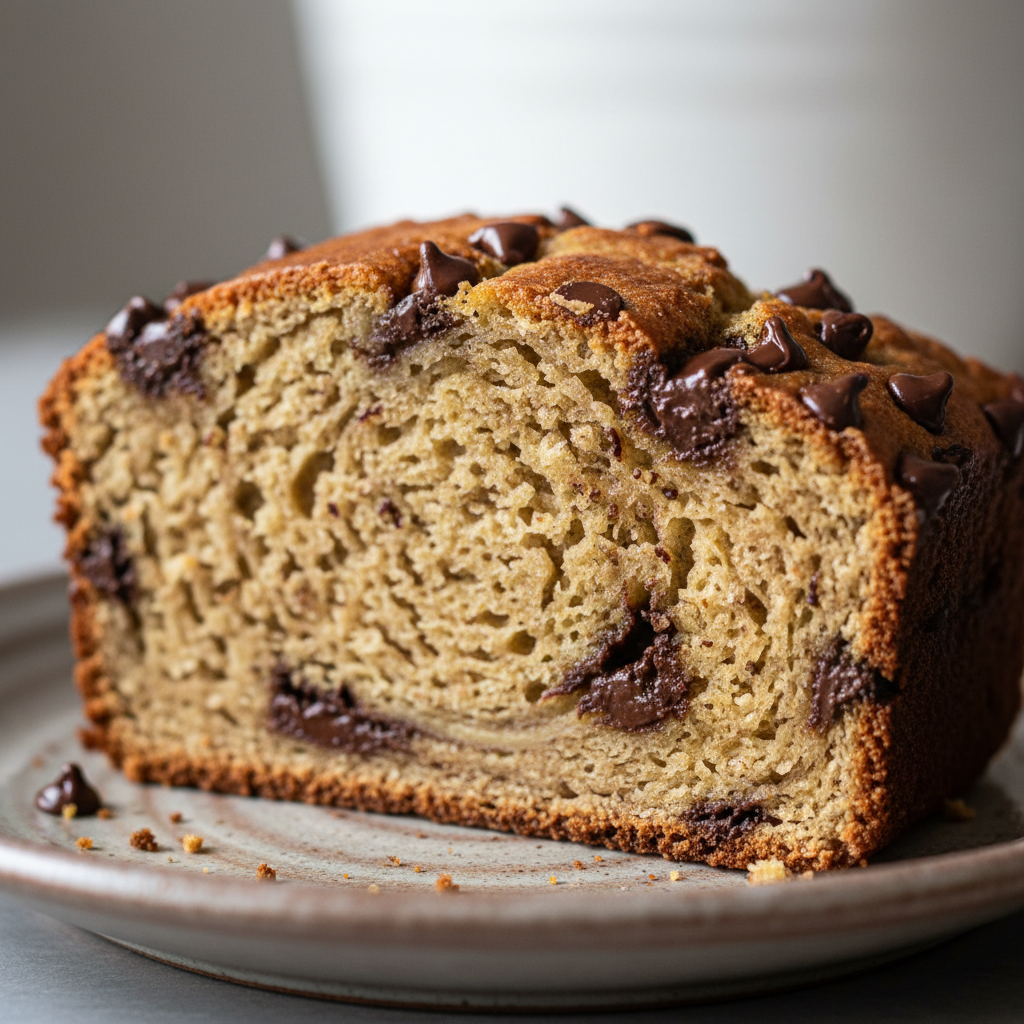
There’s something truly magical about the perfect brownie. It’s more than just a dessert; it’s a moment of pure bliss, a square of intensely chocolatey comfort. In my kitchen, I’ve spent years perfecting the art of the brownie, and I’m thrilled to share my ultimate Fudge Brownie Recipe with you. This isn’t just any recipe; it’s your secret weapon for achieving rich, gooey, and satisfying homemade brownies every single time, complete with that coveted crackly top. We will unlock a unique technique that guarantees an unparalleled chocolate flavor and texture, transforming your baking from good to absolutely extraordinary.
Why You’ll Love This Recipe
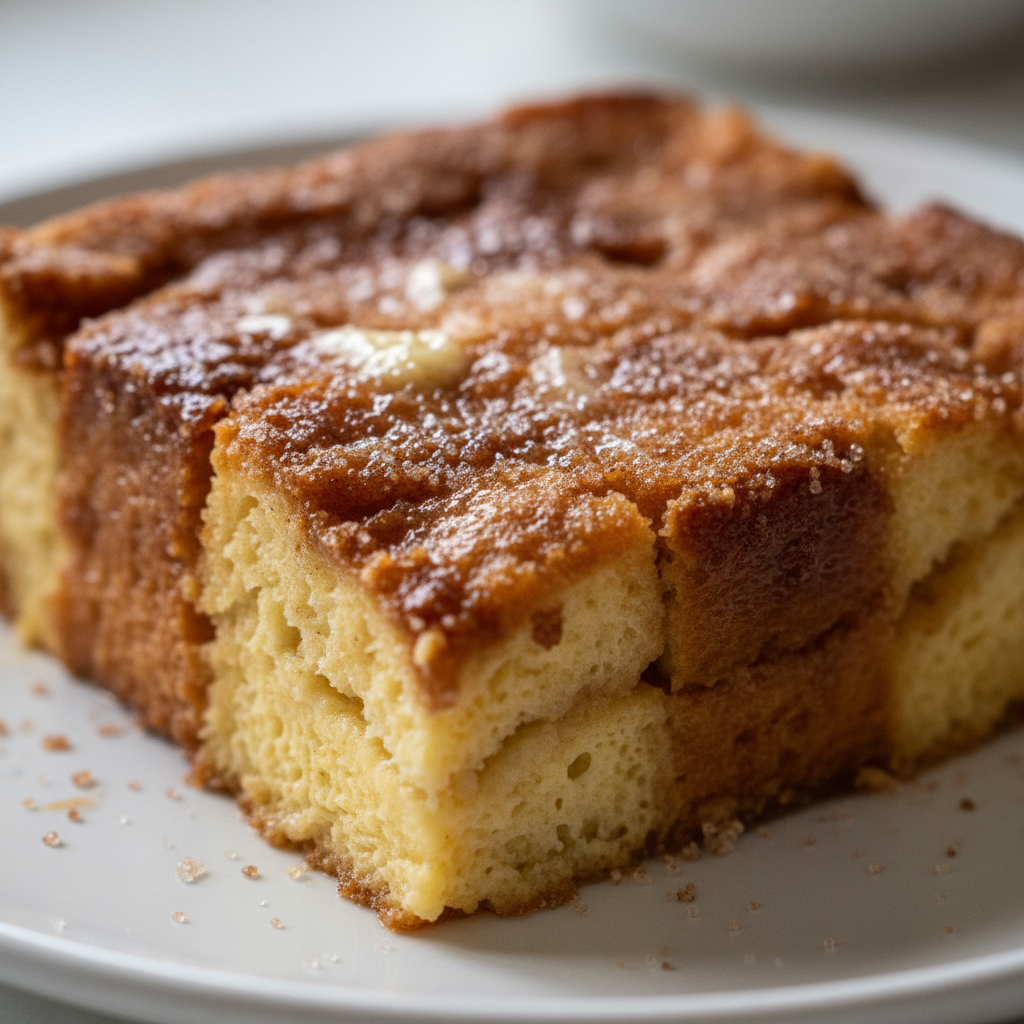
You will absolutely adore this Fudge Brownie Recipe because it consistently delivers everything you crave in a brownie. It creates intensely chocolatey, perfectly fudgy brownies with a distinct crackly top that truly sets them apart from the rest.
The core innovation here is our unique cocoa blooming technique. Before combining with the egg mixture, we simmer the unsweetened cocoa powder and espresso powder with the melted butter, oil, and 1/3 cup of granulated sugar for 1-2 minutes until fragrant and slightly thickened. This process is a game-changer.
Heating the cocoa powder with fat and sugar ‘blooms‘ the cocoa. This helps dissolve its solids, intensifying its deep chocolate flavor dramatically. It also ensures the sugar fully dissolves, creating a smoother, more stable emulsion in the batter. This scientific approach directly contributes to those delightful crackly tops and an irresistibly fudgy texture.
Beyond the science, these are surprisingly easy bakery-style brownies to achieve right at home. They are a guaranteed crowd-pleaser for homemade brownies and offer a superior gooey chocolate experience that makes them a cherished family favorite.
Ingredients Needed
1 cup (120g) all-purpose flour
1/2 teaspoon baking powder
1/2 teaspoon salt
1/2 cup (43g) unsweetened cocoa powder
1 teaspoon espresso powder optional (don’t use if you don’t like coffee)
3/4 cup (170g) unsalted butter
2 Tablespoons (28ml) oil canola, vegetable, or coconut will work
1 and 1/3 cups (265g) granulated sugar divided
2 large eggs
1 large egg yolk
2 teaspoons vanilla extract optional, but recommended
3/4 cup (128 grams) chocolate chips
Ingredient Notes & Substitutions
Cocoa Powder: This recipe calls for unsweetened cocoa powder, also known as natural cocoa powder. This provides a deep, rich dark chocolate flavor. Dutch-processed cocoa powder, which is treated to reduce acidity, would result in a slightly milder flavor and darker color, but I prefer natural cocoa for this recipe. For the best rich dark chocolate flavor, invest in a high-quality brand like Droste or Ghirardelli.
Espresso Powder: Don’t skip the espresso powder unless you truly dislike coffee. It does not make your chocolate brownies taste like coffee. Instead, it subtly intensifies and deepens the chocolate flavor, making it richer and more complex. It’s an entity keyword for enhancing chocolate.
Butter & Oil: I use unsalted butter to control the saltiness of my homemade brownies. The addition of oil, such as canola oil, vegetable oil, or coconut oil, contributes to a wonderfully moist and fudgy texture. It ensures your brownies stay soft and chewy for days.
Sugar: Granulated sugar is essential for achieving those signature crackly tops and the desired fudgy texture. It helps create a stable emulsion in the batter. I strongly advise against substituting brown sugar, as it introduces extra moisture and a molasses flavor that will change both the texture and the crackly top. This is a common mistake that can lead to a less authentic fudge brownie experience.
Eggs: For the best emulsion and to help achieve those beautiful crackly tops, I recommend using large eggs and an extra egg yolk. Always use them at room temperature; this allows them to incorporate more smoothly into the batter.
Vanilla Extract: While optional, a good quality vanilla extract significantly enhances the overall chocolate flavor of your brownies. It’s like a secret weapon for deepening complexity.
Chocolate Chips: You have many options for chocolate chips. Feel free to customize your fudge brownies with milk chocolate chips, dark chocolate chips, white chocolate chips, chocolate chunks, or even mini chocolate chips. Peanut butter chips are also a fun addition if you enjoy that flavor combination. Or for a classic, check out our chocolate chip cookies recipe.
How to Make Fudge Brownies
Phase 1: Preparation
Preheat your oven to 350 degrees F (175 degrees C). Take a 9×9-inch baking pan and line it with parchment paper, leaving an overhang on two sides to create “handles.” This will make lifting your cooled brownies out incredibly easy. Then, lightly spray the parchment paper with non-stick baking spray and set the pan aside.
Phase 2: Sifting Dry Ingredients
In a large bowl, it’s crucial to sift together the all-purpose flour, baking powder, salt, unsweetened cocoa powder, and espresso powder. Sifting means passing the dry ingredients through a fine-mesh sieve, which breaks up lumps and ensures they are evenly distributed. This step prevents dry pockets and contributes to a smooth, uniform batter. Once sifted, set the bowl aside.
Phase 3: The Unique Blooming Twist
In a medium saucepan, combine the unsalted butter, oil, and 1/3 cup of the granulated sugar. Heat this mixture over medium heat, stirring frequently, until the butter is completely melted and the sugar begins to dissolve. Remove the saucepan from the heat. Now, stir in the unsweetened cocoa powder and espresso powder. Return the saucepan to medium heat and simmer, stirring occasionally, for 1-2 minutes until the mixture becomes wonderfully fragrant and slightly thickened. This blooming process intensifies the deep chocolate flavor and helps create a superior fudgy texture.
Phase 4: Whisking Wet Ingredients
In a separate large mixing bowl, combine the large eggs, the extra large egg yolk, vanilla extract (if you’re using it), and the remaining granulated sugar. Whisk this mixture vigorously until it’s well combined and slightly frothy, which usually takes about 30 seconds. This vigorous whisking of the eggs is a key step in helping achieve those desired crackly tops on your homemade brownies.
Phase 5: Combining Wet Mixtures
This step requires a little care. Slowly pour the warm butter mixture into the egg mixture. It is vital to add it very gradually, a little bit at a time, while whisking constantly. This creates a stable emulsion, preventing the eggs from scrambling and ensuring a smooth, cohesive batter. Don’t rush this part.
Phase 6: Folding in Dry Ingredients & Chips
Add the sifted dry ingredients to the wet mixture, along with your chocolate chips. Using a rubber spatula, slowly stir until just combined. This is a critical point: do not over mix! Stop stirring as soon as you see the last traces of dry ingredients disappear. Over mixing develops gluten in the flour, which will result in cakey brownies instead of the dense, fudgy texture we’re aiming for.
Phase 7: Filling the Pan
Carefully scrape the gooey chocolate batter into your prepared 9×9-inch baking pan. Use the rubber spatula to gently smooth the top evenly.
Phase 8: Baking to Perfection
Bake your Fudge Brownie Recipe for 28 to 30 minutes. You’ll know they are done when the edges are firm and the top is shiny and slightly cracked. For a truly fudgy texture, the toothpick test is helpful: insert a toothpick into the center, and it should come out with moist crumbs attached, not wet batter. Avoid over baking at all costs, as this will lead to a dry texture rather than the desired fudgy interior.
Phase 9: The Essential Cooling Step
Once out of the oven, place the entire pan on a wire rack. This allows air to circulate underneath and cool the brownies properly. It is absolutely crucial to cool them completely before slicing. This can take several hours, but it’s essential for achieving the optimal fudgy texture and clean appearance. Patience is a virtue here!
Mastering Your Brownie Pan & Even Baking
Choosing the right baking pan can significantly impact the outcome of your homemade brownies. For this Fudge Brownie Recipe, a 9×9-inch baking pan is ideal, providing the perfect thickness and bake time for that desired fudgy texture.
Different pan materials conduct heat differently. A metal baking pan, particularly aluminized steel, heats up quickly and evenly, often resulting in crisper edges. Glass baking pans and ceramic baking pans retain heat for longer, which can sometimes lead to slightly chewier edges and a longer bake time. Whichever you choose, be aware of its properties and adjust your baking time slightly if needed.
To prevent uneven baking, first, get to know your oven’s hot spots. Many ovens have areas that run hotter or cooler. Rotating your pan halfway through the baking time can help ensure a uniform bake. Also, always spread the brownie batter uniformly across the pan. This simple step makes a big difference in achieving consistent fudgy texture from corner to corner.
If you ever find your brownies appearing oily, it usually points back to ingredient measurements or the fat content. Our unique fat-blooming technique is designed to integrate the fats properly, but ensure you’re measuring your butter and oil precisely. Excessive oil can sometimes leach out during baking if the emulsion isn’t stable or if ingredients aren’t balanced.
The Secret to Perfectly Sliced Brownies
For brownies that look as good as they taste, perfectly clean slices are key. The most important rule in achieving this is patience. Cooling brownies completely is absolutely crucial. Place the pan on a wire rack and allow a precise cooling time range of at least 2-3 hours, or even overnight. Trying to slice warm brownies will inevitably lead to crumbling and a messy presentation, not to mention a compromised fudgy texture.
Once fully cooled, employ the hot knife technique for cutting brownies neatly. Use a very sharp, long knife. Run it under hot water for about 30 seconds, then wipe it completely clean and dry with a kitchen towel. Make your first cut, pressing straight down. For each subsequent slice, reheat and wipe the knife clean. This prevents sticking and ensures incredibly neat edges.
The parchment paper lining also serves a critical purpose here. Once your homemade brownies are completely cool, simply use the parchment paper overhang to lift the entire slab of brownie out of the pan. This makes slicing on a cutting board much simpler and cleaner, preventing any damage to the pan or the brownies.
Pro Tips & Troubleshooting
Pro Tips for Bakery-Style Results
Quality Cocoa Matters: For that truly rich dark chocolate flavor in your Fudge Brownie Recipe, always use good quality unsweetened cocoa powder. Brands like Droste or Ghirardelli can elevate your brownies to bakery-style levels. For a twist on a classic, you could also explore recipes like mint brownies.
Enhance with Espresso & Vanilla: Espresso powder and vanilla extract are flavor amplifiers. The espresso powder intensifies the chocolate brownies flavor without adding a distinct coffee taste, while vanilla adds depth and warmth.
Achieving Crackly Tops: The secret to those beautiful crackly tops lies in two main things: vigorously whisking eggs with sugar and the unique blooming technique where butter, oil, and sugar are heated with cocoa powder. This combination creates the perfect surface tension.
Don’t Overmix: When adding the dry ingredients, mix only until they are just combined. Stop mixing as soon as the last traces of dry ingredients disappear. Overmixing develops gluten, leading to cakey brownies instead of the desired fudgy texture.
Cool Completely: I cannot stress this enough for fudgy texture. Cooling brownies completely for several hours before slicing is non-negotiable for clean cuts and the best possible texture.
Flaky Sea Salt: For a professional, bakery-style brownies touch and a lovely flavor contrast, sprinkle a pinch of flaky sea salt over the top of your cooled brownies before serving.
Common Brownie Mistakes to Avoid
Overmixing the Batter: This is one of the most common pitfalls. Overmixing develops the gluten in the flour, resulting in a tough, cakey brownies texture rather than the soft, fudgy texture everyone loves. Mix only until the dry ingredients are just incorporated.
Overbaking: This is another frequent mistake. Over baking will quickly lead to dry, crumbly homemade brownies. Keep an eye on your brownies; they are perfectly done when the edges are set and the top is shiny with slight cracks, and a toothpick inserted into the center comes out with moist crumbs.
Not Cooling Brownies Fully: Slicing warm brownies affects their fudgy texture significantly. They will be gooey, difficult to cut cleanly, prone to crumbling, and won’t have the best presentation. Always cool completely.
Substituting Brown Sugar: While delicious in other baked goods, using brown sugar in this Fudge Brownie Recipe can introduce excess moisture and a distinct molasses flavor. This alters the intended fudgy texture and prevents the formation of those beautiful crackly tops. Stick to granulated sugar for this recipe.
Serving & Storage
Serving Suggestions
These rich fudge brownies are versatile and delicious served in many ways. I recommend enjoying them warm or at room temperature for optimal fudgy texture.
They pair beautifully with a cold glass of milk, a scoop of creamy vanilla bean ice cream, or a dollop of freshly whipped cream. For an extra treat, try a drizzle of warm chocolate sauce.
Consider creative garnishes to elevate your bakery-style brownies, such as a dusting of unsweetened cocoa powder, a scattering of fresh berries like raspberries or strawberries, or that always-welcome sprinkle of flaky sea salt for a perfect sweet and salty balance. For another delightful chocolate and fruit pairing, try our chocolate covered strawberries.
Storage and Make-Ahead Tips
For room temperature storage, place your homemade brownies in an airtight container. They will maintain their moist, fudgy texture for 3-4 days.
If you need to store them for a bit longer, refrigerator storage is an option for up to a week. Make sure they are tightly wrapped in plastic wrap or foil to prevent them from drying out.
These Fudge Brownie Recipe brownies are excellent for freezer storage. To freeze, wrap individual slices tightly in plastic wrap, then place them in an airtight container or a freezer storage bag. They will keep well for up to 3 months.
To prevent freezer burn, ensure there are no air pockets when wrapping your brownies, and use heavy-duty freezer bags or containers. Double-wrapping is always a good idea.
To reheat frozen brownies, you can thaw them at room temperature for a few hours. For a fresh-baked feel, gently warm them in a preheated oven at 300 degrees F (150 degrees C) for about 5-7 minutes, or briefly in the microwave for 15-20 seconds per piece.
Conclusion
You now hold the key to creating the most incredible homemade brownies. With this Fudge Brownie Recipe, you’re not just baking; you’re crafting an experience of intense chocolate flavor, unparalleled fudgy texture, and those irresistible crackly tops. I truly believe that with our unique cocoa blooming technique and the detailed guidance provided, anyone can achieve perfect, bakery-quality results right in their own kitchen.
I encourage you to try this recipe, experiment with your favorite chocolate chips or serving ideas, and share your baking successes. Feel free to print this Fudge Brownie Recipe, share it with fellow chocolate lovers, and explore other delicious dessert recipes on my site, like our popular brownie cookies. Happy baking!
FAQ
How do I get shiny, crackly tops on my fudge brownies?
Achieving shiny, crackly tops on your fudge brownies is a result of a few key steps. First, vigorously whisking your eggs and sugar together until light and frothy is crucial. Second, our unique blooming technique, where butter, oil, and a portion of the granulated sugar are heated with the cocoa powder and espresso powder, helps create a stable emulsion and sets the stage for that perfect crackly surface.
What’s the secret to fudgy, not cakey, brownies?
The secret to fudgy, not cakey, brownies lies in precise ingredient ratios and careful mixing. This Fudge Brownie Recipe uses a higher fat-to-flour ratio and includes an extra egg yolk to maximize richness. Crucially, avoid over mixing the batter once the dry ingredients are added; stir only until just combined to prevent gluten development, which leads to a cakey texture. Also, do not over bake your brownies.
What type of cocoa powder should I use for the best chocolate flavor?
For the best rich dark chocolate flavor in these chocolate brownies, I recommend using high-quality unsweetened cocoa powder, also known as natural cocoa powder. Brands like Droste or Ghirardelli offer superior taste. While Dutch-processed cocoa powder can be used, natural cocoa powder usually yields a more intense and complex chocolate profile when bloomed.
Can I freeze these homemade fudge brownies for later?
Yes, these homemade fudge brownies freeze beautifully. For freezer storage, wrap individual slices tightly in plastic wrap, then place them in an airtight container or freezer storage bag. They can be stored for up to 3 months. Thaw at room temperature or gently reheat for a fresh-baked feel.
What is the best pan size and material for baking fudge brownies?
For this Fudge Brownie Recipe, a 9×9-inch baking pan is ideal for the perfect thickness and fudgy texture. A metal baking pan, particularly aluminized steel, is generally recommended for even heat conduction and slightly crisper edges. While glass baking pan and ceramic baking pan can be used, they retain heat longer, which might require a slight adjustment to baking time.
How do I know when my brownies are perfectly baked?
Your brownies are perfectly baked when the edges are firm and the top is shiny and slightly cracked. For that ideal fudgy texture, the toothpick test is key: insert a toothpick into the center, and it should come out with moist crumbs attached, not wet batter. Over baking will lead to dry, crumbly brownies.
How do I cut brownies cleanly without them sticking?
To cut brownies cleanly without them sticking, ensure they are completely cooled, ideally for 2-3 hours or even overnight. Use a sharp knife heated under hot water, wipe it clean and dry, then make each cut. Reheat and wipe the knife between each slice for the cleanest edges. The parchment paper lining also helps by allowing you to lift the whole slab out for easier cutting.
What role does espresso powder play in enhancing brownie flavor?
Espresso powder plays a crucial role in enhancing brownie flavor by intensifying and deepening the chocolate notes. It doesn’t add a coffee taste to your chocolate brownies; rather, it acts as a flavor enhancer, making the chocolate taste richer, darker, and more complex. It’s a secret ingredient for truly outstanding homemade brownies.
Can I use brown sugar instead of granulated sugar in this brownie recipe?
I do not recommend using brown sugar instead of granulated sugar in this particular Fudge Brownie Recipe. Brown sugar contains molasses and more moisture, which would alter the desired fudgy texture and could prevent the formation of the signature crackly tops. Granulated sugar is essential for achieving the specific characteristics of these bakery-style brownies.

Ultimate Fudge Brownie Recipe: Crackly Top & Fudgy Core
Ingredients
Equipment
Method
- Preheat your oven to 350 degrees F (175 degrees C). Take a 9x9-inch baking pan and line it with parchment paper, leaving an overhang on two sides to create 'handles.' Lightly spray the parchment paper with non-stick baking spray and set the pan aside.
- In a large bowl, sift together the all-purpose flour, baking powder, salt, unsweetened cocoa powder, and espresso powder through a fine-mesh sieve. Set the bowl aside.
- In a medium saucepan, combine the unsalted butter, oil, and 1/3 cup of the granulated sugar. Heat this mixture over medium heat, stirring frequently, until the butter is completely melted and the sugar begins to dissolve. Remove the saucepan from the heat.
- Stir in the unsweetened cocoa powder and espresso powder. Return the saucepan to medium heat and simmer, stirring occasionally, for 1-2 minutes until the mixture becomes fragrant and slightly thickened.
- In a separate large mixing bowl, combine the large eggs, the extra large egg yolk, vanilla extract (if using), and the remaining granulated sugar. Whisk this mixture vigorously for about 30 seconds until well combined and slightly frothy.
- Slowly pour the warm butter mixture into the egg mixture, adding it gradually while whisking constantly. This creates a stable emulsion and prevents the eggs from scrambling.
- Add the sifted dry ingredients and chocolate chips to the wet mixture. Using a rubber spatula, stir slowly until just combined, ensuring not to over mix. Stop as soon as the last traces of dry ingredients disappear.
- Scrape the brownie batter into your prepared 9x9-inch baking pan. Use the rubber spatula to gently smooth the top evenly.
- Bake for 28 to 30 minutes, or until the edges are firm and the top is shiny and slightly cracked. A toothpick inserted into the center should come out with moist crumbs attached, not wet batter. Avoid over baking.
- Once out of the oven, place the entire pan on a wire rack and cool completely before slicing. This can take several hours (2-3 hours or even overnight) and is essential for optimal fudgy texture and clean appearance.
Notes
Printable Recipe Card
Want just the essential recipe details without scrolling through the article? Get our printable recipe card with just the ingredients and instructions.