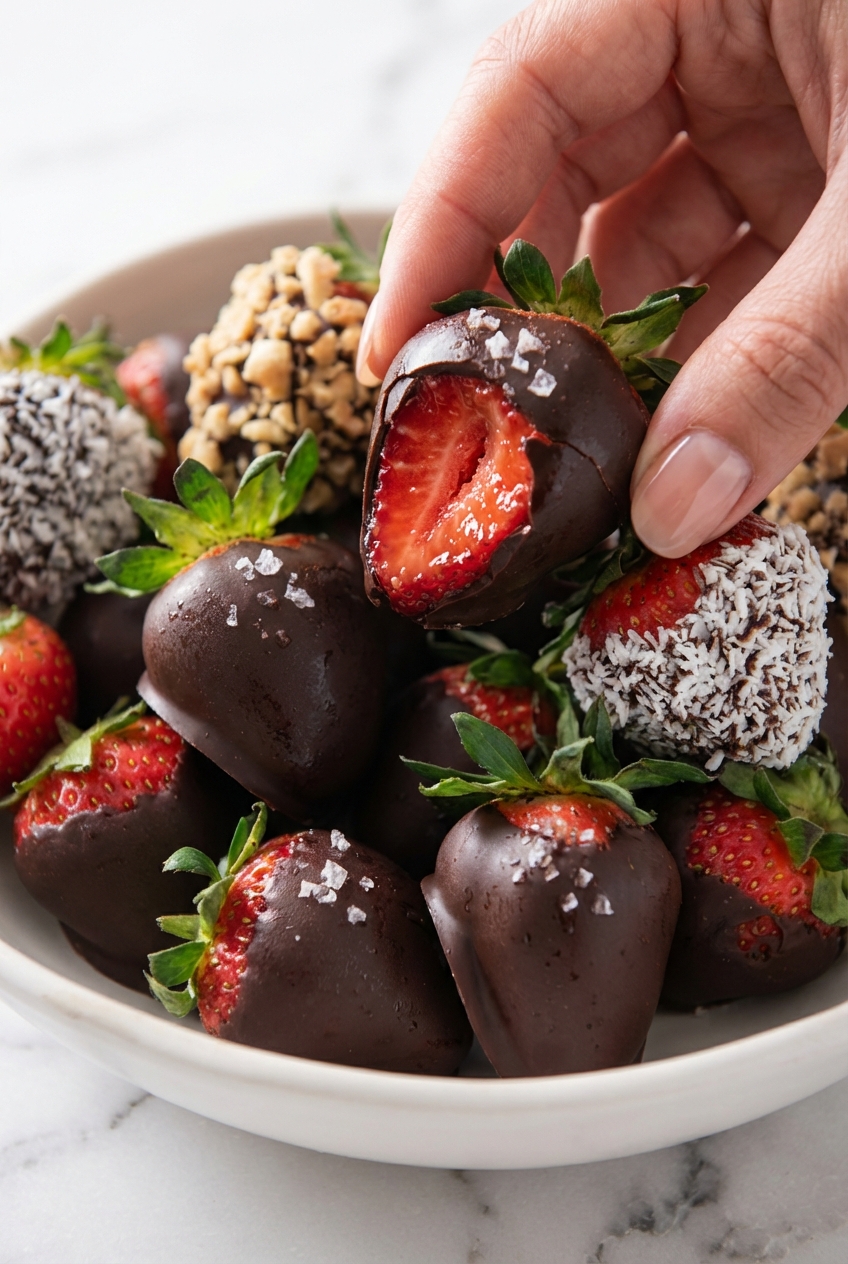
There’s something truly magical about chocolate covered strawberries, isn’t there? For me, they embody romance and celebration, making them the ultimate indulgence for Valentine’s Day or any special moment. While they might look like something only a professional pastry chef could create, I promise you, mastering the perfect gourmet chocolate covered strawberries at home is simpler than you think. This recipe isn’t just about dipping berries; it’s about achieving that professional ‘gourmet’ finish, complete with a perfect snap and a flavor balance that will surprise and delight you.
Why You Will Love This Recipe
Elevated Flavor Profile: My secret twist involves incorporating just a touch of espresso powder into the chocolate. This doesn’t make your berries taste like coffee; instead, it acts as a flavor enhancer, deepening those rich cocoa notes and making the chocolate taste incredibly complex and luxurious.
Sophisticated Sweet-Salty Balance: Adding a tiny pinch of Maldon sea salt immediately after dipping provides a brilliant contrast. It cuts through the sweetness of the semi-sweet chocolate and highlights the natural acidity of the fresh strawberries, creating a truly sophisticated taste experience.
Unforgettable Sensory Experience: Imagine that satisfying glossy chocolate snap as you bite in, followed by the burst of juicy, sweet-tart berry. It’s a textural and flavor journey that truly makes these chocolate covered strawberries stand out.
Ingredients Needed
Creating these exquisite treats starts with selecting the right ingredients. Each component plays a vital role in achieving that perfect gourmet finish, ensuring both taste and texture are spot on.
Ingredients
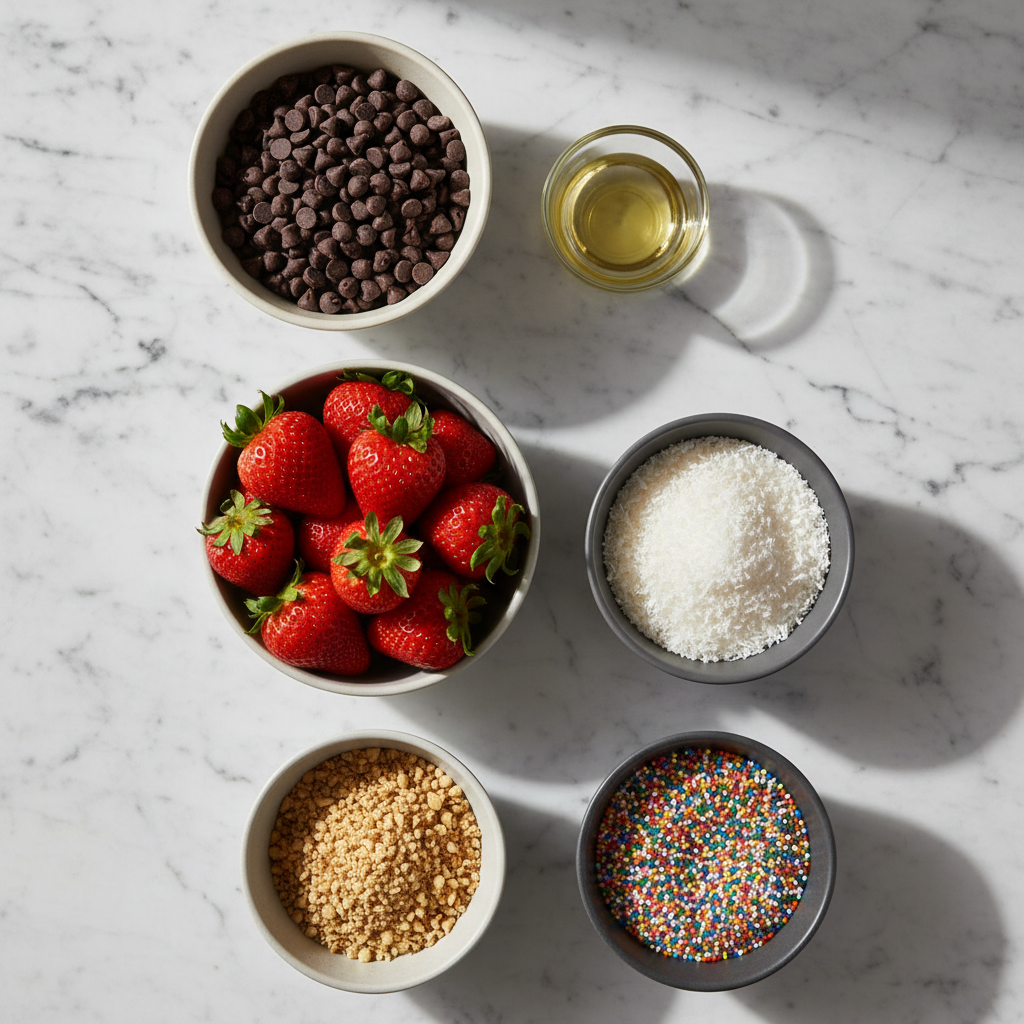
- 175g chocolate chips
- 2 tsp vegetable oil
- 500g strawberries
Optional – for coating:
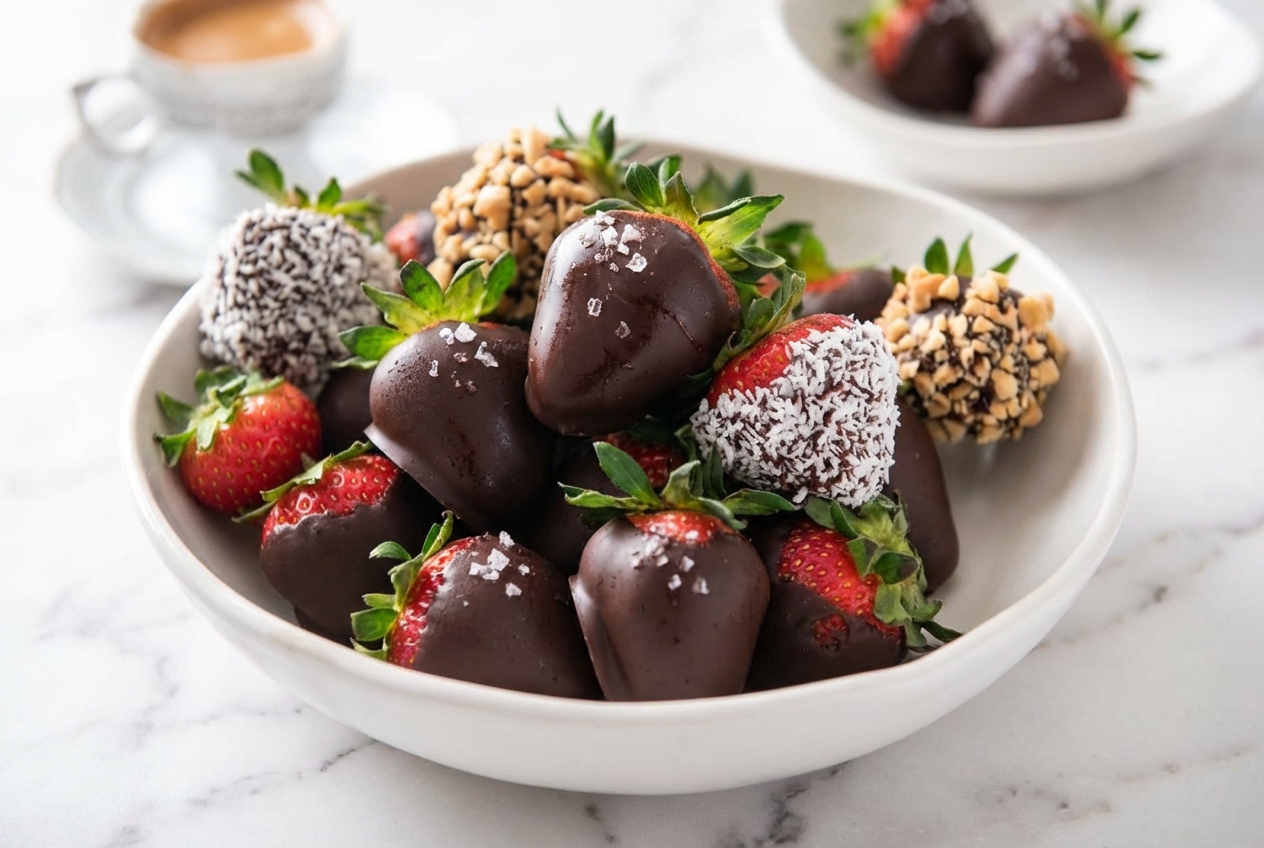
- Desiccated coconut
- Crushed nuts
- Sprinkles
- Other coating of choice
Ingredient Notes and Substitutions
Chocolate Chips: For truly superior chocolate covered strawberries, opt for high-quality baking chips, like Ghirardelli 60% cacao. They melt smoother and yield a better, more stable snap than standard eating chocolate or candy melts.
Semi-Sweet Chocolate: I find that semi-sweet chocolate offers the perfect canvas for our secret espresso powder addition. It provides a delightful balance of bitterness and sweetness that complements the berries beautifully.
Vegetable Oil or Coconut Oil: A little oil is crucial here. It helps the chocolate maintain a beautiful glossy finish and prevents it from becoming too thick or seizing, ensuring a smooth, even coat on every strawberry.
How to Make Gourmet Chocolate Covered Strawberries
Creating these decadent chocolate covered strawberries is a delightful process, and with these steps, you’ll achieve professional results every time.
Preparation and Melting the Chocolate
- First, prepare your workspace by lining a sturdy baking tray with parchment paper. This simple step is vital for easy removal once your gourmet chocolate covered strawberries have set, preventing any sticking.
- Next, place your chocolate chips into a microwave-safe bowl. Begin melting them by heating on high in 30-second bursts. After each burst, stir the chocolate thoroughly. This gentle, gradual melting prevents burning and ensures a smooth, even consistency.
- Once the chocolate is mostly melted and smooth, stir in 1/2 teaspoon of espresso powder. Continue stirring until it is completely dissolved and integrated, infusing the chocolate with that deep cocoa-enhancing flavor.
Dipping and Coating the Strawberries
- Now, it’s time to dip! Carefully pick up a strawberry either by its stem or by gathering the leaves around the stem to create a secure grip.
- Gently immerse the strawberry into the melted chocolate, rolling it until most of the berry is coated, leaving a small portion exposed near the stem for a natural look.
- As soon as each strawberry is dipped, and while the chocolate is still wet, sprinkle a tiny pinch of Maldon sea salt over the coated portion. This immediate application ensures the salt adheres perfectly, ready to deliver that fantastic flavor contrast.
- If you’re using optional coatings like desiccated coconut, crushed nuts, or sprinkles, roll the freshly dipped and salted strawberry through your chosen coating immediately after dipping, then place it onto your prepared parchment-lined tray.
Setting and Serving
Once all your chocolate covered strawberries are dipped and decorated, place the tray into the refrigerator for at least 30 minutes, or until the chocolate is completely firm to the touch. For the very best texture and flavor, I always recommend serving these within 12 hours of making them.
Mastering the Art of Professional Berries
Achieving a truly professional finish for your chocolate covered strawberries goes beyond just dipping. It involves understanding a few key culinary principles.
The ‘Scientific Logic’ behind using espresso powder and sea salt together is quite fascinating. The espresso powder doesn’t add a coffee flavor but rather amplifies the cocoa notes, making the chocolate taste richer and more intense. Meanwhile, the sea salt provides a crucial contrast; studies show that sodium can lead to the suppression of bitterness, which in turn highlights the sweetness and the natural acidity of the strawberry, creating a more balanced and sophisticated flavor profile.
For a perfect, glossy chocolate with a satisfying snap, you might consider the ‘Seeding Method’ for tempering. This involves saving a small amount of un-melted chocolate to stir into your hot, melted chocolate. The solid chocolate ‘seeds’ help to stabilize the crystals in the melted chocolate, giving you a beautiful, stable temper without needing a thermometer. For more on achieving that perfect chocolate snap, you might want to explore our Dubai chocolate bar recipe.
Washing your strawberries correctly is a critical step often overlooked. Give them a quick, gentle rinse under cool water, but the most important part is drying them completely, making sure they are bone-dry. Any moisture on the berries will prevent the chocolate from adhering properly, leading to a runny mess.
If, by chance, a tiny drop of water sneaks into your melted chocolate and causes it to ‘seize’ (turn thick, lumpy, and grainy), don’t panic! You can often fix it by stirring in a teaspoon of vegetable oil or shortening, which helps to emulsify the mixture and bring it back to a smooth, workable state.
Pro Tips and Troubleshooting
Even seasoned chefs have little tricks up their sleeves, and for chocolate covered strawberries, these expert secrets can make all the difference.
Expert Secrets for Success
- Moisture is truly the enemy here; even a tiny drop of water on your berries will cause the chocolate to slide right off or seize.
- Always use strawberries that are at room temperature. Cold berries can cause condensation to form under the chocolate layer, leading to ‘sweating’ and an unstable coating.
- If your melted chocolate seems a bit too thick for a delicate, elegant shell, stir in an additional teaspoon of coconut oil to thin it out while maintaining that beautiful glossy finish. To get a feel for working with thinner chocolate, you could practice on our chocolate drizzled popcorn recipe.
- Remember that proper drying is essential; university extension resources like Virginia Tech emphasize the need to eliminate moisture thoroughly to ensure food safety and prevent issues like mold.
Common Pitfalls to Avoid
- Avoid overheating the chocolate in the microwave. This can burn it, making it grainy and dull, and impossible to work with for a smooth coating.
- Never use strawberries directly from the fridge. Their cold surface will cause the chocolate shell to set too quickly and crack as the berry adjusts to room temperature.
- Resist the urge to wash your berries right before dipping. They need to be prepared and completely dry several hours in advance to guarantee the chocolate adheres beautifully.
Serving and Storage Advice
Presenting and preserving your chocolate covered strawberries properly ensures they remain a delightful treat.
Elegant Presentation Ideas
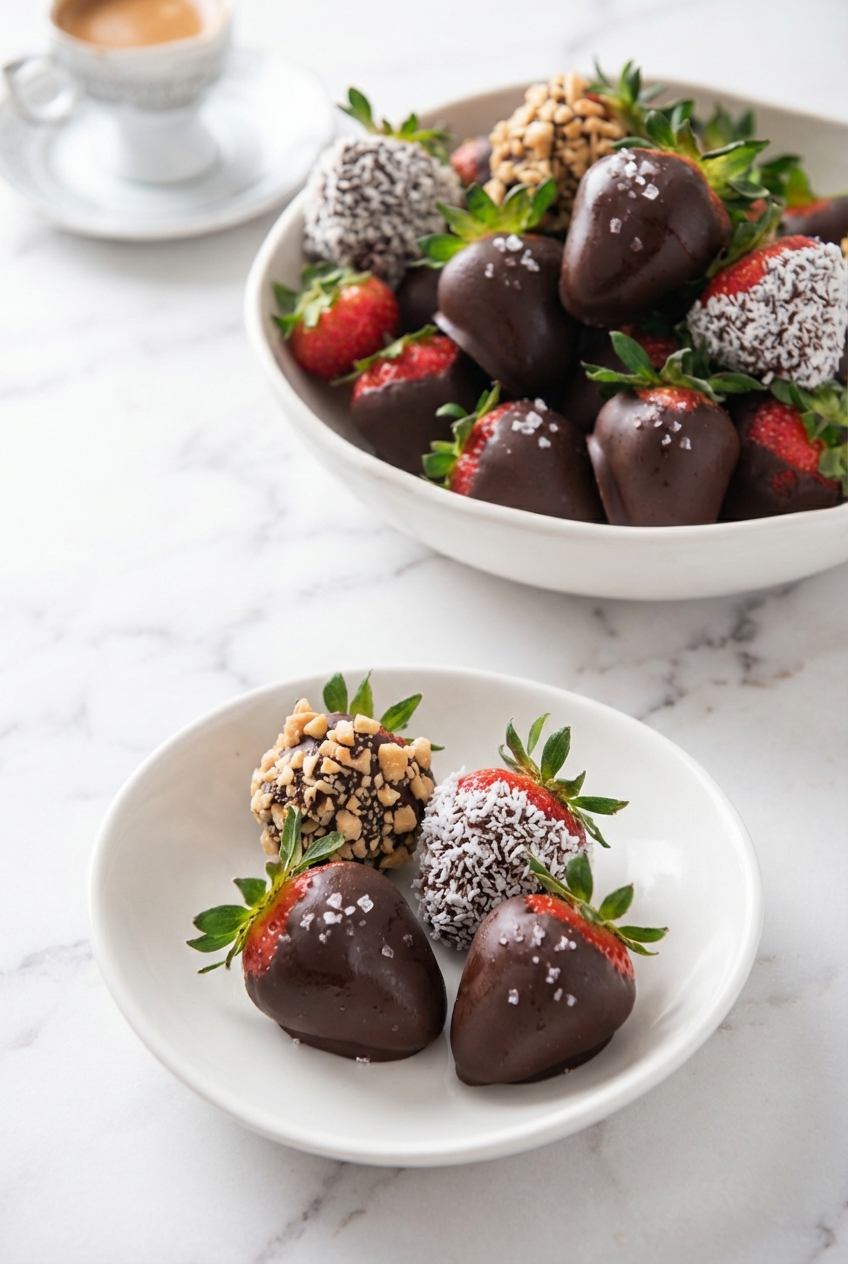
- For a truly luxurious gift-box look, place each of your gourmet chocolate covered strawberries into individual gold mini cupcake liners.
- Elevate the experience by pairing these sophisticated treats with a glass of crisp Champagne or a dry Prosecco.
- Consider adding a contrasting white chocolate drizzle over your dark chocolate berries for a classic ‘tuxedo’ finish. If you’re looking for more ways to impress, our Dubai chocolate strawberries offer an even more decadent experience.
Proper Storage to Prevent Leaks
One common issue is the dreaded ‘syrup leak’ that can happen after about 24 hours. This occurs because the sugar in the chocolate naturally draws moisture out of the fresh berry, creating a syrupy puddle.
For the best quality, these chocolate covered strawberries have an ideal shelf life of 12-24 hours. While refrigeration is necessary for initial setting, serving them at near room temperature will prevent the chocolate shell from becoming too hard to bite through and minimize condensation. For a complete dessert spread, these pair beautifully with a rich fudgy brownie recipe.
Gourmet Chocolate Covered Strawberries
Ingredients
Equipment
Method
- Prepare your workspace by lining a sturdy baking tray with parchment paper to ensure the berries do not stick once set.
- Place the chocolate chips into a microwave-safe bowl and melt them on high in 30-second bursts, stirring thoroughly after each interval until smooth and even.
- Stir in 1/2 teaspoon of espresso powder into the melted chocolate, continuing to stir until it is completely dissolved to enhance the deep cocoa flavor.
- Hold each strawberry by the stem or leaves and gently immerse it into the melted chocolate, rolling it until most of the berry is coated while leaving a small portion exposed at the top.
- Immediately sprinkle a tiny pinch of sea salt over the wet chocolate to create a sophisticated flavor contrast.
- If using optional toppings like coconut, nuts, or sprinkles, roll the salted strawberry through the coating immediately before the chocolate sets, then place it on the prepared tray.
- Place the tray in the refrigerator for at least 30 minutes, or until the chocolate coating is completely firm to the touch.
- Serve the strawberries within 12 hours for the best texture, ideally bringing them close to room temperature just before serving to ensure a perfect bite.
Notes
Conclusion
And there you have it, the secret to making truly gourmet chocolate covered strawberries right in your own kitchen! With the simple additions of espresso powder and a pinch of Maldon sea salt, you can transform a classic treat into a sophisticated dessert that looks and tastes like it came from a high-end chocolatier. Don’t be shy; give this recipe a try and impress your loved ones with your professional results. I can’t wait to hear how your creations turn out!
Frequently Asked Questions
How do I keep chocolate covered strawberries from sweating?
The key to preventing sweating is to use room temperature strawberries and to store them in an airtight container in a cool, dry place, rather than a very cold refrigerator. Cold temperatures cause condensation when brought to room temperature.
Can I make these a day in advance?
While you can make them a day in advance, they are truly best served within 12 hours. After 24 hours, the strawberries tend to “sweat” or leak their juices, which can affect the chocolate’s appearance and texture.
What is the best way to melt chocolate without a double boiler?
The microwave is an excellent alternative. Place chocolate chips in a microwave-safe bowl and heat in 30-second bursts, stirring thoroughly after each interval, until smooth and fully melted. This prevents overheating and scorching.
Why should I add oil or shortening to the chocolate?
Adding a small amount of vegetable oil or coconut oil to your melted chocolate helps to thin it out slightly, ensuring a smooth, glossy, and thin coating on your strawberries. It also contributes to a pleasant snap once the chocolate has set.
Why is my chocolate falling off the strawberry?
The most common reason for chocolate falling off is moisture on the strawberry. It is absolutely crucial for the strawberries to be completely dry before dipping, as any water will prevent the chocolate from adhering.
Can I use frozen strawberries for chocolate dipping?
No, I do not recommend using frozen strawberries. When thawed, they release too much water, making it impossible for the chocolate to adhere properly and resulting in a soggy texture. Always use fresh, firm strawberries.
Printable Recipe Card
Want just the essential recipe details without scrolling through the article? Get our printable recipe card with just the ingredients and instructions.