There’s something truly magical about transforming simple chicken breasts into a restaurant-quality, vibrantly spiced, and incredibly juicy Blackened Chicken dish right in your own kitchen. I often find myself craving that signature crisp, flavorful crust, and I’m thrilled to share my go-to recipe with you. This article will not only guide you through making perfectly seasoned, tender chicken with a crispy crust, but it will also demystify the blackening technique, empowering you with the ‘why’ behind each crucial step. Get ready to master this classic, impressive meal with consistent success every time.
Why You’ll Love This Recipe
You will love this Blackened Chicken recipe for its incredible flavor and straightforward execution. My unique twist makes all the difference. Instead of just oil for searing, I replace 1 tablespoon of canola oil with 1 tablespoon of clarified butter, or I use a 1:1 mix of clarified butter and canola oil.
Clarified butter truly elevates the dish. It has a higher smoke point than regular butter, so you get all the rich, nutty flavor without the milk solids burning in your hot skillet. This contributes to a superior, crispier crust through the Maillard reaction. It enhances the taste and texture beyond what oil alone can provide.
This recipe is Quick & Easy. It is a flavorful weeknight meal that comes together fast, perfect for busy evenings.
You will enjoy Flavorful & Tender results. The chicken remains incredibly juicy with a beautiful golden-brown, spicy, Cajun-style crust.
It is incredibly Versatile. This blackened chicken is adaptable for various meals and dietary preferences, easily fitting into low carb, keto friendly, and gluten free plans.
I also share Expert-Approved Techniques. You will incorporate professional tips for consistent success, such as using a Ziploc bag for seasoning, ensuring perfect Blackened Chicken every time.
Ingredients Needed

- 1/2 tablespoon smoked paprika
- 1/2 teaspoon cayenne pepper (this is the hot one, so you can tame it back if need be)
- 1/2 teaspoon dried thyme
- 1/2 teaspoon garlic powder
- 1/2 teaspoon onion powder
- 1/2 teaspoon fresh ground black pepper
- 1/4 teaspoon dried oregano
- 1/4 teaspoon salt
- 2 large boneless skinless chicken breasts sliced in half lengthwise
- 3 tablespoons canola oil
Ingredient Notes & Substitutions
Blackening Seasoning is the heart of this dish, creating its signature flavor. The smoked paprika provides a deep color and smoky depth, while cayenne pepper brings the heat. Remember, you can adjust the amount of cayenne to suit your personal spice preference. Dried thyme, garlic powder, onion powder, dried oregano, salt, and black pepper complete this vibrant Cajun spices blend.
For the Chicken Breasts, I recommend selecting boneless skinless chicken breasts. Slicing them in half lengthwise not only creates healthier, more manageable portions but also ensures more even cooking, preventing dry spots. If you prefer, chicken thighs or tenderloins can also be used; just be sure to adjust your cook times accordingly, as they might cook faster or slower.
When it comes to Fats, the choice of canola oil and clarified butter is deliberate. Canola oil has a high smoke point, making it suitable for high-heat cooking. However, my twist of using clarified butter, either alone or blended with canola oil, is a game-changer. Clarified butter has an even higher smoke point and contributes a rich, nutty flavor that deepens the taste of the crust. This blend ensures a superior, crispier sear without burning. Other high smoke point oils like grapeseed or avocado oil are also suitable alternatives if you do not have clarified butter on hand.
This Blackened Chicken recipe is naturally versatile for Dietary Swaps. It is an excellent choice if you are following a low carb, keto friendly, or gluten free diet, offering a delicious and satisfying main course.

How to Make Blackened Chicken
Prepare the Seasoning
First, let’s get our blackening seasoning ready. I like to combine the smoked paprika, cayenne pepper, dried thyme, garlic powder, onion powder, black pepper, oregano, and salt in a Ziploc bag. This is my secret for easy mixing and minimal cleanup. Once all the spices are in, I shake the bag vigorously to ensure everything is thoroughly combined and evenly distributed.
Prepare the Chicken
Next, prepare your boneless skinless chicken breasts. It is crucial to pat the chicken breasts thoroughly dry with paper towels. This step is vital because excess moisture on the surface creates steam in the hot pan, preventing that desirable crisp crust and hindering the Maillard reaction. Once dry, I lightly brush both sides of the chicken with oil or spray them with baking spray. Then, I use my hands to evenly spread the seasoning mixture over the chicken, making sure every surface is fully coated for maximum flavor.
Preheat the Skillet
Now, it is time to get the pan hot. Heat one tablespoon of canola oil (or clarified butter, or your clarified butter/canola oil blend) in a nonstick skillet over medium-high heat. You will know the pan is hot enough for searing when the oil just begins to smoke lightly. This high heat is essential for achieving that perfect, flavorful crust. While a nonstick skillet works well, a cast-iron skillet is also an excellent choice, known for its even heat distribution and ability to hold high temperatures.
Cook the Chicken
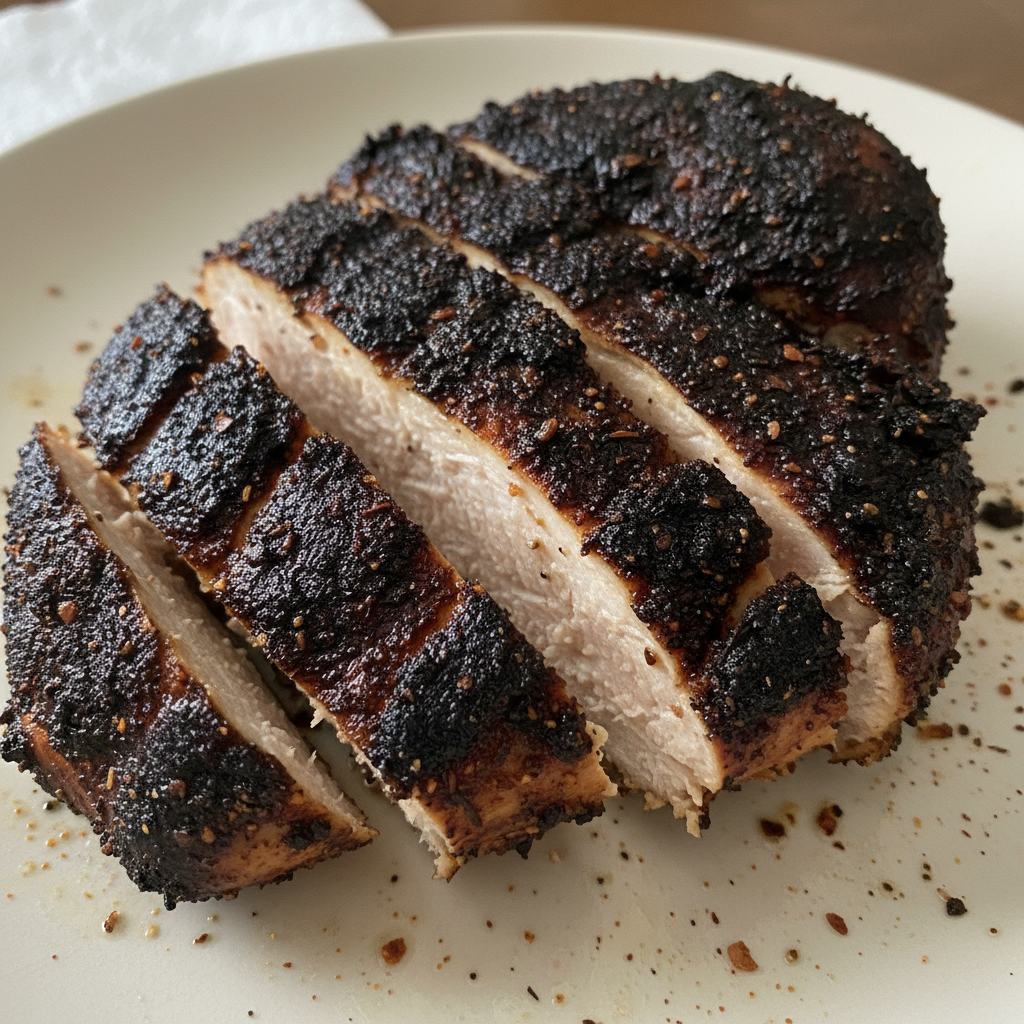
Carefully place the seasoned chicken into the smoking hot skillet. Listen for that satisfying sizzle. Cook the chicken until it is golden brown, almost black, on both sides and cooked through. This usually takes approximately 5 minutes on each side. The rich aroma of the spices will fill your kitchen as the Maillard reaction works its magic, creating complex flavors and that signature crust. Be mindful of your heat; cooking at too high a heat can burn the seasoning, while too low a heat will dry out the chicken and prevent proper blackening. Heat management is key here.
Rest the Chicken
Once the chicken is perfectly cooked, remove it from the skillet. Immediately cover it loosely with an aluminum foil tent. Let it rest for 10 minutes. This resting period is incredibly important for juiciness and tender chicken. It allows the juices, which have migrated to the center during cooking, to redistribute throughout the meat, ensuring every bite is moist and flavorful. For food safety, always ensure your chicken reaches an optimal internal temperature of 165°F (74°C) using a meat thermometer.
The Art and Science of Blackening: What Makes it Unique?
Blackening is a distinct culinary technique that creates a dark, flavorful crust on food, most famously on fish and chicken. It is crucial to understand that “blackened” means developing a deep, rich color and intense flavor, not burning. This method involves cooking thinly coated food in a very hot cast-iron skillet with a generous amount of butter or oil.
The magic behind blackening lies in the Maillard reaction. This complex chemical reaction occurs between amino acids and reducing sugars in the food when exposed to high heat. It is responsible for the signature golden-brown to dark crust and the incredible depth of complex flavors that we associate with blackened dishes. It is a flavor-building process, not charring.
One of the most crucial steps for successful blackening is patting chicken dry. Moisture on the surface of the chicken creates steam when it hits the hot pan. Steam prevents direct contact between the food and the hot cooking surface, effectively hindering the Maillard reaction and making it impossible to achieve that crisp, flavorful crust. A dry surface allows for a direct, intense sear.
The role of fat and heat cannot be overstated. High smoke point fats like clarified butter or canola oil are essential because they can withstand the very high heat cooking required for blackening without burning and producing off-flavors. The right amount of fat is also important; enough to coat the pan and contribute to the crust, but not so much that you are deep-frying the chicken. This combination of dry chicken, high smoke point fat, and intense heat ensures a perfect blackening effect.
Mastering Blackening: Essential Techniques & Troubleshooting
Controlling smoke in your kitchen is a common concern when blackening chicken. Beyond just using a lid, proper ventilation is key. Always turn on your exhaust fan to its highest setting, and if possible, open a nearby window to create airflow. Choosing high smoke point fats like clarified butter or canola oil also significantly reduces smoke compared to regular butter or lower smoke point oils.
Optimal pan selection plays a big role in blackening. A cast-iron skillet is often preferred by professional chefs for its exceptional heat distribution and ability to hold high temperatures, which is ideal for achieving a consistent, deep crust. However, a good quality nonstick skillet can also work effectively, especially for beginners. The key is to get any pan very hot before adding the chicken to ensure a proper sear.
This technique is wonderfully versatile for cooking different cuts and proteins. For chicken strips or chicken bites, reduce the cooking time to about 2-3 minutes per side. For thicker chicken thighs or tenderloins, you might need 6-8 minutes per side, depending on thickness, ensuring an internal temperature of 165°F (74°C). You can also use this seasoning and high-heat method for other proteins like firm white fish such as grouper, adjusting cook times significantly (often just 2-3 minutes per side for fish).
Scaling the recipe for different serving sizes efficiently can be done. For larger quantities, simply multiply the ingredients. However, be mindful of pan overcrowding. If cooking for many people, it is best to cook the chicken in batches to maintain high pan temperature and ensure each piece achieves a proper blackened crust. Overcrowding will steam the chicken instead of searing it, compromising the texture and flavor.
Pro Tips & Troubleshooting
Pro Tips
For easy spice prep, I always suggest using a Ziploc sandwich bag to mix your Cajun spices. It makes combining them a breeze and cleanup is minimal.
To ensure even cooking and healthier portions, advise slicing large chicken breasts in half lengthwise. This helps them cook more uniformly.
Temperature matters for the best results. Let your chicken breasts come to room temperature for about 30 minutes before cooking. This promotes more even cooking throughout the meat.
Achieve a perfect sear by preheating your pan just until the oil or clarified butter begins to smoke before adding the chicken. This ensures a proper Maillard reaction and a fantastic crust.
Reinforce the unique twist. Use clarified butter for searing to get the crispiest, most flavorful crust while managing the smoke point effectively during high-heat cooking.
To retain juices and ensure tender chicken, after cooking, cover the chicken loosely with an aluminum foil tent and let it rest for 10-15 minutes.
For food safety, always use a meat thermometer to confirm your chicken is cooked to an internal temperature of 165°F (74°C).
Common Mistakes to Avoid
Avoid incorrect heat. Cooking at too high a heat will cause excessive smoke and burn the seasoning. Too low a heat will dry out the chicken and prevent the proper blackening effect. Master your heat management.
Do not overcrowd the pan. Adding too much chicken at once lowers the pan temperature. This leads to steaming instead of searing, preventing the desired crispy crust. Cook in batches if necessary.
Never skip the dry pat. Moisture on the chicken prevents proper blackening, as it creates steam rather than a sear.
Neglecting resting time is a common error. Always stress the importance of resting meat to redistribute its juices and prevent dry chicken.
Lastly, do not ignore ventilation. Proper smoke control and ventilation, like using your exhaust fan and opening windows, are crucial during this high-heat cooking method.
Serving & Storage
Serving Ideas
Blackened chicken is incredibly versatile. For a complete and comforting meal, I love serving it with Bacon Asparagus Cajun Pasta or a rich Cauliflower Au Gratin.
For a quicker, satisfying dinner, pair it with simple buttered angel hair pasta and a fresh garden salad.
You can also transform it into blackened chicken strips for dipping in ranch sauce, or cut it into blackened chicken bites to toss in a vibrant salad or wrap in warm tortillas.
Garnish your finished dish with fresh parsley, cilantro, or a squeeze of lime to brighten and enhance the flavors.
Storage and Make-Ahead
To store leftovers, place your cooked blackened chicken in an airtight container in the refrigerator. It will stay fresh and delicious for up to 3 days.
When reheating, I recommend using the microwave at reduced power to help maintain moisture. You can also gently reheat it in a skillet over low heat or in a warm oven.
Blackened chicken is excellent for meal prep. It provides a flavorful, high-protein component that can be added to salads, grain bowls, or sandwiches throughout the week.
Conclusion
I hope you are as excited as I am about this Blackened Chicken recipe. Its incredible flavor, tender juiciness, and the ease with which you can master it, especially with my clarified butter twist, make it a true kitchen triumph. With these detailed tips and clear instructions, I am confident you can achieve perfect results every time, whether you are a seasoned cook or just starting your culinary journey. I encourage you to try this recipe, experiment with the suggested variations or serving ideas, and share your experiences. Feel free to print this recipe, share it with friends, or explore other easy chicken recipe ideas on my site for more delicious inspiration.
FAQ
What does “blackened” mean in cooking and what makes it unique?
“Blackened” refers to a high-heat cooking technique that creates a dark, flavorful crust on food, rather than burning it. This distinct crust results from the Maillard reaction, which develops complex flavors and a unique texture, setting it apart from other cooking methods.
What is the best type of pan to use for blackened chicken?
A cast-iron skillet is often considered the best choice for blackened chicken due to its superior heat retention and even heat distribution. However, a good quality nonstick skillet can also be used effectively, provided it can reach and maintain a high temperature.
How can I prevent excessive smoke when blackening chicken?
To prevent excessive smoke, ensure proper ventilation by using your kitchen exhaust fan and opening windows. Using high smoke point fats like clarified butter or canola oil instead of regular butter also significantly helps reduce smoke.
Can I cook blackened chicken on a grill instead of the stovetop?
Yes, you can cook blackened chicken on a grill. Preheat your grill to a high temperature and place the seasoned chicken directly on the grates, or use a cast-iron skillet on the grill. Be sure to account for potential flare-ups and adjust cooking times as needed.
What is the safe internal temperature for blackened chicken?
For food safety, blackened chicken should be cooked to an optimal internal temperature of 165°F (74°C). Always use a meat thermometer to confirm doneness.
What are some popular side dishes and serving suggestions for blackened chicken?
Popular side dishes for blackened chicken include Bacon Asparagus Cajun Pasta, Cauliflower Au Gratin, buttered angel hair pasta, and a fresh garden salad. It can also be served as chicken strips for dipping, or as bites in salads and tortillas.
How do you make Blackened Seasoning from scratch?
You can make Blackened Seasoning from scratch by combining smoked paprika, cayenne pepper (to taste), dried thyme, garlic powder, onion powder, fresh ground black pepper, dried oregano, and salt. Mix these Cajun spices thoroughly in a bowl or a Ziploc bag.
What is the difference between Cajun and blackened seasoning?
Cajun seasoning is a spice blend used in various Cajun dishes, typically featuring paprika, cayenne, garlic, onion, and herbs. Blackened seasoning uses a similar spice profile but specifically refers to the blend used in the blackening cooking technique, where food is seared at high heat to create a dark, flavorful crust.
Blackened Chicken Recipe
Ingredients
Equipment
Method
- First, combine the smoked paprika, cayenne pepper, dried thyme, garlic powder, onion powder, black pepper, oregano, and salt in a Ziploc bag.
- Shake the bag vigorously to ensure everything is thoroughly combined and evenly distributed.
- Pat the chicken breasts thoroughly dry with paper towels; this is crucial as excess moisture prevents a crisp crust.
- Lightly brush both sides of the chicken with oil or spray them with baking spray.
- Evenly spread the seasoning mixture over the chicken, making sure every surface is fully coated for maximum flavor.
- Allow chicken breasts to come to room temperature for about 30 minutes before cooking, as this promotes more even cooking throughout the meat.
- Heat one tablespoon of canola oil (or clarified butter, or your clarified butter/canola oil blend) in a nonstick or cast-iron skillet over medium-high heat until the oil just begins to smoke lightly. This high heat is essential for a perfect, flavorful crust.
- Carefully place the seasoned chicken into the smoking hot skillet, listening for that satisfying sizzle.
- Cook the chicken until it is golden brown, almost black, on both sides and cooked through, usually taking approximately 5 minutes on each side. The Maillard reaction will create complex flavors and that signature crust.
- For food safety, always ensure your chicken reaches an optimal internal temperature of 165°F (74°C) using a meat thermometer.
- Once the chicken is perfectly cooked, remove it from the skillet and immediately cover it loosely with an aluminum foil tent.
- Let it rest for 10 minutes; this allows the juices to redistribute throughout the meat, ensuring every bite is moist and flavorful.
Notes
Printable Recipe Card
Want just the essential recipe details without scrolling through the article? Get our printable recipe card with just the ingredients and instructions.