Skip to content
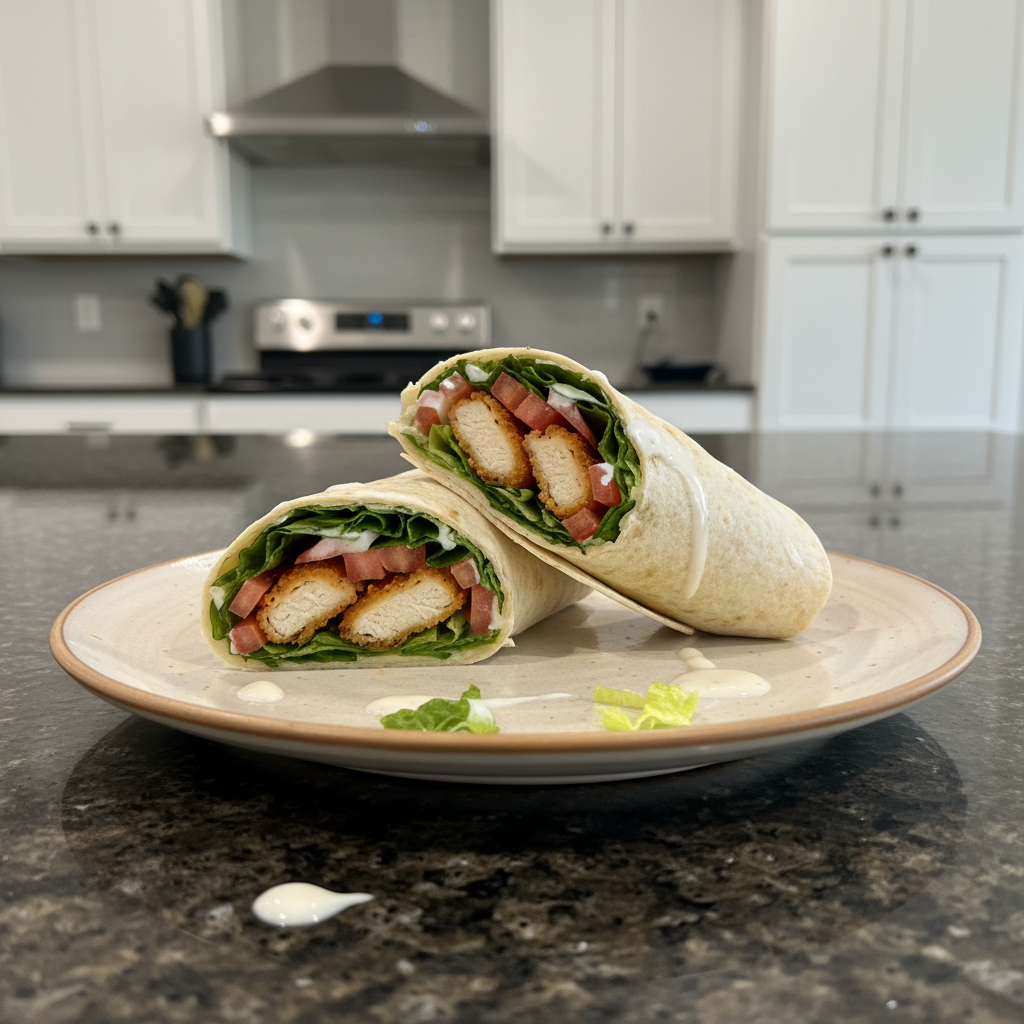
 In my kitchen, delicious meals don’t have to be complicated, and these ultimate crispy chicken wraps are a testament to that philosophy. Whether you’re a seasoned home cook looking for a new staple or just starting your culinary journey, this recipe is designed to deliver maximum flavor with minimal fuss. I’ll share my secret to avoiding soggy wraps and packing them perfectly for any occasion, ensuring every bite is satisfyingly crunchy and fresh. Get ready to elevate your lunch game!
Why You’ll Love This Crispy Chicken Wrap Recipe
I’ve refined this recipe over countless lunch experiments, and I’m thrilled to share the game-changer that makes these crispy chicken wraps truly stand out:
- The Secret to Truly Crispy Wraps: My unique twist involves lightly toasting the flour tortilla before assembling. Briefly heating the tortilla in a dry pan for about 30 seconds per side over medium heat removes residual moisture. This crucial step initiates a mild Maillard reaction, yielding a beautiful golden-brown surface and a superior texture that prevents that ‘raw’ tortilla taste. It also makes the tortilla incredibly pliable and less prone to tearing, which is essential for a perfectly rolled wrap.
- Quick & Convenient: These wraps are perfect for busy weeknights, effortless school lunch ideas, or a speedy office meal. They come together in minutes once your chicken is cooked!
- Satisfying & Protein-Rich: Packed with delicious chicken strips, these wraps are a fantastic way to enjoy a hearty, high-protein lunch that keeps you full and energized.
- Customizable: This recipe is a fantastic base for creativity. Easily adapt it with different sauces, cheeses, and vegetables to suit your taste or what you have on hand.
- Prevents Soggy Lunches: Thanks to my toasting secret and proper packing techniques, you can say goodbye to the common problem of soggy wrap syndrome, ensuring a fresh meal every time.
Ingredients Needed for Crispy Chicken Wraps

Here’s exactly what you’ll need to create these incredible crispy chicken wraps. Simple, fresh, and delicious!
- 1 large flour tortilla
- 2 green lettuce leaves
- 2 slices tomato
- 2 chicken strips, cooked
- 1 tablespoon Ranch dressing
Ingredient Notes & Smart Substitutions
- Flour Tortillas: I recommend using a large, burrito style flour tortilla for easier rolling and a more substantial wrap. Remember, the key to its crispness and pliability is the toasting step – it’s a difference you can truly taste and feel!
- Chicken Strips: You have options here! Feel free to use store-bought cooked chicken strips, prepare your own homemade chicken strips, or even use leftover cooked chicken. Chicken nuggets are also a fun, kid-friendly substitute. This recipe makes for an excellent high-protein lunch.
- Ranch Dressing: A classic choice for a reason! However, if you’re packing this for school lunch, remember my tip: go light on the dressing if packing this for school to prevent a soggy wrap. You can always pack extra on the side.
- Lettuce & Tomato: The lettuce leaves aren’t just for crunch and nutrition; they act like a vital barrier preventing the tortilla from absorbing moisture from the tomato slices, which is a common cause of sogginess. For best results, always pat your washed veggies dry before adding them to the wrap.
- Dietary Adaptations: For those with dietary restrictions, feel free to swap in gluten-free tortillas or a dairy-free dressing alternative without compromising on flavor.

How to Make the Best Crispy Chicken Wraps (Step-by-Step)
Get ready for a flavor explosion! Here’s my detailed guide to making perfect crispy chicken wraps every single time, incorporating my essential toasting technique.
Step 1: Prep Your Crispy Chicken
If you’re going to enjoy your crispy chicken wraps right away, you’ll want to ensure your chicken strips are perfectly warmed and crispy. Reheat them in the microwave for about a minute, in the oven at 350F for 10 minutes, or in your air fryer at 350F for 6 minutes to ensure truly crispy tenders. If you’re packing this as a cold lunch ideas, make sure the chicken is fully cooled before assembly.
Step 2: The Secret to a Perfectly Toasted Tortilla (The Unique Twist!)
This is where the magic happens! Lightly toast your flour tortilla in a dry pan over medium heat for about 30 seconds per side. You’ll notice it becoming slightly golden-brown, pliable, and wonderfully aromatic. This brief heating removes excess moisture and kickstarts the Maillard reaction, which is simply the browning process that creates complex flavors and that delightful, subtle crispness, making it less prone to tearing when you roll it.
Step 3: Assemble Your Wrap
Lay the perfectly toasted flour tortilla flat on a clean surface. Begin by creating your moisture barrier: place the lettuce leaves in the center of the tortilla, followed by the vibrant tomato slices on top. Now, arrange your warm or cool cooked chicken strips over the tomatoes. Finally, drizzle with your chosen Ranch dressing. Remember my pro tip: go light on the dressing if packing this for school to prevent a soggy wrap. You can always pack a small lidded container with extra dressing on the side for later!
Step 4: Fold and Serve
To create a firm, well-packed wrap, fold the sides in and roll the wrap burrito style tightly from the bottom up. You should feel the fillings compress neatly inside. Slice your finished wrap in half for easy handling and enjoy immediately, or get it ready for packing.
Step 5: Pack for Lunch (If Applicable)
If you’re preparing this for school lunch or office, pair your crispy chicken wraps with delicious sides. Add fresh fruit and veggies as sides inside separate lunch containers or compartments of the lunch box. Refrigerate the lunch until you’re ready to pack it inside an insulated bag for school. Include an ice pack if necessary to keep everything cool and fresh until lunchtime.
Customizing Your Crispy Chicken Wraps & Beyond
One of the best things about crispy chicken wraps is their incredible versatility! Let’s explore how you can elevate your fillings and even master homemade chicken strips.
Elevate Your Fillings: Sauces, Cheeses & Veggies
- Sauces & Dressings: While Ranch dressing is a classic, don’t be afraid to go beyond Ranch! Experiment with honey mustard, a tangy buffalo sauce, sweet BBQ sauce, spicy sriracha mayo, or even a simple lemon-herb vinaigrette. Each sauce can completely transform the flavor profile of your crispy chicken wraps.
- Cheese Please! Add a layer of cheesy goodness with my favorite cheese recommendations like shredded cheddar, creamy mozzarella, savory Monterey Jack, or zesty pepper jack for an extra kick. If you’re serving your wraps warm, the cheese will melt beautifully into the other fillings.
- Vibrant Veggies: Boost the nutrition and crunch factor with additional vegetable filling ideas. I love adding finely sliced cucumber, colorful bell peppers (red, yellow, or orange), finely shredded carrots, thinly sliced red onion, fresh spinach, or even sweet corn. These additions bring wonderful color, texture, and vitamins to your wraps.
Mastering Your Own Crispy Chicken Strips
Making your own homemade chicken strips is easier than you think and allows you to control the ingredients! Here’s a simple method:
- Prep the Chicken: Cut boneless, skinless chicken breast into even strips.
- Breading Station: Set up three shallow dishes. One with seasoned flour (salt, pepper, paprika), one with whisked eggs, and one with panko breadcrumbs (for extra crunch) or regular breadcrumbs.
- Coat: Dredge each chicken strip in flour, then egg, then breadcrumbs, ensuring an even coating.
- Cook for Optimal Crispness:
- Air Fryer: Spray lightly with oil and cook at 375°F (190°C) for 10-15 minutes, flipping halfway, until golden and cooked through.
- Oven: Bake on a wire rack set over a baking sheet at 400°F (200°C) for 15-20 minutes, flipping halfway.
- Pan-Frying: Heat about 1 inch of oil in a skillet over medium-high heat. Fry strips for 3-5 minutes per side until golden brown and cooked through.
- Enjoy your perfectly crispy chicken in your wraps, or serve them like chicken nuggets!
Pro Tips & Troubleshooting for Perfect Wraps Every Time
Achieving the perfect crispy chicken wraps isn’t just about the ingredients; it’s about technique. Here are my expert tips and common pitfalls to avoid.
Pro Tips for Success
- Perfectly Toasted Tortillas: As I emphasized, lightly toasting your flour tortilla in a dry pan is paramount. This not only enhances flavor and gives it that sought-after subtle crispness but also significantly increases its pliability, preventing tearing during the rolling process.
- Moisture Control is Key: To keep your wraps from becoming a soggy wrap, remember that the lettuce acts like a barrier against moisture from tomato slices and dressings. Always pat your washed vegetables completely dry before adding them to the wrap.
- Mastering the Roll: For a wrap that holds together beautifully and doesn’t end up falling apart, the rolling technique is crucial. Lay your fillings in the center, fold in the two shorter sides snugly, then roll tightly from the bottom up in a neat, burrito style fashion.
- Meal Prep Smart: If you’re using these for meal prep or packing for school lunch, always go light on the dressing if packing for school. Better yet, pack extra dressing in a small lidded container separately to maintain the wrap’s crispness and freshness until it’s time to eat.
- Optimal Chicken Crispness: If you’re serving your wraps warm, a quick reheat of your chicken strips (using the microwave, oven, or air fryer methods mentioned earlier) just before assembly will ensure you get that delightful crispy chicken texture.
Common Mistakes to Avoid
- Over-Dressing: This is a major culprit for a soggy wrap. Using too much dressing when packing for school can lead to a soggy wrap, especially if it sits for a few hours. Less is more, or pack it on the side!
- Cold Tortillas: Attempting to roll a cold tortilla is a common mistake. Cold tortillas are stiff, inflexible, and much more prone to tearing. Always warm or toast your tortillas first for perfect pliability.
- Overfilling: While tempting, cramming too many fillings into your wrap will make it impossible to roll tightly and neatly. It’s a surefire way to have your wrap end up falling apart. Balance is key.
- Improper Layering: Placing watery ingredients directly against the tortilla without a protective barrier (like lettuce) is a recipe for a soggy disaster. Always start with a sturdy layer to absorb any excess moisture.
Serving & Storage Suggestions
These crispy chicken wraps are incredibly versatile, perfect for enjoying right away or packing for later. Here’s how to serve them best and keep them fresh.
Delicious Serving Ideas
- Complete Meals: I love to round out these crispy chicken wraps by serving them with fresh, vibrant sides. Serve with fresh fruit and veggies as sides, like crisp carrot sticks, sweet apple slices, juicy grapes, or crunchy bell pepper strips. A small cup of yogurt or a handful of pretzels also makes a great accompaniment.
- For Home or On-the-Go: Enjoy your wraps warm at home right after making them, or they’re perfectly suited to be packed cold for school/office lunch. If packing, use good quality lunch containers or an insulated bag with an ice pack to keep everything cool and delicious.
- Flavor Combinations: For a more varied meal, consider pairing your wraps with a light soup or a fresh green salad.
Storage and Make-Ahead Tips
- Make-Ahead Strategy: “Can crispy chicken wraps be made ahead of time?” Absolutely! To avoid a soggy wrap, my best advice is to assemble the wraps without the dressing. Cook your chicken strips and chop all your veggies ahead of time, storing them separately in airtight containers in the refrigerator. When it’s time to eat, simply assemble, add dressing, and enjoy. Pack dressing in a small separate container if taking on the go.
- Refrigerator Storage: For pre-made wraps (without dressing), I recommend storing them in an airtight container in the refrigerator for up to 1-2 days. If your wrap is fully dressed, it’s best consumed within 4-6 hours to prevent sogginess. Utilizing quality lunch containers will significantly help maintain freshness.
- Reheating Prepared Wraps: If you’ve stored your wraps in the refrigerator, you can let them come to room temperature for about 15-20 minutes before eating. If you prefer a slightly warm wrap, a quick 10-15 second blast in the microwave can do the trick, but be careful not to overheat and soften the tortilla too much.
Adaptations for All Ages & Needs
- Kid-Friendly Versions: “Clarification on appropriate serving sizes for different age groups (e.g., for kids vs. adults)” is important. For little ones, use smaller tortillas, cut the wraps into fun pinwheels, and opt for milder dressings or just a touch of cream cheese. These make excellent, easy-to-eat school lunch options.
- Adult Portions & Variations: For adults, feel free to load up your wrap with extra chicken strips for a more substantial high-protein lunch. Experiment with spicier sauces, more complex veggie blends, or even a sprinkle of crumbled feta. Keep in mind general nutritional considerations like calories, protein, carbohydrates, and fat when customizing.
Conclusion: Your New Favorite Crispy Chicken Wrap!
There you have it – the ultimate guide to creating incredible crispy chicken wraps! My unique twist of toasting the flour tortilla is truly a game-changer, guaranteeing a pliable, subtly crunchy exterior that perfectly complements the savory crispy chicken filling. This recipe proves that making delicious, satisfying meals can be both easy and rewarding, whether you’re planning for meal prep or whipping up a quick lunch.
I encourage you to try this recipe, experiment with the customization ideas, and make it your own. Say goodbye to boring lunches and hello to your new favorite go-to! I’d love to hear your thoughts and variations in the comments below, or check out my other cold lunch ideas for more inspiration.
Crispy Chicken Wraps FAQ
Q: How to prevent soggy chicken wraps for school lunch?
To prevent a soggy wrap for school lunch, make sure your vegetables are patted dry. Use the lettuce as a barrier preventing the tortilla from absorbing moisture from the tomato. Toast your tortilla beforehand to remove excess moisture and make it more pliable. Most importantly, go light on the dressing if packing for school, or even better, pack it in a separate small lidded container to add just before eating.
Q: Can crispy chicken wraps be made ahead of time?
Yes, crispy chicken wraps can be made ahead of time with a few strategic steps. Prepare and cook your chicken strips and chop all your vegetables, storing them separately. Assemble the wrap (including your toasted tortilla!) just before you’re ready to eat or pack it for the next day, but hold off on adding the dressing until serving to prevent a soggy wrap. Store assembled wraps without dressing in an airtight container for up to 1-2 days in the refrigerator.
Q: What are the best chicken options for a crispy chicken wrap?
For crispy chicken wraps, I recommend using cooked chicken strips, whether homemade (breaded and fried/air-fried) or frozen, pre-cooked varieties. You can also use leftover roast chicken or even chicken nuggets as a fun alternative. The key is to ensure the chicken is perfectly cooked and, if serving warm, reheated to maintain its crispness.
Q: Should the chicken be hot or cold in a lunch wrap?
For packed lunches, the chicken in a crispy chicken wrap is typically enjoyed cold. However, if you’re eating it immediately at home, you can reheat your chicken strips in the microwave, oven, or air fryer to ensure they are warm and extra crispy tenders just before assembling your wrap.
Q: What are some delicious side dishes for crispy chicken wraps?
For light and satisfying cold lunch ideas, I love to serve with fresh fruit and veggies as sides for crispy chicken wraps. Think carrot sticks, bell pepper strips, apple slices, grapes, or a small container of berries. A small bag of pretzels or a cup of yogurt also pairs wonderfully.
Q: How can I make the tortilla for my crispy chicken wrap extra crispy?
The secret to an extra crispy tortilla for your crispy chicken wraps is toasting it! Simply heat a dry pan over medium heat and lightly toast your flour tortilla for about 30 seconds per side. This process removes moisture, initiates the Maillard reaction for a golden hue and rich flavor, and makes the tortilla more pliable and less prone to tearing. It’s a game-changer!
Q: How do I prevent my wrap from falling apart?
To prevent your wrap from falling apart, make sure not to overfill it. Use a pliable, toasted tortilla (as stiff, cold tortillas tear easily). Lay your fillings in the center, fold in the two shorter sides snugly, then roll tightly from the bottom up in a neat, burrito style fashion. A firm, even roll makes all the difference.
Q: What are some other flavor combinations for chicken wraps?
Beyond the classic Ranch dressing, you can explore many other flavor combinations for your crispy chicken wraps! Consider honey mustard, buffalo sauce, BBQ sauce, sriracha mayo, or a vibrant vinaigrette. For fillings, add shredded cheddar or pepper jack cheese, and additional vegetables like cucumber, bell peppers, shredded carrots, or spinach for extra crunch and nutrition.
Ultimate Crispy Chicken Wraps: Your Go-To Recipe for Lunch & Dinner
Ingredients
Equipment
Method
- Ensure your chicken strips are perfectly warmed and crispy. Reheat them in the microwave for about a minute, in the oven at 350F for 10 minutes, or in your air fryer at 350F for 6 minutes. If packing as a cold lunch, ensure the chicken is fully cooled.
- Lightly toast your flour tortilla in a dry pan over medium heat for about 30 seconds per side until slightly golden-brown, pliable, and aromatic. This removes excess moisture and kickstarts the Maillard reaction for subtle crispness and prevents tearing.
- Lay the toasted tortilla flat. Place the lettuce leaves in the center as a moisture barrier, followed by the tomato slices and warm or cool cooked chicken strips. Drizzle with Ranch dressing, going light if packing for school, or pack extra on the side.
- Fold the sides in and roll the wrap tightly burrito-style from the bottom up to compress fillings neatly. Slice in half for easy handling and enjoy immediately, or prepare for packing.
- If packing for school or office, pair your wraps with fresh fruit and veggies as sides in separate lunch containers. Refrigerate until ready to pack in an insulated bag with an ice pack to keep it cool and fresh.
Notes
Printable Recipe Card
Want just the essential recipe details without scrolling through the article? Get our printable recipe card with just the ingredients and instructions.