Skip to content
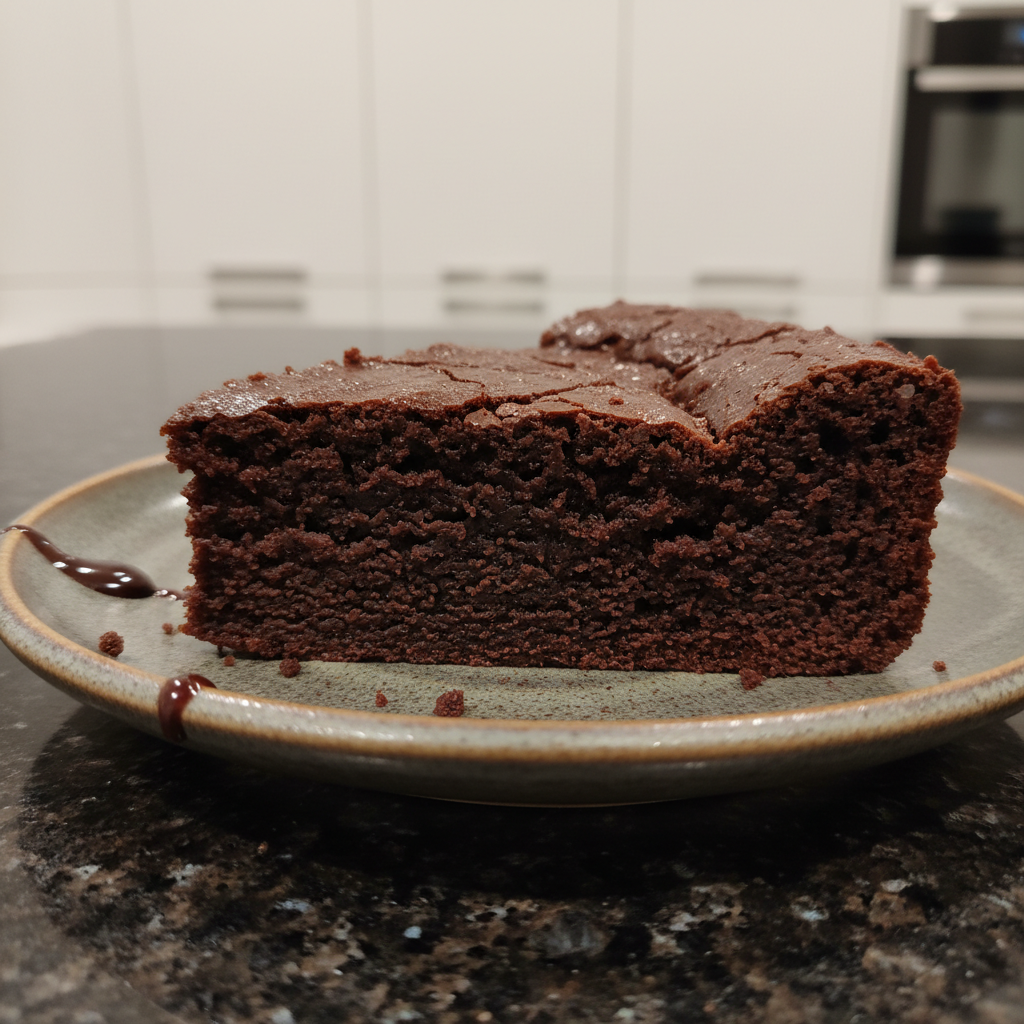
 As a professional chef and avid home baker, I’m always looking for creative ways to minimize waste and elevate classic recipes. If you’re like me, a thriving sourdough starter means a steady supply of sourdough discard. And what better way to use it than in the most decadent, fudgy sourdough discard brownies you’ve ever tasted? This recipe promises not just an incredibly rich sweet treat to satisfy all your chocolate cravings, but also features a gorgeous shiny crackly top and a unique twist that sets it apart. Prepare to impress everyone with these truly special brownies!
Why You’ll Love This Recipe
There are brownies, and then there are *these* brownies. I’ve refined this brownie recipe to deliver everything you crave in a classic, plus a sophisticated flourish you won’t soon forget.
- The Unique Flaky Sea Salt Twist: Just before baking, a generous sprinkle of high-quality flaky sea salt transforms these from great to extraordinary. It provides a delightful textural crunch and a powerful contrast that brightens and deepens the rich chocolate flavor, creating a truly gourmet experience.
- Irresistibly Fudgy & Chewy: My sourdough discard brownies boast a dense, moist, and utterly fudgy interior that melts in your mouth. They’re perfectly chewy without being tough.
- Beautiful, Shiny Crackly Top: With specific mixing techniques, you’ll achieve that coveted, professional-looking, shiny crackly top that signals a perfectly baked brownie every time.
- Clever Use for Sourdough Discard: This recipe is a delicious and intelligent way to utilize your sourdough discard, adding a subtle depth of flavor without any overt sourness, and helping you reduce food waste.
- Easy & Approachable: Despite the impressive outcome, this brownie recipe is straightforward and accessible for any home baker, making gourmet results achievable in your own kitchen.
Ingredients Needed

Gather your ingredients, and let’s get ready to bake some magic. Precision here makes all the difference!
- 8 tablespoons unsalted butter
- 12 oz. semi sweet chocolate chips
- 1/2 cup dutched cocoa powder (or regular cocoa powder)
- 2 teaspoons vanilla extract
- 2 large eggs
- 1 egg yolk
- 1 cup granulated sugar
- 1/2 cup dark brown sugar
- 1/2 cup sourdough starter discard
- 1 cup all-purpose flour
- 1 teaspoon salt
Ingredient Notes & Substitutions
Understanding your ingredients is key to successful baking. Here’s what you need to know:
- Sourdough Discard: For this specific brownie recipe, I recommend using unfed, 100% hydration sourdough discard straight from the fridge. Its purpose here is not leavening but to contribute moisture for a fudgy texture and a subtle, complex tang that enhances the chocolate flavor without making the brownies taste sour. An active starter isn’t necessary.
- Cocoa Powder: Dutched cocoa powder provides a darker color and a smoother, less acidic chocolate flavor. You can certainly use regular cocoa powder if that’s what you have, but note that the brownies might be slightly lighter in color and have a subtly different, more intense chocolate profile.
- Chocolate Chips: Opt for good quality semi sweet chocolate chips. If you prefer a richer, darker brownie, you can substitute with dark chocolate chips.
- Sugars: Both granulated sugar and dark brown sugar play crucial roles. Granulated sugar contributes to the structure, crispness, and the essential shiny crackly top, while dark brown sugar adds moisture, chewiness, and a deeper, more complex flavor. Using both creates the ideal balance.
- Flour: All-purpose flour is my choice for achieving that dense, fudgy, and chewy texture. Avoid cake flour or self-rising flour, as they can result in a softer, more cake-like brownie, which isn’t our goal here.
- Butter: I always recommend unsalted butter so you can control the overall salt content of your brownies, especially since we’re adding flaky sea salt at the end.
- Flaky Sea Salt: This is our star! Don’t skip it. High-quality flaky sea salt provides a textural contrast and a flavor burst that really makes the chocolate sing. It’s not just for saltiness, but for a unique, irresistible finish.
- Dietary Substitutions: For dairy-free brownies, simply swap the unsalted butter for a plant-based butter alternative and use dairy-free chocolate chips. For gluten-free brownies, a 1:1 gluten-free baking blend designed for cakes and brownies can be used, though be aware that the texture might be slightly altered.

How to Make Sourdough Discard Brownies
Follow these steps closely for the ultimate fudgy sourdough discard brownies!
1. Prep the Pan & Oven
Preheat your oven to 350°F (176°C). Prepare a 9″ x 9″ baking dish by lining it with parchment paper, leaving an overhang on two sides to create a convenient ‘sling.’ This makes lifting the cooled brownies out of the pan incredibly easy and ensures clean, perfect squares.
2. Melt Chocolate Mixture
In a small saucepan, melt the unsalted butter over low heat. Once melted, remove from the burner and add the semi sweet chocolate chips, vanilla extract, and dutched cocoa powder. Stir these ingredients continuously until the chocolate chips have melted completely and the mixture is smooth and glossy. This ‘blooming’ of the chocolate on the stovetop helps to enhance its deep, rich flavor. Set the saucepan aside to cool down slightly while you prepare the wet ingredients.
3. Beat Eggs & Sugars for Shine
In a large mixing bowl, combine the large eggs, egg yolk, dark brown sugar, and granulated sugar. Using an electric mixer, beat this mixture for a full 7-10 minutes. This crucial step incorporates air and creates a light, airy, almost meringue-like texture, which is vital for achieving that beautiful, shiny crackly top on your brownies.
4. Incorporate Wet Ingredients
Gently add the sourdough starter discard and the slightly cooled chocolate mixture to your beaten egg and sugar mixture. Beat on low speed with the electric mixer until just combined. Be careful not to overmix or deflate the airy egg mixture you worked so hard to create.
5. Fold in Dry Ingredients
Add the all-purpose flour and salt to the bowl. Switch to a spatula and stir until the flour is *just* combined. The batter will be very thick. Avoid overmixing at this stage, as it can develop too much gluten and lead to tough, cakey brownies rather than the desired fudgy texture.
6. Bake with the Unique Twist
Pour the thick batter evenly into your prepared 9″ x 9″ baking dish and smooth the top with your spatula. Now for the unique twist: generously sprinkle the top of the batter with flaky sea salt before placing it in the oven. Bake for 35-40 minutes. The brownies are done when the edges are set and a toothpick inserted into the center comes out with moist crumbs, not wet batter. They should still appear slightly underbaked in the very center with a minimal wobble, as they will continue to set as they cool.
7. Cool Completely & Cut
Once out of the oven, it’s absolutely crucial to allow the brownies to cool completely in the pan. This patience is key to achieving the fudgiest texture and ensuring clean, neat cuts. The irresistible aroma during this cooling time will test your willpower! Once fully cooled, use the parchment paper sling to lift the entire slab of brownies from the pan and cut into desired squares.
The Science of Sourdough Brownies & Perfecting Your Bake
Let’s dive a little deeper into why these sourdough discard brownies are so special and how to guarantee perfect results every time.
The Sourdough Discard Advantage: Texture & Flavor
In this recipe, sourdough discard isn’t about leavening; it’s a secret weapon for extraordinary texture and flavor. The liquid content of the discard adds crucial moisture, contributing significantly to the brownies’ incredibly fudgy texture. Its slight acidity also tenderizes gluten development in the flour, resulting in a softer, chewier crumb compared to brownies made without it. Most importantly, the discard imparts a nuanced, slightly tangy complexity that deepens the chocolate flavor, adding a gourmet dimension without any overt sourness.
Mastering Brownie Doneness & Oven Accuracy
Knowing when your brownies are perfectly done is an art. Look for brownies with set edges but a center that still appears slightly underbaked and has a minimal wobble. A toothpick inserted should come out with moist crumbs, not wet batter. This “slightly underbaked” appearance is key, as residual heat will continue to cook them as they cool, leading to that ultimate fudgy texture. Over-baking is the quickest way to dry, cakey brownies. Remember, oven calibration is also critical. Oven temperatures can vary significantly, so using an oven thermometer ensures your baking temperature is accurate. This prevents inconsistent baking times and helps avoid dry or undercooked results.
Pro Tips & Troubleshooting
Here are my top tips for baking success and how to avoid common pitfalls:
Pro Tips for Perfect Brownies
- Measure Accurately with a Kitchen Scale: For truly consistent and professional results, weigh your dry ingredients like all-purpose flour, granulated sugar, and dark brown sugar using a kitchen scale.
- Don’t Rush the Beat: That 7-10 minute beating time for the eggs and sugars isn’t optional. It’s crucial for incorporating enough air to create the stable aeration needed for a gorgeous shiny crackly top and that dense, fudgy texture.
- Bloom Your Chocolate: Taking the time to melt the butter, chocolate, and cocoa powder together on the stovetop helps to ‘bloom’ the cocoa, unlocking and intensifying the depth of chocolate flavor in your brownies.
- The Flaky Sea Salt Finish: Ensure you sprinkle the flaky sea salt evenly over the batter just before baking. This guarantees that every single bite gets that perfect sweet and salty balance.
- Parchment Paper is Your Friend: Always line your baking dish with parchment paper, creating a sling. This makes lifting the cooled brownies out of the pan effortless, ensuring clean edges and simple removal.
- Patience in Cooling: This cannot be stressed enough. Allow your brownies to cool completely for optimal fudginess and to achieve perfectly clean, neat cuts.
Common Mistakes to Avoid
- Over-baking: This is the most common and detrimental mistake. Over-baking will quickly transform your desired fudgy brownies into dry, cakey ones. Trust the doneness cues – slightly underbaked is perfect.
- Overmixing the Batter: Once you add the flour, stir with a spatula until just combined. Overmixing develops too much gluten, leading to tough or cakey brownies instead of a wonderfully chewy texture.
- Cutting Warm Brownies: Resist the urge! Cutting brownies before they are fully cooled will result in messy, crumbly squares and compromises their beautiful fudgy texture.
- Using the Wrong Flour: Stick to all-purpose flour. Using cake flour or self-rising flour will yield a brownie with less structure and a softer, more cake-like texture, deviating from our dense, fudgy goal.
- Not Cooling Properly: Cooling brownies too quickly or in a sealed container can trap steam, negatively affecting the shiny crackly top and overall texture.
Serving & Storage
These sourdough discard brownies are delicious on their own, but here are some ideas to elevate your experience.
Serving Ideas
- Classic & Elegant: Serve the cooled brownies cut into perfect squares, allowing the rich chocolate flavor and the sparkling flaky sea salt to truly shine.
- Warm & Gooey Indulgence: For an extra decadent treat, briefly reheat a brownie in the microwave for 10-15 seconds to enjoy a warm, gooey center.
- Gourmet Pairings: Elevate your dessert with a scoop of creamy vanilla bean ice cream, a luxurious drizzle of high-quality caramel sauce, or a scattering of fresh raspberries or strawberries to cut through the richness.
- Beverage Companions: Pair these rich brownies with a strong cup of coffee, a tall glass of cold milk, or even a glass of robust red wine for a sophisticated evening sweet treat.
Storage and Make-Ahead
- Room Temperature Storage: Once completely cooled, store your sourdough discard brownies in an airtight container at room temperature for up to 3-4 days. This helps maintain their optimal freshness and prevents them from drying out.
- Freezing Instructions: These brownies freeze beautifully! To freeze, wrap individual squares tightly in plastic wrap, then place them in a freezer-safe bag or container. They will keep well for up to 3 months.
- Thawing & Reheating: Thaw frozen brownies at room temperature for a few hours. For a warm, freshly baked feel, reheat thawed brownies briefly in the microwave for 10-15 seconds.
- Make-Ahead Advantage: These brownies are excellent for making ahead. Their flavor and fudgy texture often improve slightly overnight, making them perfect for parties, gifts, or simply for enjoying throughout the week.
Conclusion
There’s immense satisfaction in transforming humble sourdough discard into something truly spectacular. These fudgy sourdough discard brownies, with their irresistible shiny crackly top and the sophisticated crunch of flaky sea salt, are a testament to that. This brownie recipe is designed to be approachable, yet it consistently delivers impressive, gourmet results that will have everyone asking for more, even those new to baking with sourdough discard. I encourage you to try this recipe, experiment with the serving suggestions, and share your delicious creations. Don’t forget to bookmark this recipe for your next chocolate craving, and explore other creative sourdough discard recipes here on my site!
FAQ
Frequently Asked Questions About Sourdough Discard Brownies
How do I know when sourdough brownies are done?
Your sourdough brownies are done when the edges are set and a toothpick inserted into the center comes out with moist crumbs, not wet batter. The center should still have a slight wobble, as they will continue to set as they cool. Avoiding over-baking is key to a fudgy texture, so trust in that carry-over cooking!
What kind of flour is best for fudgy brownies?
All-purpose flour is ideal for achieving the desired dense, fudgy texture in this brownie recipe. Other flours like cake flour are not suitable as they can result in a lighter, more cake-like crumb, which isn’t what we’re aiming for here.
Can I use regular cocoa powder instead of Dutch-processed?
Yes, you can use regular cocoa powder. However, dutched cocoa powder provides a darker color and a smoother, less acidic chocolate flavor. Using regular cocoa powder may result in brownies that are slightly lighter in color and have a more intense, slightly bitter chocolate profile.
Can I adjust the type of sugar in the recipe?
While possible, using both granulated sugar and dark brown sugar is crucial for the optimal balance of chewiness, fudginess, and the coveted shiny crackly top. Granulated sugar aids in crispness and structure, while dark brown sugar contributes moisture and depth. Using only one type would alter the final texture and appearance.
Is parchment paper necessary for baking brownies?
While the brownies will bake without it, parchment paper is highly recommended. It acts as a convenient ‘sling’ to easily lift the cooled brownies from the pan, ensuring perfectly clean edges and simplifying the entire removal and cutting process.
How do I store and freeze sourdough brownies?
Store cooled sourdough brownies in an airtight container at room temperature for up to 3-4 days. To freeze, wrap individual squares tightly in plastic wrap, then place them in a freezer-safe bag or container for up to 3 months. Thaw frozen brownies at room temperature, or briefly microwave for a warm treat.
How can I make sourdough brownies less rich?
To make sourdough brownies less rich, you could slightly reduce the quantity of semi sweet chocolate chips, or opt for a chocolate with a lower cocoa percentage. Pairing them with tart elements like fresh raspberries or a dollop of unsweetened whipped cream can also help balance the richness.
What kind of sourdough discard should I use in this recipe?
For this recipe, unfed, 100% hydration sourdough discard straight from the fridge is perfect. Its purpose is to add moisture and a subtle tang for flavor and texture, not for leavening, so an active or freshly fed starter is not necessary.
Fudgy Sourdough Discard Brownies with Flaky Sea Salt
Ingredients
Equipment
Method
- Preheat your oven to 350°F (176°C). Prepare a 9" x 9" baking dish by lining it with parchment paper, leaving an overhang on two sides to create a convenient 'sling.'
- In a small saucepan, melt the unsalted butter over low heat. Once melted, remove from the burner and add the semi sweet chocolate chips, vanilla extract, and dutched cocoa powder. Stir these ingredients continuously until the chocolate chips have melted completely and the mixture is smooth and glossy. Set the saucepan aside to cool down slightly.
- In a large mixing bowl, combine the large eggs, egg yolk, dark brown sugar, and granulated sugar. Using an electric mixer, beat this mixture for a full 7-10 minutes until it creates a light, airy, almost meringue-like texture.
- Gently add the sourdough starter discard and the slightly cooled chocolate mixture to your beaten egg and sugar mixture. Beat on low speed with the electric mixer until just combined. Be careful not to overmix or deflate the airy egg mixture.
- Add the all-purpose flour and salt to the bowl. Switch to a spatula and stir until the flour is *just* combined. The batter will be very thick. Avoid overmixing at this stage.
- Pour the thick batter evenly into your prepared 9" x 9" baking dish and smooth the top with your spatula. Generously sprinkle the top of the batter with flaky sea salt. Bake for 35-40 minutes. The brownies are done when the edges are set and a toothpick inserted into the center comes out with moist crumbs, not wet batter.
- Once out of the oven, allow the brownies to cool completely in the pan. Once fully cooled, use the parchment paper sling to lift the entire slab of brownies from the pan and cut into desired squares.
Notes
Printable Recipe Card
Want just the essential recipe details without scrolling through the article? Get our printable recipe card with just the ingredients and instructions.