Skip to content
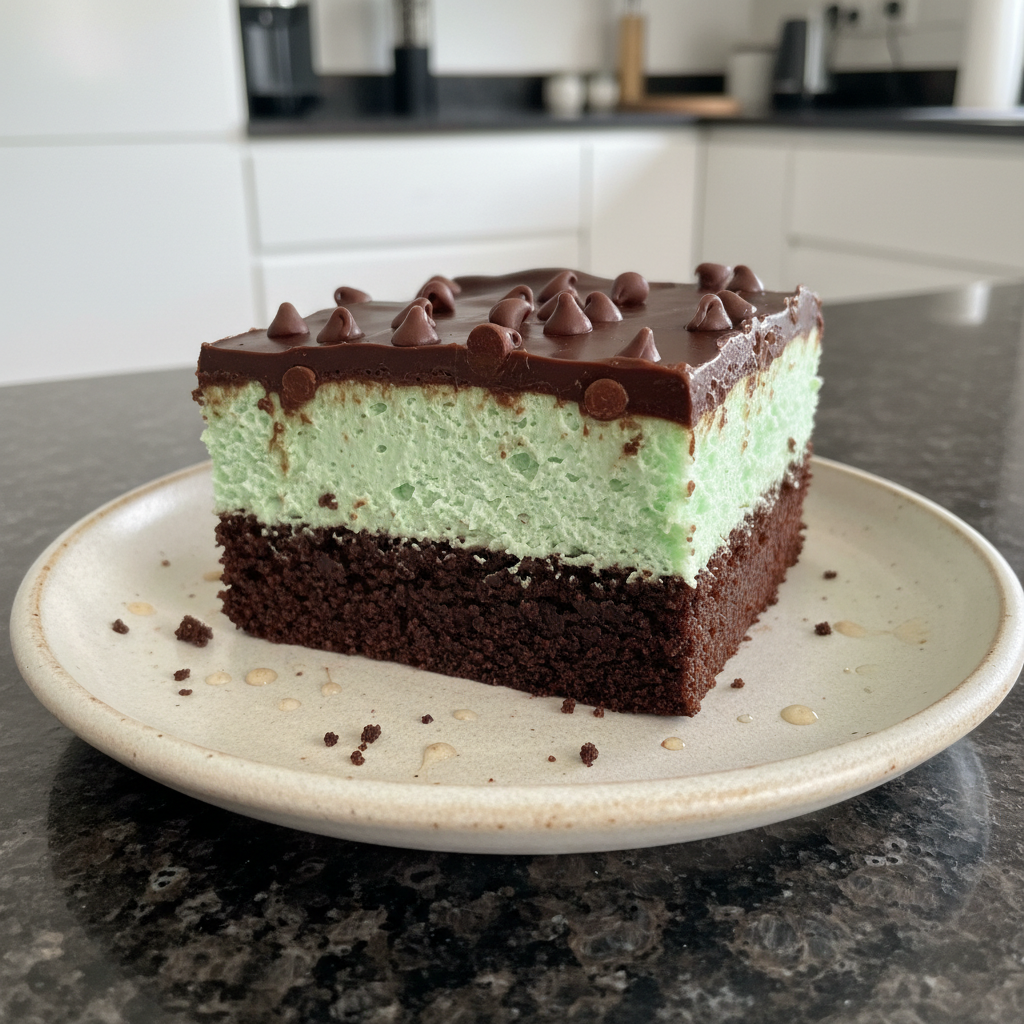
 Welcome to my kitchen, fellow dessert lovers! Today, I’m thrilled to share a recipe that combines two of the world’s most beloved flavors into one utterly irresistible treat: chocolate and mint. These aren’t just any ordinary mint brownies; they are a masterpiece of fudgy indulgence, featuring distinct layers and a show-stopping twist. Whether you’re a seasoned baker looking for a new challenge or a beginner eager to master the art of homemade brownies, you’re in the right place. Get ready to bake the most decadent, perfectly fudgy, and visually stunning layered mint brownies you’ve ever tasted, complete with expert tips for baking success.
Why You’ll Love This Recipe
As a professional chef and a devoted chocolate enthusiast, I’ve spent years perfecting classic recipes. With these layered mint brownies, I wanted to create something truly special, elevating the familiar into an extraordinary dessert experience.
* The Ultimate Fudgy Texture: My recipe delivers brownies that are incredibly dense, moist, and wonderfully fudgy, never cakey. Each bite melts in your mouth, a testament to the perfect balance of chocolate and sugars.
* A Symphony of Layers: Beyond the rich brownie base, you’ll find a dreamy, creamy mint frosting, crowned with a glossy chocolate ganache. It’s a delightful textural journey with every slice.
* The Unique Twist You Crave: What truly sets these mint brownies apart is the sophisticated touch of a melted white chocolate swirl and a sprinkle of crushed peppermint candy canes integrated directly into the chocolate ganache topping. The white chocolate creates a beautiful visual contrast and adds a complementary creamy sweetness, while the candy canes introduce a delightful crunchy texture and an extra burst of refreshing peppermint flavor.
* Impressive for Any Occasion: From Christmas baking to a vibrant `St. Patrick’s Day treat`, these `layered brownies` are guaranteed to impress. Their layered beauty and complex flavors make them perfect for holiday gatherings or simply a decadent `dessert recipe` to share with loved ones.
Ingredients Needed

Gathering your ingredients is the first step to baking bliss! Here’s exactly what you’ll need for these ultimate `fudgy mint brownies`:
Brownie Base:
- 1 cup (16 Tbsp; 226g) `unsalted butter`
- 8 ounces `semi-sweet chocolate`, coarsely chopped
- 1 and 1/2 cups (300g) `granulated sugar`
- 1/2 cup (100g) packed `light brown sugar`
- 4 `large eggs`, at room temperature
- 2 teaspoons `pure vanilla extract`
- 1/2 teaspoon `salt`
- 1/2 cup + 3 Tablespoons (86g) `all-purpose flour` (spooned & leveled)
- 1/4 cup (21g) `natural unsweetened cocoa powder`
Mint Frosting Layer:
- 1/2 cup (8 Tbsp; 113g) `unsalted butter`, softened to room temperature
- 2 cups (240g) `confectioners’ sugar`
- 2 Tablespoons (30ml) `milk`
- 1 and 1/4 teaspoons `peppermint extract`*
- optional: 1 drop liquid or gel `green food coloring`
Chocolate Ganache Topping:
- 1/2 cup (8 Tbsp; 113g) `unsalted butter`
- 1 heaping cup (around 200g) `semi-sweet chocolate chips`
For the Unique Twist:
- 1-2 ounces melted white chocolate chips (for swirling)
- 1/4 cup crushed peppermint candy canes (for crunch)
Ingredient Notes & Substitutions
Understanding your ingredients is key to successful `baking from scratch`. Here are some pointers to ensure your brownies are nothing short of perfect:
- Chocolate: For the `brownie base`, I specify both `semi-sweet chocolate` (chopped from a bar) and `natural unsweetened cocoa powder`. This combination is my secret to a deep, extra chocolatey flavor. The solid chocolate provides richness and structure, while the cocoa powder intensifies the flavor without adding extra fat. While chocolate chips can be used in the base, coarsely chopped bar chocolate often melts more smoothly and incorporates better into the batter, contributing to a fudgier final `brownie texture`.
- Butter: I always use `unsalted butter` in my recipes. This gives you complete control over the `salt` content, ensuring your baked goods are perfectly seasoned.
- Sugars: This recipe uses a blend of `granulated sugar` and `light brown sugar`. The `granulated sugar` contributes to that classic crinkly top, while the `light brown sugar` is crucial for moisture and a delightfully chewy, `fudgy brownie` texture thanks to its molasses content.
- Flour: Measuring `all-purpose flour` correctly is paramount for avoiding `cakey brownies`. My recipe calls for `\”spooned & leveled\” all-purpose flour`, which I’ll detail further below. This method prevents over-measuring, which can lead to dense or dry brownies by increasing gluten development too much.
- Extracts: Please, whatever you do, use peppermint extract for the `mint frosting`! `Mint extract` can often taste like spearmint toothpaste, which isn’t what we’re going for in a decadent dessert. `Peppermint extract` delivers that pure, refreshing flavor we associate with classic `mint brownies`.
- Food Coloring: The `green food coloring` in the `mint frosting` is entirely optional. It’s purely for aesthetics, giving your `layered brownies` that classic festive look, especially for `St. Patrick’s Day treat` or `Christmas baking`.
- Adaptations: For those with dietary restrictions, these brownies can be adapted. Plant-based butter alternatives can often be swapped 1:1 for the `unsalted butter`. Flax eggs (1 tbsp ground flaxseed + 3 tbsp water per egg) can sometimes replace `large eggs`, though texture may vary. For gluten-free, a 1:1 gluten-free flour blend can often be substituted for `all-purpose flour`, but always check the blend’s recommendations.

How to Make Fudgy Mint Brownies
Baking these `fudgy mint brownies` is a joy, and with my detailed instructions, you’ll achieve perfection every time. Remember, precise timing and careful layering are the secrets to these stunning `layered brownies`!
Prepare the Brownie Base
- Adjust your oven rack to the lower third position and preheat the oven to 350°F (177°C).
- Line the bottom and sides of a `9×13-inch baking pan` with `parchment paper`, leaving an overhang on all sides. This overhang will be your lifter later! Set the prepared pan aside.
- In a `medium saucepan` over medium heat, melt the `unsalted butter` and `semi-sweet chocolate`, stirring constantly, for about 5 minutes until smooth and glossy. Alternatively, you can melt them in a `medium microwave safe bowl` in 20-second increments, stirring after each, until fully melted.
- Remove the melted chocolate mixture from the heat and pour it into a `large mixing bowl`. Allow it to cool slightly for 10 minutes. This prevents the eggs from scrambling when added.
- Once slightly cooled, whisk the `granulated sugar` and `light brown sugar` into the chocolate/butter mixture until well combined.
- Add the `large eggs`, one at a time, whisking vigorously until smooth after each addition. The mixture will become beautifully emulsified and glossy. Whisk in the `pure vanilla extract`.
- Gently fold in the `salt`, `all-purpose flour` (remember, spooned & leveled!), and `natural unsweetened cocoa powder` until just combined. Be careful not to overmix, as this can lead to `cakey brownies` by developing too much `gluten`.
- Pour the rich brownie batter into the prepared `9×13-inch baking pan` and spread evenly.
- Bake for 35-36 minutes, or until the edges of the brownies begin to pull away slightly from the sides of the pan. A `toothpick test` inserted into the center should come out with only a few moist crumbs, not wet batter. All ovens vary, so start checking around 30 minutes.
- Allow the brownies to cool completely in the pan, set on a `wire rack`. This `cooling time` is critical – do not rush it! Once completely cooled, use the `parchment paper` overhang to lift the entire brownie slab out of the pan. Place it, still on the `parchment paper`, onto a `baking sheet` for easier handling as you prepare the next layers. Do not cut the brownies yet.
Craft the Creamy Mint Frosting Layer
- In a `medium mixing bowl` using a `handheld mixer` or `stand mixer` fitted with a `paddle attachment`, beat the softened `unsalted butter` on medium speed until it’s smooth and creamy, about 2 minutes.
- Add the `confectioners’ sugar` and `milk`. Beat on low speed for 2 minutes to incorporate, then increase to high speed and beat for 1 additional minute until light and fluffy.
- Stir in the `peppermint extract` and the optional `green food coloring` (if using) and beat on high for 1 full minute. Taste and add a drop or two more `peppermint extract` if you desire a stronger mint flavor.
- Evenly spread the creamy green `mint frosting` over the completely cooled brownies on the `baking sheet`.
- Place the `baking sheet` with the frosted brownies into the `refrigerator`. This `chilling time` is essential, allowing the `mint frosting` to set firmly on top of the brownies. Chill for at least 1 hour and up to 4 hours. This makes spreading the final chocolate layer much easier and ensures clean layers.
Add the Glossy Chocolate Ganache Topping with the Unique Twist
- For the `chocolate ganache` layer, melt the `unsalted butter` and `semi-sweet chocolate chips` in a `medium saucepan` on medium heat, stirring constantly, for about 5 minutes until smooth and glossy. Alternatively, melt in a `medium microwave safe bowl` in 20-second increments, stirring after each. Combining `chocolate chips` and `butter` this way creates a softer ganache that’s easier to cut later.
- Remove the chilled brownies from the refrigerator. Now for our `Unique Twist`! Drizzle about 1/4 of the melted white chocolate chips randomly over the chilled `mint frosting` layer.
- Immediately pour the main `chocolate ganache` over the mint layer. Gently spread it evenly with a knife or `offset spatula` to create a smooth, beautiful top.
- Before the ganache sets, immediately drizzle the remaining melted white chocolate chips over the chocolate layer. Use a skewer or a thin knife to gently swirl the white chocolate into the ganache, creating stunning patterns.
- Without delay, sprinkle the `crushed peppermint candy canes` evenly over the swirled ganache. The warmth of the ganache will help them adhere.
- Place the brownies, still on the `baking sheet`, back into the `refrigerator`. Chill for at least 1 hour (and up to 4 hours or even overnight) to allow the chocolate topping to fully set.
Slice and Serve
- Once thoroughly chilled and set, remove the brownies from the refrigerator.
- For neat cutting of these `layered brownies`, use a `sharp large knife`. Make very `quick cuts`, pressing straight down, and importantly, wipe the knife off with a paper towel between each slice to ensure clean edges.
- Your `fudgy mint brownies` are now ready! They are perfectly fine at `room temperature` for a few hours. Cover tightly and keep any leftovers in the `refrigerator` for `up to 5 days`.
Demystifying Your Baking: Flour Measurement & Texture Control
Achieving that perfect fudgy texture in brownies comes down to a few key details, and flour measurement is right at the top.
The Art of ‘Spoon & Level’: Accurate Flour Measurement
When a recipe calls for `all-purpose flour`, especially in a precise `baking from scratch` context, how you measure it matters immensely. The “spooned & leveled” method is crucial for this recipe to ensure `fudgy brownies` and avoid a dense or dry result. Here’s how to do it:
- Fluff your flour: Before scooping, use a spoon or whisk to lightly aerate the flour in its container. Flour can settle and become compacted, leading to over-measuring.
- Spoon into cup: Use a spoon to lightly scoop the flour into your dry measuring cup. Do not pack it down.
- Level it off: Once the cup is mounded, use the straight edge of a knife or an `offset spatula` to level off the excess flour. Do not tap the cup or shake it, as this will compact the flour.
This method prevents you from adding too much flour, which is a common culprit for `cakey brownies` because it leads to excessive `gluten development` and a drier crumb.
Fudgy vs. Cakey Brownies: The Flour Ratio
The `flour ratio` is a significant factor in determining `brownie texture`. Generally, less flour results in fudgier brownies, while more flour yields a cake-like brownie. My recipe is carefully crafted with a specific, slightly lower flour content to ensure that deeply rich, dense, and moist `fudgy brownie` consistency that we all adore. Following the “spoon and level” method for `all-purpose flour` ensures you maintain this precise ratio.
Troubleshooting Common Brownie Issues
- Dry or Crumbly Brownies: This is often a sign of `overbaking brownies` or using too much flour (due to incorrect measurement). Always use the `toothpick test` to check for doneness, aiming for moist crumbs, not a clean toothpick.
- Greasy Brownies: Greasy brownies can result from using too much butter, not properly emulsifying the fats and liquids, or cooling them incorrectly in an airtight container where steam gets trapped. Ensure your ingredients are at `room temperature ingredients` for optimal `emulsification` and always cool completely on a `wire rack`.
- Hard or Stiff Ganache: If your `chocolate ganache` topping becomes too hard after chilling, it might be due to incorrect butter to chocolate ratio or chilling for too long. My recipe uses butter to keep it soft and cuttable. If it’s too firm, let the brownies come to `room temperature` for 15-30 minutes before cutting.
Pro Tips & Troubleshooting
Pro Tips
As an experienced chef, I believe that small details make a big difference. Here are my top tips for success with these `layered mint brownies`:
- Rich Chocolate Flavor: Don’t skip the combination of both `natural unsweetened cocoa powder` and solid `semi-sweet chocolate` in the brownie base. This blend provides a complexity and depth of flavor that a single chocolate source simply can’t achieve.
- Moisture & Fudginess: The `light brown sugar` is your secret weapon for incredible moisture and chewiness. Its molasses content is key to that ultimate `fudgy brownie` texture.
- Perfect Peppermint: Always, always use `peppermint extract` over mint extract. The difference is stark; `peppermint extract` gives a clean, refreshing flavor, while mint extract can taste like chewing gum or toothpaste.
- Layer Setting: Patience is a virtue, especially with `layered brownies`. Respect the `cooling time` for the brownie base and the `chilling time` for both the `mint frosting` and the `chocolate ganache`. This ensures each layer sets perfectly, preventing a messy outcome and allowing for clean, distinct slices.
- Clean Cuts: For pristine slices of your `layered brownies`, arm yourself with a `sharp large knife`. Make quick, decisive cuts, and remember to wipe the knife clean with a damp paper towel between each slice. This prevents the layers from smearing.
- Room Temperature Ingredients: For a smoother batter and frosting, ensure your `large eggs` and `unsalted butter` (for the brownie base and frosting) are at `room temperature ingredients`. This allows for better `emulsification` and a more uniform mixture.
- The Unique Twist: When applying the `white chocolate swirl` and `crushed peppermint candy canes`, work quickly after spreading the ganache. The warmth of the ganache will help the white chocolate spread and the candy canes adhere beautifully, creating maximum visual appeal and textural impact.
Common Mistakes to Avoid
Even the best bakers encounter challenges. Here are common pitfalls to steer clear of:
- Overbaking: The number one killer of `fudgy brownies` is `overbaking brownies`. It transforms them into dry, `cakey brownies` rather than the moist, dense squares we’re aiming for. Use the toothpick test as your guide!
- Premature Frosting: Applying the `mint frosting` before the brownie base is completely cooled, or the `chocolate ganache` before the frosting is adequately chilled, will lead to melted, messy layers. Patience is truly rewarded here.
- Wrong Extract: As mentioned, using `mint extract` instead of `peppermint extract` will result in an undesirable flavor profile, more akin to spearmint. Stick to `peppermint extract` for that authentic taste.
- Cutting Too Soon: `Attempting to cut layered brownies before the frosting and chocolate topping have adequately chilled and set` is a recipe for disaster. The layers will slide, smudge, and create an unsightly mess. Allow sufficient `chilling time`.
- Greasy Brownies: While butter adds richness, too much or incorrect mixing can lead to greasy brownies. Ensure `room temperature ingredients` for good `emulsification` and measure accurately.
Serving & Storage
Serving Ideas
These `fudgy mint brownies` are a spectacular dessert recipe on their own, but a few simple additions can elevate the experience even further:
- Optimal Temperature: I recommend serving these `layered brownies` at `room temperature` for the best consistency and flavor. The chocolate will be soft and melt-in-your-mouth, and the mint frosting will be perfectly creamy.
- Classic Pairings: A tall, `cold glass of milk` is a timeless pairing. For an extra indulgent treat, serve a brownie warm (just a few seconds in the microwave!) with a scoop of premium vanilla bean ice cream.
- Occasions: These are truly versatile. They’re an absolute showstopper for `Christmas baking`, their colors perfect for a festive spread. They’re also an ideal `St. Patrick’s Day treat` with their vibrant green layer.
- Garnish: For a professional touch, a small sprig of fresh mint or a dusting of `confectioners’ sugar` can enhance the presentation.
Storage and Make-Ahead
Planning ahead? These `mint brownies` are excellent for preparing in advance!
- Refrigeration: For `storage tips` for leftovers, cover the `mint brownies` tightly with plastic wrap or store them in an airtight container in the `refrigerator`. They will stay fresh for `up to 5 days`.
- Freezing: Yes, `mint brownies` can be frozen for later! For `freezing instructions`, once fully chilled and cut into squares, arrange them in a single layer on a `baking sheet` and flash freeze for about an hour until firm. Then, transfer the frozen squares to an airtight freezer-safe container, separating layers with parchment paper. They can be frozen for up to 2-3 months. Thaw overnight in the refrigerator or at `room temperature` for a few hours before serving.
- Make-Ahead Tips: The beauty of this `layered brownies` recipe is that it benefits from `chilling time`. You can make the brownie base a day ahead, chill it, then add the frosting and ganache the next day. Or, make the entire batch a day or two before your event, allowing ample `chilling time` for perfectly set layers.
Conclusion
There you have it—my ultimate recipe for `fudgy mint brownies` with a delightful `white chocolate swirl` and `peppermint crunch`. This is more than just a dessert; it’s a testament to the magic that happens when classic flavors meet a creative twist. The rich brownie base, creamy mint frosting, and the glossy ganache with its surprising crunch make these `layered brownies` an unforgettable experience. With my detailed instructions and expert tips, even beginner bakers can achieve spectacular results. So, preheat your oven, gather your ingredients, and prepare to bake a batch of brownies that will undoubtedly become a cherished favorite. Don’t forget to print this `dessert recipe` for your collection and share the joy!
FAQ
What is the secret to fudgy mint brownies?
The secret to `fudgy brownies` lies in a few key elements: a balanced ratio of `semi-sweet chocolate` and `natural unsweetened cocoa powder` for deep flavor, the use of `light brown sugar` for moisture and chewiness, and careful attention to baking time. Don’t `overbake brownies`; a `toothpick test` that comes out with a few moist crumbs is the sweet spot for that perfect fudgy texture.
How do you get neat slices on layered mint brownies?
Achieving neat slices on `layered brownies` is all about proper `chilling time` and the right tools. Ensure all layers are thoroughly chilled and set (at least 1-4 hours in the `refrigerator`). Then, use a `sharp large knife`, making `quick cuts` straight down, and importantly, wipe the knife clean with a damp paper towel between each slice. This prevents smearing and ensures clean, distinct layers.
Can I use mint extract instead of peppermint extract?
I strongly recommend using `peppermint extract` for this `mint frosting` recipe. `Mint extract` can often contain spearmint, which can give your brownies a taste reminiscent of toothpaste. `Peppermint extract` provides that classic, refreshing mint flavor that perfectly complements the chocolate.
How long can mint brownies be stored, and can they be frozen?
These `mint brownies` can be stored tightly covered in the `refrigerator` for `up to 5 days`. Yes, they can absolutely be frozen! For `freezing instructions`, flash-freeze individual squares on a `baking sheet` until firm, then transfer to an airtight freezer-safe container for up to 2-3 months. Thaw at `room temperature` or overnight in the fridge.
What size pan should I use for mint chocolate brownies, and can I halve the recipe?
This recipe is designed for a `9×13-inch baking pan`. While you can halve the recipe for a smaller batch, I recommend using an 8×8-inch or 9×9-inch pan and closely monitoring the baking time, as it will likely be reduced (start checking around 25-30 minutes).
How do I know when my brownies are perfectly baked?
To ensure `fudgy brownies`, look for visual cues like the edges pulling away from the sides of the `9×13-inch baking pan`. The most reliable method is the `toothpick test`: insert a toothpick into the center of the brownies. It should come out with a few moist crumbs attached, but no wet batter. A clean toothpick indicates `overbaking brownies` and a `cakey texture`.
What tools are essential for making these brownies?
For these `layered brownies`, you’ll need a `medium saucepan` (or `microwave safe bowl`), a `large mixing bowl`, a `9×13-inch baking pan`, `parchment paper`, a `handheld mixer` or `stand mixer` with a `paddle attachment` for the frosting, a `wire rack` for cooling, a `baking sheet` for chilling, a `sharp large knife` for cutting, and an `offset spatula` for spreading.
Why is brown sugar used in this brownie recipe?
`Light brown sugar` is essential in this `brownie recipe` because its molasses content contributes significantly to the brownies’ moisture, fudginess, and a delightful chewy `brownie texture`. It helps create a softer crumb compared to using only `granulated sugar`.
Is green food coloring necessary for mint brownies?
No, the `green food coloring` for the `mint frosting` is completely optional. It’s purely for visual appeal, especially if you’re making them for festive occasions like `St. Patrick’s Day treat` or `Christmas baking` where the color adds to the theme.
Ultimate Fudgy Mint Brownies with White Chocolate Swirl & Peppermint Crunch
Ingredients
Equipment
Method
- Adjust your oven rack to the lower third position and preheat the oven to 350°F (177°C).
- Line the bottom and sides of a 9x13-inch baking pan with parchment paper, leaving an overhang on all sides. Set the prepared pan aside.
- In a medium saucepan over medium heat, melt the unsalted butter and semi-sweet chocolate, stirring constantly, for about 5 minutes until smooth and glossy. Alternatively, melt them in a medium microwave safe bowl in 20-second increments, stirring after each, until fully melted.
- Remove the melted chocolate mixture from the heat and pour it into a large mixing bowl. Allow it to cool slightly for 10 minutes.
- Once slightly cooled, whisk the granulated sugar and light brown sugar into the chocolate/butter mixture until well combined.
- Add the large eggs, one at a time, whisking vigorously until smooth after each addition. Whisk in the pure vanilla extract.
- Gently fold in the salt, all-purpose flour (spooned & leveled!), and natural unsweetened cocoa powder until just combined. Be careful not to overmix.
- Pour the rich brownie batter into the prepared 9x13-inch baking pan and spread evenly.
- Bake for 35-36 minutes, or until the edges of the brownies begin to pull away slightly from the sides of the pan. A toothpick inserted into the center should come out with only a few moist crumbs. All ovens vary, so start checking around 30 minutes.
- Allow the brownies to cool completely in the pan, set on a wire rack. Once completely cooled, use the parchment paper overhang to lift the entire brownie slab out of the pan. Place it, still on the parchment paper, onto a baking sheet for easier handling. Do not cut the brownies yet.
- In a medium mixing bowl using a handheld mixer or stand mixer fitted with a paddle attachment, beat the softened unsalted butter on medium speed until it’s smooth and creamy, about 2 minutes.
- Add the confectioners’ sugar and milk. Beat on low speed for 2 minutes to incorporate, then increase to high speed and beat for 1 additional minute until light and fluffy.
- Stir in the peppermint extract and the optional green food coloring (if using) and beat on high for 1 full minute. Taste and add a drop or two more peppermint extract if you desire a stronger mint flavor.
- Evenly spread the creamy green mint frosting over the completely cooled brownies on the baking sheet.
- Place the baking sheet with the frosted brownies into the refrigerator. Chill for at least 1 hour and up to 4 hours. This makes spreading the final chocolate layer much easier and ensures clean layers.
- For the chocolate ganache layer, melt the unsalted butter and semi-sweet chocolate chips in a medium saucepan on medium heat, stirring constantly, for about 5 minutes until smooth and glossy. Alternatively, melt in a medium microwave safe bowl in 20-second increments, stirring after each.
- Remove the chilled brownies from the refrigerator. Drizzle about 1/4 of the melted white chocolate chips randomly over the chilled mint frosting layer.
- Immediately pour the main chocolate ganache over the mint layer. Gently spread it evenly with a knife or offset spatula to create a smooth, beautiful top.
- Before the ganache sets, immediately drizzle the remaining melted white chocolate chips over the chocolate layer. Use a skewer or a thin knife to gently swirl the white chocolate into the ganache, creating stunning patterns.
- Without delay, sprinkle the crushed peppermint candy canes evenly over the swirled ganache. The warmth of the ganache will help them adhere.
- Place the brownies, still on the baking sheet, back into the refrigerator. Chill for at least 1 hour (and up to 4 hours or even overnight) to allow the chocolate topping to fully set.
- Once thoroughly chilled and set, remove the brownies from the refrigerator.
- For neat cutting of these layered brownies, use a sharp large knife. Make very quick cuts, pressing straight down, and importantly, wipe the knife off with a paper towel between each slice to ensure clean edges.
- Your fudgy mint brownies are now ready! They are perfectly fine at room temperature for a few hours. Cover tightly and keep any leftovers in the refrigerator for up to 5 days.
Notes
Printable Recipe Card
Want just the essential recipe details without scrolling through the article? Get our printable recipe card with just the ingredients and instructions.