Skip to content
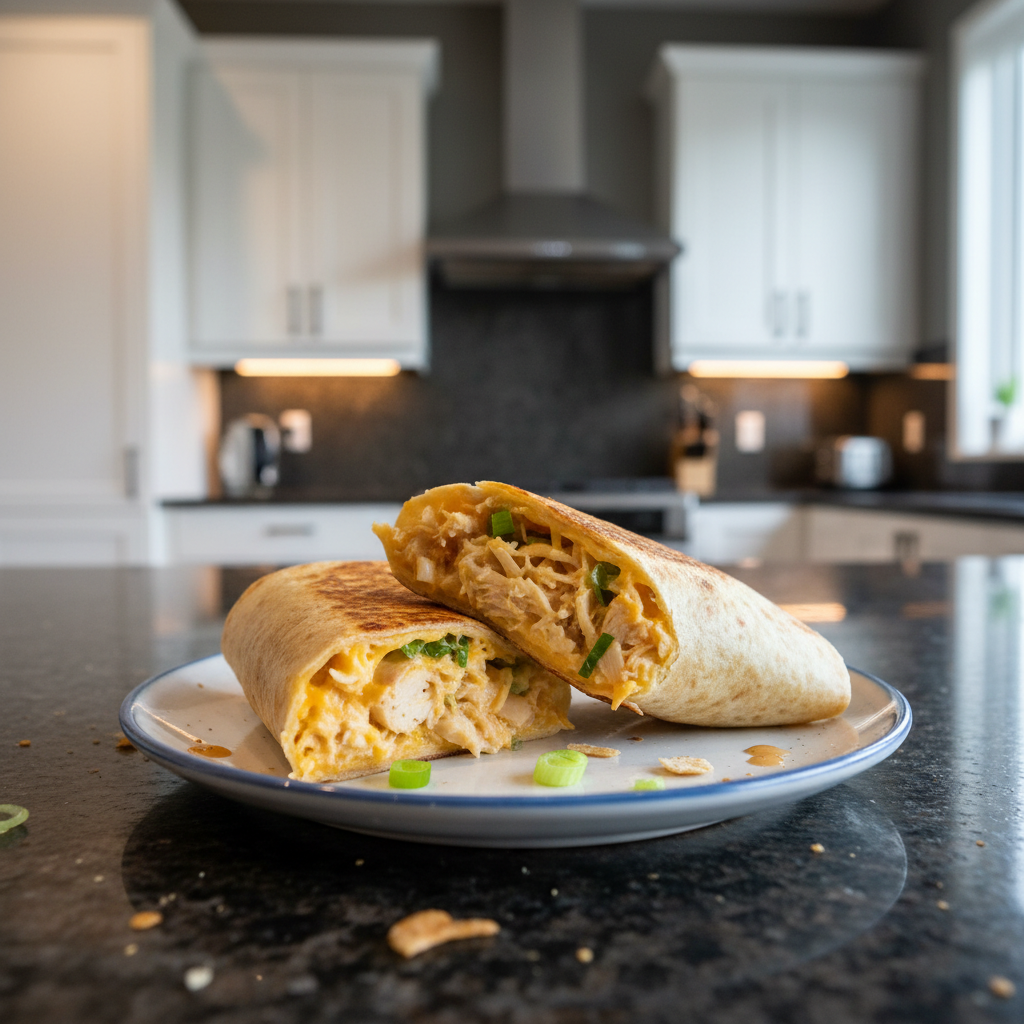
 There’s nothing quite like the comforting crunch of a perfectly pan-fried wrap, especially when it’s bursting with flavor. In my kitchen, these crispy, cheesy garlic chicken wraps have become an absolute staple for those busy weeknights or whenever I crave a satisfying, protein-packed lunch. Forget soggy, bland fillings – this recipe promises a gooey, garlicky interior encased in a golden, irresistible tortilla. Get ready to discover your new favorite easy comfort food, complete with a bright, unexpected flavor twist that makes all the difference!
Why You’ll Love This Recipe
What makes these garlic chicken wraps stand out? It’s all about the unique twist that transforms a simple meal into something truly special. I’ve found that incorporating 1 tablespoon of freshly squeezed lemon juice and 1 teaspoon of finely chopped fresh dill into the chicken mixture elevates the entire experience.
- Bright and Balanced Flavor: The lemon juice provides a vibrant, acidic counterpoint to the rich mayonnaise and gooey cheese. This acidity cuts through the richness, brightening the overall flavor and making each bite feel less heavy, allowing the garlicky chicken to truly sing.
- Herbaceous Depth: Fresh dill introduces a sophisticated herbaceous aroma and flavor that perfectly complements both the chicken and garlic. It adds a layer of freshness that’s truly addictive.
- Quick & Easy: Perfect for busy weeknights, these cheesy chicken wraps come together in minutes, especially if you use pre-cooked chicken.
- High-Protein & Satisfying: Packed with tender chicken, these wraps are a fantastic source of protein, keeping you full and energized.
- Irresistible Texture: Get ready for an incredible sensory experience – a beautifully crispy wrap exterior giving way to a warm, garlicky filling with perfectly gooey cheese.
Ingredients Needed

Gather these simple ingredients to create your delicious wraps:
- 2 large tortillas (regular or low-carb/high-protein)
- 7 oz cooked chicken (about 200 grams, chopped (rotisserie is great))
- 2 garlic cloves (minced or grated (adjust to taste))
- 2 tablespoons light mayonnaise
- 1 tablespoon light Greek yogurt (or plain yogurt)
- 2 teaspoons hot sauce (like Frank’s)
- ¼ teaspoon salt
- 3 oz grated cheese (about 90 grams (I used a cheddar blend))
- 1 green onion (chopped)
- Olive oil spray
Ingredient Notes & Substitutions
- Tortillas: While regular flour tortillas are classic, feel free to experiment! For a lighter option, try low-carb wraps or high-protein tortillas. Gluten-free options are also widely available and work beautifully for dietary needs, though they might have a slightly different texture and browning pattern.
- Cooked Chicken: The convenience of using rotisserie chicken is unmatched for speed. You can also use any pre-cooked chicken breast or thigh you have on hand, simply chopped or shredded.
- Garlic: Two garlic cloves add wonderful flavor. Minced garlic offers a more subtle distribution, while grated garlic provides a more intense burst of flavor. Adjust to your preference!
- Mayonnaise & Yogurt: I opt for light mayonnaise and light Greek yogurt to keep things a bit lighter, but plain yogurt works just as well. For dairy-free versions, use plant-based mayo and yogurt alternatives.
- Hot Sauce: I love the kick from Frank’s RedHot, but any hot sauce you enjoy will work here. Adjust the quantity to your preferred spice level.
- Cheese: A good cheddar blend melts beautifully and delivers fantastic flavor. Monterey Jack, Colby, or a Mexican blend are also excellent choices for that irresistible gooey cheese factor.
- Green Onion: Chopped green onion adds a fresh, mild oniony bite. If you don’t have any, chives or a small amount of finely chopped red onion can be used.
- Our Special Twist: Don’t skip the fresh lemon juice and dill! These two ingredients are truly what elevate these garlic chicken wraps from good to absolutely incredible, providing a vibrant freshness that balances the richness.

How to Make Cheesy Garlic Chicken Wraps
Let’s get cooking! Follow these simple steps for perfectly crispy, cheesy wraps every time.
1. Prepare the Aromatic Filling
In a medium bowl, combine your chopped cooked chicken, minced garlic, light mayonnaise, light Greek yogurt, hot sauce, and salt. Now, for our signature twist, stir in 1 tablespoon of freshly squeezed lemon juice and 1 teaspoon of finely chopped fresh dill. Mix everything until well combined. The mixture should smell wonderfully bright and garlicky already!
2. Assemble Your Wraps with Care
Lay out one of your large tortillas. On the lower third of the tortilla, sprinkle about 2 tablespoons of grated cheese. This creates a delicious cheesy barrier. Next, top with about ⅔ cup of your chicken mixture, spreading it out slightly but leaving a small border around the edges. Add another tablespoon of cheese on top of the chicken mixture, followed by a sprinkle of chopped green onion. Remember not to overpack your wraps; leaving a little room prevents tearing during folding.
3. Fold for Success
To create a secure parcel, first fold in the sides of the tortilla over the filling. Then, starting from the bottom (the side closest to you with the filling), roll the tortilla up tightly towards the top. A tight roll is key to keeping all that delicious garlicky filling contained during cooking.
4. Pan-Fry to Golden Perfection
Heat a non-stick pan over medium-high heat. Spray the pan generously with olive oil spray. Once the pan is hot, carefully place your wraps seam-side down in the skillet. This helps to seal the wrap and prevent it from unraveling. Cook for 3–4 minutes per side, or until the exterior is beautifully crispy and golden brown. Crucially, cover the pan with a lid while cooking. This traps heat, helping the cheese inside to melt perfectly and the filling to warm through evenly and quickly.
5. Slice and Serve!
Once both sides are golden and crispy, remove the wraps from the pan. Let them rest for just a minute or two, then slice each wrap in half diagonally. Serve immediately and enjoy the satisfying crunch and gooey center!
Master Your Wraps: Chicken Prep & Cooking Methods
Achieving the perfect garlic chicken wraps often starts with the chicken itself and knowing your cooking options. Here’s how to make sure your chicken is ready and how to get those wraps perfectly crispy, no matter your preferred method.
Preparing Your Chicken for the Wraps
The type of chicken you choose and how you prepare it makes a difference in texture and convenience.
- Rotisserie Chicken Shortcut: For ultimate speed and ease, I highly recommend using a store-bought rotisserie chicken. It’s already cooked, flavorful, and incredibly tender, making it an ideal choice for quick assembly. Simply shred or chop about 7 ounces (200 grams) for this recipe.
- Cooking Chicken Breast: If cooking from scratch, boneless, skinless chicken breast is a lean option. You can poach it gently in simmering salted water or chicken broth until cooked through (about 15-20 minutes, depending on thickness). Alternatively, bake it at 375°F (190°C) with a little salt, pepper, and garlic powder for 20-25 minutes. Once cooled, chop or shred it finely.
- Cooking Chicken Thighs: For a juicier, richer filling, boneless, skinless chicken thighs are excellent. You can pan-fry them or bake them until cooked through. Season simply with salt, pepper, and garlic powder. Once cooled, chop into small, even pieces.
- Chopping/Shredding: Regardless of how you cook it, ensure your cooked chicken is chopped or shredded into small, even pieces. This allows it to mix well with the creamy filling and ensures an even distribution in every bite.
Beyond the Pan: Air Fryer & Oven Baking Methods
While pan-frying offers the crispiest exterior, you have other fantastic options for cooking your garlic chicken wraps.
- Air Fryer Instructions: The air fryer is a fantastic tool for getting crispy wraps! Preheat your air fryer to 375°F (190°C). Lightly spray the assembled wraps with olive oil spray for extra crispness. Place them in the air fryer basket in a single layer, ensuring not to overcrowd. Cook for about 6–8 minutes, flipping halfway through, until they are golden brown and the cheese is beautifully melted.
- Oven Baking Instructions: Baking is another great hands-off method. Preheat your oven to 400°F (200°C). Place the assembled wraps on a baking sheet, optionally lined with parchment paper for easy cleanup. Bake for 10-15 minutes, or until the tortillas are golden brown and the interior is warm with perfectly gooey cheese. Again, a light spray of olive oil helps with crispness.
- Achieving Optimal Crispness: For any method, preheating your cooking appliance is crucial. Don’t overcrowd the pan, air fryer basket, or baking sheet, as this can steam the wraps instead of crisping them. A little spritz of olive oil before cooking always helps create that desirable crunchy exterior.
Pro Tips & Troubleshooting
I’ve learned a few tricks over the years to ensure these garlic chicken wraps turn out perfectly every time. Here’s my collective wisdom to help you master them, along with common pitfalls to avoid.
Pro Tips for Perfect Wraps
- Pre-Cooked Chicken is Key: Seriously, using already cooked chicken or rotisserie chicken is the biggest time-saver. It makes this recipe a true quick meal.
- Don’t Skimp on the Twist: That fresh lemon juice and dill are not optional! They are crucial for balancing the richness and adding that vibrant, fresh flavor that distinguishes these wraps.
- Cover the Pan: When pan-frying, using a lid is a game-changer. It traps heat, ensuring the gooey cheese melts evenly and the filling warms through faster, preventing an over-browned exterior with a cold center.
- Perfect Pan Temperature: Maintain medium-high heat on your non-stick pan. This allows the tortilla to get beautifully golden and crispy without burning, and the cheese to melt properly. Too low, and they’ll be soggy; too high, and they’ll burn before warming through.
- Internal Temperature for Melt & Safety: If you’re starting with cold filling, aim for an internal temperature of 145-165°F (74°C). This ensures not only food safety but also that your gooey cheese is perfectly melted.
- Meal Prep Ahead: The delicious garlicky filling can be made in advance! Prepare it up to 3 days ahead and store it in an airtight container in the fridge, making these ideal for meal prep.
- Utilize Leftover Filling: If you have any extra filling, don’t let it go to waste! It’s fantastic in toasties, quesadillas, or even as a topping for baked potatoes.
Common Mistakes to Avoid
- Overfilling the Tortilla: This is a classic trap! Too much filling makes it difficult to roll tightly and often leads to the tortilla tearing during assembly or cooking. Leave a small border around the edges.
- Not Rolling Tightly Enough: A loose roll means your filling might spill out in the pan. Take a moment to roll it snugly and securely from the bottom up, tucking in the sides.
- Low Pan Temperature: Insufficient heat is the enemy of crispy wraps. If your pan isn’t hot enough, the tortillas will absorb oil and become soggy instead of developing that golden, crunchy exterior.
- Skipping the Lid: Forgetting to cover the pan can result in wraps with cold centers or cheese that hasn’t fully melted, even if the outside is browned.
- Starting with Very Cold Filling: While the filling can be made ahead, very cold filling will take longer to heat through. If you start with cold filling, be prepared to cook the wraps slightly longer, or bring the filling closer to room temperature before assembling.
- Forgetting the Lemon & Dill: Seriously, don’t omit these! They are the secret sauce (pun intended) that elevates the entire dish and provides that signature brightness and herbaceous note.
Serving & Storage
Once you’ve mastered making these incredible wraps, here’s how to best enjoy and manage them.
Serving Suggestions & What to Pair With
These garlic chicken wraps are a meal in themselves, but they pair wonderfully with a variety of sides to complete your feast:
- Fresh & Crunchy Sides: A big, crisp crunchy salad with a light vinaigrette is a perfect counterpoint. Roasted vegetables like broccoli or asparagus also make a healthy and delicious accompaniment.
- Tangy Additions: For an extra layer of flavor and crunch, serve with a side of crunchy pickles or a fresh tomato salsa for dipping.
- Comfort Food Companions: Sometimes you just need that classic combo. A handful of chips on the side makes for a truly satisfying and complete easy comfort food experience.
- Garnish: A final sprinkle of fresh dill or chopped green onion not only looks appealing but also adds a last burst of freshness.
- Other Ideas: Feel free to customize your wraps or sides with extras like sliced avocado, chopped sun-dried tomatoes, or even sliced olives inside the wrap.
Make Ahead, Storage & Reheating
These wraps are fantastic for planning ahead!
- Make-Ahead Filling: The garlicky filling is incredibly meal prep friendly! Prepare the chicken mixture (with the lemon and dill) up to 3 days in advance and store it in an airtight container in the refrigerator. This makes assembling and cooking the wraps super fast when you’re ready.
- Storing Cooked Wraps: Store any leftover cooked crispy wraps in an airtight container in the fridge for 2-3 days.
- Reheating for Crispness: For the best results, reheat cooked wraps in a pan over medium heat until warmed through and re-crisped on the outside. An air fryer also works wonders for reheating, at about 350°F (175°C) for 3-5 minutes, until the wrap is crispy again. I generally advise against microwave reheating if you want to maintain that delightful crispy texture.
- Freezing: While whole cooked wraps don’t freeze well due to texture changes, the prepared freezer-friendly filling can be frozen separately for up to 1-2 months. Thaw it overnight in the fridge before assembling and cooking your wraps as usual.
Conclusion
There you have it – my recipe for truly exceptional Crispy Garlic Chicken Wraps. What started as a quest for a quick, satisfying weeknight dinner evolved into this vibrant, flavorful dish, all thanks to that bright lemon-dill twist. I promise you a gratifying experience, from the satisfying crunch of the tortilla to the warm, gooey cheese and the incredible garlicky filling. These high-protein chicken wraps are not just delicious; they’re achievable for cooks of all skill levels.
So, whether you’re looking for a speedy lunch recipe, an easy dinner idea, or something comforting yet fresh, these wraps deliver. Experiment with different cheeses, add your favorite veggies like spinach or mushrooms, and make them your own. Don’t forget to save or print this recipe – it’s destined to become a regular in your rotation. Enjoy every delicious bite!
FAQ
- How do you get chicken wraps crispy and perfectly melted?
- For crispy wraps and gooey cheese, use a non-stick pan over medium-high heat. Spray with olive oil spray, place wraps seam-side down first, and importantly, cover the pan with a lid. This traps heat, ensuring the cheese melts evenly while the tortilla gets golden and crunchy.
- Can I prepare the cheesy garlic chicken wrap filling in advance?
- Absolutely! The delicious garlicky filling can be made up to 3 days ahead and stored in an airtight container in the refrigerator. This makes these garlic chicken wraps perfect for stress-free meal prep.
- What are the best cooking methods for garlic chicken wraps (pan-fry, air fryer, oven)?
- Pan-frying typically yields the crispiest exterior. However, air fryer cooking at 375°F (190°C) for 6-8 minutes (flipping halfway) or baking wraps at 400°F (200°C) for 10-15 minutes are great alternatives for convenience, also delivering delicious crispy wraps and gooey cheese.
- How should I store and reheat leftover chicken wraps?
- Store cooked chicken wraps in an airtight container in the fridge for 2-3 days. For optimal crispness when reheating, use a pan over medium heat or an air fryer at 350°F (175°C) for 3-5 minutes. Avoid the microwave if you want to maintain a crispy texture.
- What are some easy variations or dietary swaps for these chicken wraps?
- For a lighter version, reduce the amount of cheese or opt for low-carb wraps or high-protein tortillas. Delicious add-ins include sliced avocado, sun-dried tomatoes, olives, or fresh spinach. For dietary needs, simply use gluten-free tortillas.
- What are the best side dishes and dipping sauces for chicken wraps?
- Serve these easy comfort food wraps with a fresh, crunchy salad, delightful roasted vegetables, tangy pickles, or a side of zesty salsa. For a classic pairing, a handful of chips always hits the spot!
- What kind of tortillas should I use for chicken wraps?
- Flour tortillas are commonly used and provide a good balance of texture and crispness. For specific dietary needs, consider low-carb wraps, high-protein tortillas, or gluten-free options. The type of tortilla you choose will impact the final texture and flavor of your crispy wraps.
- How do I fold a chicken wrap correctly to prevent tearing?
- To fold correctly, lay out your tortilla and place the garlicky filling on the lower third, leaving a small border. First, fold in the left and right sides tightly over the filling. Then, roll up the tortilla from the bottom edge (closest to you) tightly towards the top, ensuring a snug wrap that keeps all the delicious contents inside.
Crispy Garlic Chicken Wraps: Lemon-Dill Twist & Easy Recipe
Ingredients
Equipment
Method
- In a medium bowl, combine your chopped cooked chicken, minced garlic, light mayonnaise, light Greek yogurt, hot sauce, and salt. Stir in 1 tablespoon of freshly squeezed lemon juice and 1 teaspoon of finely chopped fresh dill. Mix everything until well combined.
- Lay out one of your large tortillas. On the lower third, sprinkle about 2 tablespoons of grated cheese. Top with about ⅔ cup of your chicken mixture, spreading it out slightly but leaving a small border. Add another tablespoon of cheese on top, followed by a sprinkle of chopped green onion.
- Fold in the sides of the tortilla over the filling. Starting from the bottom, roll the tortilla up tightly towards the top to create a secure parcel.
- Heat a non-stick pan over medium-high heat and spray generously with olive oil. Carefully place your wraps seam-side down in the skillet. Cook for 3–4 minutes per side, or until beautifully crispy and golden brown. Cover the pan with a lid while cooking to trap heat.
- Once both sides are golden and crispy, remove the wraps from the pan. Let them rest for 1-2 minutes, then slice each wrap in half diagonally. Serve immediately.
Notes
Printable Recipe Card
Want just the essential recipe details without scrolling through the article? Get our printable recipe card with just the ingredients and instructions.