Skip to content
 As a chef and lover of all things festive, I believe the holiday season calls for a touch of magic, especially in the kitchen. But who says magic has to be complicated? This year, I’m thrilled to share my go-to easy Christmas Oreo cookies recipe that transforms a classic cookie into a dazzling, no-bake holiday masterpiece. Whether you’re a seasoned baker or just starting your festive journey, these delightful treats are simple, fun, and incredibly impressive. Get ready to create stunning cookies that are perfect for gifting, holiday parties, or simply enjoying with a warm mug of cocoa.
Why You’ll Love This Recipe
In my kitchen, I’m always looking for ways to elevate simple concepts, and this recipe does exactly that with a delightful secret weapon: peppermint extract. I infuse the creamy white chocolate dipping layer with a hint of food-grade peppermint, turning these ordinary Oreo cookies into extraordinary holiday delights.
- The Peppermint Chocolate Twist: Peppermint is the quintessential Christmas flavor, and it pairs beautifully with the rich chocolate of Oreos. Adding just a small amount of oil-based peppermint extract into the melted white chocolate creates a refreshing coolness that perfectly contrasts the cookie’s sweetness. It’s a subtle but powerful flavor enhancer that doesn’t alter the chocolate’s texture or appearance, provided you use a high-quality, oil-based extract to prevent any seizing.
- Quick & No-Bake: This recipe is a lifesaver during the busy holiday season. No oven time required means less fuss and more fun!
- Family-Friendly Fun: Dipping and decorating are activities everyone can enjoy. It’s a wonderful way to involve kids in holiday preparations.
- Incredibly Customizable: While we’re making festive Christmas trees, these decorated Oreos can be adapted for any holiday or occasion by simply changing your sprinkle palette.
Ingredients Needed

Gather these simple ingredients, and you’ll be on your way to a festive treat in no time!
- 4 ounces white chocolate or white candy melts
- 12 Oreos
- 2 ounces green candy melts
- rainbow nonpareils (optional)
- yellow or gold beads or stars (optional)
- chocolate jimmies (optional)
Ingredient Notes & Substitutions
- Chocolate Choice: For the best results, I often reach for high-quality white chocolate bars like Lindt chocolate, Baker’s chocolate, or Ghirardelli chocolate for their smooth melt and superior flavor. However, white candy melts are incredibly convenient and forgiving, making them a great choice for beginners. I advise against using chocolate chips for dipping, as their stabilizers can make the melted chocolate too thick and difficult to work with.
- Green Coloring Options: The recipe calls for green candy melts, which are a straightforward option. If you prefer to use white chocolate and tint it green, make sure to use a high-quality gel food coloring, such as AmeriColor. Liquid-based food colorings can cause your chocolate to seize, so stick to gels or powders.
- The Peppermint Twist: For our unique flavor twist, select a high-quality, food-grade peppermint extract. It’s crucial that it’s oil-based to ensure it blends seamlessly with the chocolate without causing it to seize. When adding, start conservatively: I recommend adding 1/8 to 1/4 teaspoon for every 4 ounces of melted chocolate. Taste and add a tiny bit more if desired, as it’s potent!
- Oreo Varieties: Don’t limit yourself to classic Oreo cookies! Feel free to experiment with holiday-themed Oreos, DoubleStuf, or even peppermint-flavored Oreos for an extra layer of minty goodness. Any flavor will work beautifully as your cookie base.
- Festive Sprinkles: The fun part! Rainbow nonpareils add a classic speckled texture, while yellow beads or gold stars can act as the “star” on top of your abstract tree. Chocolate jimmies are fantastic for creating a rustic “tree trunk” at the bottom of your design. For precise placement of smaller decorations like gold stars or `yellow beads`, a pair of clean tweezers can be your best friend.

How to Make Christmas Oreo Cookies
Let’s get dipping and decorating! This simple process will have you making beautiful Christmas Oreo cookies in no time.
1. Prepare Your Workspace
First things first, line a large baking sheet with parchment paper or a silicone baking mat. This ensures your dipped cookies won’t stick and makes for easy cleanup. Set it aside.
2. Melt and Infuse the White Chocolate
Melt the 4 ounces of white chocolate or white candy melts. You can do this in a small, shallow microwave-safe cup or bowl, heating in short 30-second bursts, stirring well after each, until smooth. Alternatively, use a double boiler for a gentler melt, stirring constantly. Once beautifully smooth and velvety, stir in 1/8 to 1/4 teaspoon of the oil-based peppermint extract until thoroughly combined. If you used a double boiler, transfer the melted white chocolate to a small, shallow cup or bowl for easier dipping.
3. Dip the Oreo Bases
Working with one Oreo at a time, hold it gently and dip the bottom half into the melted peppermint white chocolate. Allow any excess to drip off, then carefully lay the dipped cookie onto your prepared baking sheet. Aim for a smooth, even coating. Let these harden at room temperature for about 15 minutes. This step is crucial for a flawless finish.
4. Prepare the Green Candy Melts
Once your peppermint white chocolate is set, it’s time for the green. Melt the 2 ounces of green candy melts in a small microwave-safe bowl (again, short bursts and stirring) or in a double boiler until wonderfully smooth.
5. Set Up for Piping
Transfer the melted green candies into a piping bag. You can snip just a very tiny bit off the corner for a fine line, or use a piping bag fitted with a size 1 or size 2 piping tip. My favorite option is a small cookie decorating bottle fitted with a size 2 piping tip; it offers great control.
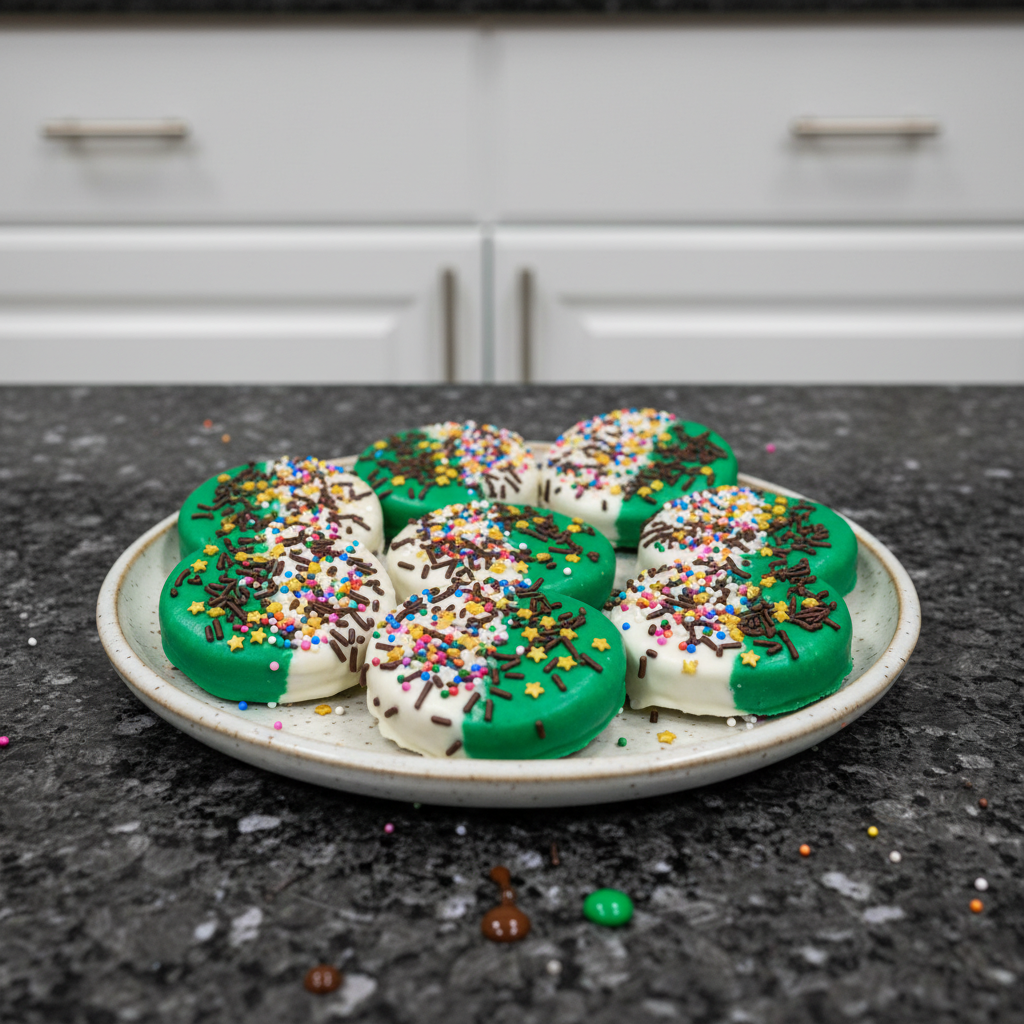
6. Decorate Your Christmas Trees
Now for the artistic part! Using a zig-zag motion, pipe lines onto the white chocolate-dipped half of the Oreo to create the shape of an abstract Christmas tree. Immediately after piping, add your decorations: rainbow nonpareils, yellow beads, gold stars, or chocolate jimmies. I strongly recommend decorating only 1 or 2 Oreos at a time because the green lines start to set quickly, and you want to ensure your festive decorations stick perfectly. Allow all cookies to set completely at room temperature before serving or carefully packaging them to gift.
Store any leftovers at room temperature in an airtight container for up to 2 weeks. These Oreo cookies also freeze well, up to 2 months, though they will lose a bit of their satisfying crunch. Wrap them tightly, then thaw at room temperature in a single layer when you’re ready to enjoy.
Mastering Your Peppermint Chocolate Dip
A perfect dip is key to these beautiful Christmas Oreo cookies. Here’s how to ensure your chocolate is always on point, especially with our refreshing peppermint twist.
Achieving Perfect Melted Chocolate Consistency
Maintaining the right consistency for your melted chocolate is crucial, especially if you’re dipping a larger batch of cookies. My preferred method is using a microwave in short 30-second bursts, stirring diligently after each, to prevent overheating. A double boiler offers a more gentle, controlled melt. The goal is a fluid, pourable consistency that coats the Oreo cookies smoothly without being too thick or clumpy. If it starts to thicken as you work, gently reheat it for a few seconds. Always work on a prepared baking sheet lined with parchment paper or a silicone baking mat for a clean finish.
The Peppermint Infusion
The peppermint extract is our special touch! Remember to use an oil-based, food-grade extract to avoid seizing the chocolate. For 4 ounces of chocolate, I recommend starting with 1/8 to 1/4 teaspoon. Gently fold it into your melted white chocolate until it’s fully incorporated. Taste a tiny bit on a clean spoon—it’s potent, so add sparingly if you desire a stronger mint flavor!
Room Temperature Hardening for a Flawless Finish
Resist the urge to pop your freshly dipped Oreo cookies into the fridge or freezer! The ideal room temperature for chocolate hardening is around 68-72°F (20-22°C). This slower, controlled hardening process prevents common issues like cracking, streaking, or unsightly blooming on your chocolate surface. It also ensures a beautiful, smooth, and even coating without any excess moisture.
Troubleshooting Streaky or Bloomed Chocolate
If you encounter streaky chocolate or bloomed chocolate (a grayish, dull film), don’t despair! This often happens due to overheating the chocolate, moisture contamination, or improper storage. To prevent this, ensure your tools are completely dry, melt chocolate gradually, and always let it harden at room temperature. Proper storage in an airtight container away from humidity helps maintain its pristine appearance.
Decorating Your Christmas Oreos Like a Pro
Turning a simple cookie into a festive masterpiece is all about the technique. Here’s how to make your abstract Christmas trees shine.
Step-by-Step Abstract Tree Piping
For beginners, creating the abstract tree design is easier than it looks! Load your piping bag or cookie decorating bottle with the melted green candy melts. Hold the bag or bottle steady, about an inch above the cookie. Start at the bottom center of your dipped Oreo and pipe a short, slightly wider horizontal line. Then, move up a little and pipe a slightly shorter zig-zag line, moving your hand from side to side as you go. Repeat this motion, making each zig-zag progressively shorter and narrower as you move towards the top, creating a triangle shape. Finish with a small vertical line for the trunk, perhaps with a chocolate jimmie at the base! Using a size 1 or 2 piping tip gives you excellent control.
Timing is Everything for Sprinkles
This is critical: the green candy melts set very quickly! You must add your rainbow nonpareils, yellow beads, gold stars, or chocolate jimmies immediately after piping the green lines. I always decorate only 1-2 cookies at a time. Pipe your design, add sprinkles, then move to the next. This ensures every decoration adheres perfectly.
Choosing Your Decorations
Each type of sprinkle brings something different to your Christmas trees. Rainbow nonpareils offer a fine, textured look, while chocolate jimmies can be strategically placed at the base of your tree for a charming “trunk.” Yellow beads or gold stars make perfect tree toppers or bright ornaments. Don’t be afraid to mix and match! For those tiny, delicate placements, a pair of clean tweezers is invaluable for precision.
Tinting White Chocolate Green
If you prefer to work with white chocolate and tint it green instead of using green candy melts, ensure you use gel food coloring. Brands like AmeriColor are excellent for this. Add a very tiny amount of gel coloring to your melted white chocolate with a toothpick, stir well, and add more until you reach your desired shade of vibrant green. Avoid any liquid-based food colorings, as they will almost certainly cause your chocolate to seize.
Pro Tips & Troubleshooting
Pro Tips for Perfect Christmas Oreos
- Gentle Melting is Key: Always melt your white chocolate and green candy melts in small increments in the microwave, stirring often, to keep them velvety smooth and prevent burning.
- Patience with Hardening: Allow dipped cookies to harden at room temperature, not the fridge or freezer. This prevents cracking, blemishes, and unsightly sweating of the chocolate due to condensation.
- Speedy Sprinkling: Work quickly when adding sprinkles to piped lines, as the lines start to set fast. Decorate only 1-2 cookies at a time to ensure decorations stick properly.
- Gel for Color: If tinting white chocolate green, always use gel food coloring (e.g., AmeriColor) to avoid seizing.
- Quality Chocolate for Smoothness: For the smoothest finish on your dipped Oreos, opt for high-quality bar chocolate like Lindt chocolate, Baker’s chocolate, or Ghirardelli chocolate over chocolate chips.
- Precision Decorating: Use clean, sanitized tweezers or small tongs for precise placement of small decorations like chocolate jimmies or gold stars.
- Control the Peppermint: For the peppermint extract dip, stir it in gradually, tasting as you go, to control the flavor intensity.
Common Mistakes to Avoid
- Rushing the Hardening: Placing dipped Oreo cookies in the fridge or freezer to speed up hardening is a common mistake. It can cause cracking, blemishes, and “sweating” (condensation) on the chocolate surface. Always allow them to set at room temperature.
- Burning Chocolate: Not stirring melted chocolate often enough or using too high a heat setting, especially in the microwave, can lead to burning or an unpleasant, uneven texture. Slow and steady wins the race.
- Sprinkles Not Sticking: Waiting too long after piping your green candy melts lines to add sprinkles will mean they won’t adhere properly as the chocolate quickly sets. Work in small batches!
- Seized Chocolate: Introducing any moisture, especially through liquid-based food coloring (like water-based drops), into melted chocolate will almost certainly cause it to seize and become a grainy, unusable mess. Stick to oil-based or gel food coloring.
Serving & Storage
Serving Ideas for Festive Occasions
These beautiful Christmas Oreo cookies are versatile and always a crowd-pleaser!
- Holiday Dessert Table: Arrange them on a festive platter as a show-stopping holiday treat alongside other classic Christmas cookies like gingersnaps or chocolate chip snowballs.
- Edible Gifts: These make truly cherished edible gifts! Package them in a lovely mason jar tied with festive ribbon, a classic cookie tin, or clear treat bags with plastic windows. The thoughtful touch of homemade gift packaging elevates them beautifully.
- Party Platter: As an easy no-bake cookies option, they’re perfect for any holiday party platter. Their vibrant colors and delicious flavor will disappear fast!
Storage and Make-Ahead Tips
- Room Temperature Storage: For the best quality and appearance, your finished Christmas Oreo cookies should be stored in an airtight container at room temperature (ideally around 68-72°F) for up to 2 weeks. This prevents any condensation that can affect the chocolate’s shine or cause blooming.
- Freezing Dipped Oreos: Yes, you can absolutely freeze these dipped Oreos for longer storage, up to 2 months. To prevent freezer burn and preserve freshness, wrap them tightly in plastic wrap, then place them in an airtight freezer-safe container. While freezing is a great option for make-ahead, be aware that the Oreos might lose a bit of their crunch upon thawing. To thaw, simply arrange them in a single layer at room temperature to minimize moisture issues.
Adaptations for Special Occasions
The beauty of this recipe is its adaptability! Beyond Christmas, you can customize your sprinkle colors and shapes to fit any celebration:
- Halloween: Use orange and black sprinkles.
- Valentine’s Day: Pink and red sprinkles with heart shapes.
- Birthdays: Bright, multi-colored sprinkles.
- Easter: Pastel colors and bunny or egg shapes.
- New Year’s Eve: Gold and silver sprinkles for a touch of sparkle.
Conclusion
There you have it—a simple, elegant, and incredibly delicious Christmas Oreo cookies recipe that’s destined to become a holiday tradition in your home. The unique twist of peppermint extract in the white chocolate dip truly sets these apart, offering a refreshing contrast to the rich cookie. I promise, even if you’re a beginner, you can achieve stunning, professional-looking results. Don’t hesitate to experiment with different Oreo flavors and personalize your decorations. Print this recipe, share it with friends, and fill your home with the joy of homemade holiday treats!
FAQ
What type of chocolate or candy melts should I use for Christmas Oreos?
You can use either good quality white chocolate bars (like Lindt chocolate, Baker’s chocolate, or Ghirardelli chocolate for superior flavor) or white candy melts for ease of use. I recommend avoiding chocolate chips for dipping, as their stabilizers can make the coating too thick.
How do I prevent my melted chocolate from seizing when adding color or flavor?
To prevent seizing, ensure all your tools are completely dry. When adding color, always use gel food coloring (like AmeriColor) or oil-based extracts for flavoring, never liquid-based food colorings or water.
Can I freeze Christmas Oreos for later, and how does it affect their texture?
Yes, you can freeze Christmas Oreos for up to 2 months. Wrap them tightly to prevent freezer burn. They will thaw well at room temperature, but expect a slight loss in their original crisp crunch.
How long do dipped Oreos take to harden and what are the best storage conditions?
Dipped Oreos typically take about 15 minutes to harden at a comfortable room temperature (68-72°F or 20-22°C). Store them in an airtight container at room temperature for up to 2 weeks to prevent cracking, sweating, or chocolate bloom.
What are some fun ways to customize Christmas Oreo decorations for different occasions?
You can easily customize these! Simply swap out the Christmas-themed sprinkle colors and shapes. Think orange and black for Halloween, pink and red for Valentine’s Day, or bright pastels for Easter. You can even use chocolate jimmies for creative accents beyond a tree trunk.
What is a chocolate jimmie and how do I use it for decorating?
A chocolate jimmie is a small, rod-shaped sprinkle, often used to add texture and a touch of chocolate flavor. For this recipe, you can place a jimmie at the bottom of your abstract green tree design to act as a rustic “tree trunk.”
What kind of green food coloring can you add to white chocolate to tint it?
When tinting white chocolate, you must use a gel-based food coloring. Brands like AmeriColor are highly recommended because they are concentrated and won’t introduce excess moisture, which would cause the chocolate to seize. Avoid any liquid, water-based food colorings.
What are common problems when dipping Oreos in chocolate and how can I avoid them?
Common problems include seizing (due to moisture), streaky chocolate (from overheating or improper cooling), and decorations not sticking (because the chocolate sets too fast). Avoid these by using gel food coloring, melting chocolate gently, allowing cookies to harden at room temperature, and adding sprinkles immediately after piping.
What’s the best way to package Christmas Oreos for gift-giving?
For beautiful gift packaging, consider stacking them in a decorative mason jar, arranging them in a festive cookie tin, or placing them individually in clear cello treat bags tied with ribbon. Always ensure the chocolate is fully set before packaging to prevent sticking.
Christmas Oreo Cookies: Your New Favorite No-Bake Holiday Treat!
Ingredients
Equipment
Method
- Line a large baking sheet with parchment paper or a silicone baking mat. Set it aside.
- Melt 4 ounces of white chocolate or white candy melts in a small, shallow microwave-safe cup or bowl, heating in short 30-second bursts and stirring well after each until smooth. Alternatively, use a double boiler, stirring constantly.
- Once beautifully smooth and velvety, stir in 1/8 to 1/4 teaspoon of the oil-based peppermint extract until thoroughly combined.
- If you used a double boiler, transfer the melted white chocolate to a small, shallow cup or bowl for easier dipping.
- Working with one Oreo at a time, hold it gently and dip the bottom half into the melted peppermint white chocolate.
- Allow any excess to drip off, then carefully lay the dipped cookie onto your prepared baking sheet. Aim for a smooth, even coating.
- Let these harden at room temperature for about 15 minutes.
- Once your peppermint white chocolate is set, melt the 2 ounces of green candy melts in a small microwave-safe bowl (short bursts and stirring) or in a double boiler until wonderfully smooth.
- Transfer the melted green candies into a piping bag. Snip just a very tiny bit off the corner for a fine line, or use a piping bag fitted with a size 1 or size 2 piping tip. A small cookie decorating bottle fitted with a size 2 piping tip also offers great control.
- Using a zig-zag motion, pipe lines onto the white chocolate-dipped half of the Oreo to create the shape of an abstract Christmas tree.
- Immediately after piping, add your decorations: rainbow nonpareils, yellow beads, gold stars, or chocolate jimmies. Decorate only 1 or 2 Oreos at a time because the green lines start to set quickly.
- Allow all cookies to set completely at room temperature before serving or carefully packaging them to gift.
Notes
Printable Recipe Card
Want just the essential recipe details without scrolling through the article? Get our printable recipe card with just the ingredients and instructions.