Skip to content
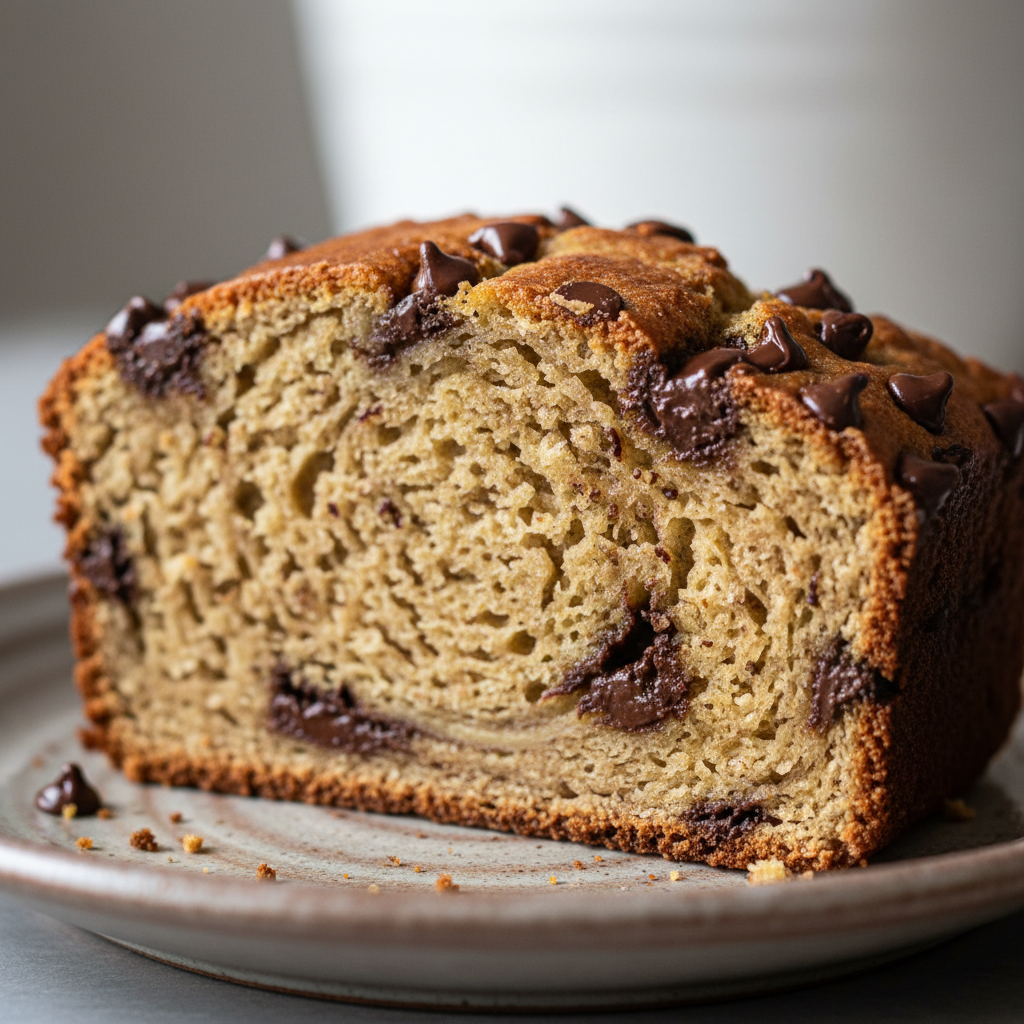
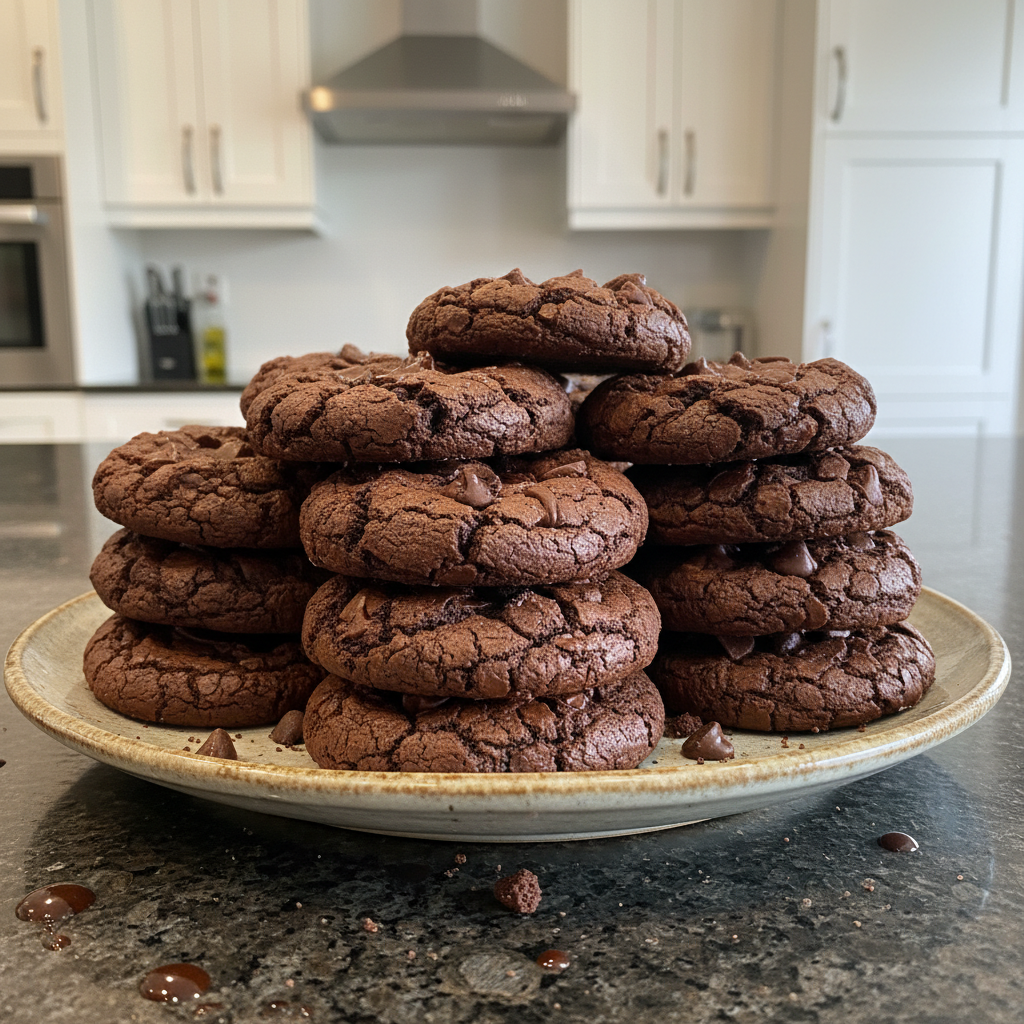
 Oh, the glorious dilemma: do you crave the intense fudginess of a brownie or the satisfying chew of a cookie? What if I told you that you don’t have to choose? In my kitchen, we’ve perfected the art of the ultimate hybrid: the **chocolate brownie cookies**. This recipe promises not just a taste, but an experience – a cookie with a crackly, crinkled top, crisp edges, and a gloriously chewy, fudgy center that will make your taste buds sing. Prepare to bake a batch of treats that will disappear faster than you can say “more, please!”
Why You’ll Love This Recipe
I know what you’re thinking: “another brownie cookie recipe?” But trust me, this one is different. My secret lies in a unique blend of fats and a subtle flavor enhancer that transforms a good cookie into an extraordinary one. Here’s why you’ll absolutely fall in love:
The Perfect Blend of Fats for Unrivaled Texture: We’re talking melted butter AND vegetable oil. This isn’t just a random choice; it’s a science-backed decision. The **melted butter** brings that rich, luxurious flavor we adore, contributing significantly to a deep, chewy texture. Meanwhile, the **vegetable oil** is a game-changer for moisture, ensuring a truly fudgy crumb that stays soft for days, all while helping those edges get wonderfully crisp. It’s the dynamic duo for the ultimate **brownie cookie texture**!
Intensified Chocolate Flavor: My not-so-secret weapon? A touch of **espresso powder**. Don’t worry, it won’t make your cookies taste like coffee. Instead, it acts as a magical **flavor enhancer**, deepening the chocolate notes and making them even more robust and irresistible. It brings out the very best in your **cocoa powder** and **semi-sweet chocolate chips**, making every bite intensely chocolatey.
Guaranteed Crinkle Top: Achieving that coveted **crinkle top** isn’t just about luck; it’s about technique and the right ingredient ratios. Our recipe is specifically designed to give you those beautiful, signature crackles that are a hallmark of a truly great brownie cookie.
Easy & Satisfying: This isn’t a complicated recipe. With straightforward steps and readily available ingredients, you’ll be able to whip up a batch of these bakery-worthy cookies with ease. The reward? Pure chocolate bliss and the satisfaction of homemade perfection.
Ingredients Needed

Gather your ingredients, and let’s get ready to bake some magic. Precision is key in baking, so I recommend measuring everything carefully.
- 1/2 cup (113g) unsalted butter, melted
- 1/4 cup (50g) vegetable oil
- 1 and 3/4 cups (350g) granulated sugar
- 2 large eggs
- 2 teaspoons vanilla extract
- 1 cup (90g) Dutch-processed cocoa powder
- 1 cup (125g) all-purpose flour
- 1 teaspoon baking powder
- 1/2 teaspoon salt
- 1 teaspoon espresso powder (optional, but highly recommended)
- 1 cup (170g) semi-sweet chocolate chips
- Flaky sea salt, for sprinkling (optional)
Ingredient Notes & Substitutions
A few notes on ingredients can make all the difference in your **chocolate brownie cookies**:
Cocoa Powder: I highly recommend Dutch-processed cocoa powder for this recipe. It’s treated with an alkali to neutralize its acidity, resulting in a darker color and a mellower, richer chocolate flavor compared to natural cocoa. If you only have natural cocoa, it will work, but the color and flavor profile will be slightly different. Always use good quality **cocoa powder** for the best results.
Chocolate Chips/Chunks: While I call for **semi-sweet chocolate chips**, feel free to use dark chocolate chips or even chopped chocolate bars for varying levels of sweetness and intensity. Higher quality chocolate will always yield a superior flavor in your cookies.
Butter vs. Oil: As mentioned, this combination is our unique twist! The **melted butter** provides that rich, signature flavor and chewiness, while **vegetable oil** ensures a wonderfully moist, fudgy crumb and crisp edges. Do not substitute one for the other entirely, as you’ll miss out on the intended **brownie cookie texture**.
Espresso Powder: This is a true **flavor enhancer** for chocolate. It won’t make your cookies taste like coffee, but it will significantly deepen the chocolate flavor. It’s optional, but if you want that intense, rich chocolate experience, I strongly recommend including it.
Flaky Sea Salt: A sprinkle of **flaky sea salt** on top of your warm cookies is a chef’s secret! It beautifully balances the sweetness and enhances the chocolate flavor, adding a gourmet touch. Don’t skip it if you have it!
Dietary Swaps: For gluten-free brownie cookies, a 1:1 gluten-free flour blend (ensure it contains xanthan gum) can be used successfully. For **dairy-free** cookies, substitute plant-based butter (like Miyoko’s Kitchen or Earth Balance sticks) and ensure your chocolate chips are dairy-free.

How to Make Fudgy Chocolate Brownie Cookies
Let’s dive into the steps. Follow these instructions carefully, and you’ll be enjoying warm, fudgy cookies in no time!
- Phase 1: Prepare Your Workspace and Wet Ingredients
- Preheat your oven to 350°F (175°C). Line two baking sheets with parchment paper. This step is crucial for preventing sticking and ensuring even baking.
- In a large mixing bowl, combine the melted butter, vegetable oil, and granulated sugar. Whisk these together until they are thoroughly combined and appear smooth.
- Add the large eggs to the sugar mixture one at a time, whisking vigorously after each addition. Continue whisking until the mixture becomes light in color, glossy, and noticeably thicker – this is key for the crinkle top! Stir in the vanilla extract until just combined.
- Phase 2: Combine Dry Ingredients and Form the Dough
- In a separate medium bowl, whisk together the **Dutch-processed cocoa powder**, all-purpose flour, baking powder, salt, and **espresso powder** (if using). Ensure all dry ingredients are well distributed.
- Gradually add the dry ingredient mixture to the wet ingredients. Mix on low speed or by hand, using a spatula, until the flour streaks have just disappeared. Be careful not to **overmix the batter**; overmixing can develop gluten, leading to tougher cookies instead of chewy ones.
- Gently fold in the **semi-sweet chocolate chips** until evenly distributed throughout the rich, dark dough.
- Cover the bowl tightly with plastic wrap and chill the dough in the refrigerator for at least 30 minutes, or up to 2 hours. This **dough chilling** step is essential for the best texture and appearance.
- Phase 3: Bake and Cool to Perfection
- Once chilled, scoop rounded tablespoons of dough onto your prepared baking sheets, leaving about 2 inches of space between each cookie to allow for proper spreading.
- Bake for 10-12 minutes. You’re looking for cookies where the edges are set and appear slightly puffed, but the centers still look slightly soft and gooey. This slight underbake is the secret to truly **fudgy brownie cookies**.
- Remove the baking sheets from the oven and, if desired, immediately sprinkle the warm cookies with a pinch of **flaky sea salt**.
- Allow the cookies to cool on the baking sheets for 5-10 minutes. They will continue to set during this time. After this initial cooling, carefully transfer them to a **cooling rack** to cool completely.
Achieving the Signature Crinkle Top & Perfect Fudginess
That beautiful, shiny **crinkle top** and irresistible fudgy interior are what set these **chocolate brownie cookies** apart. Let’s break down the **baking science** behind these perfect textures and how to avoid common pitfalls.
The Role of Sugar & Fat: Our recipe uses a generous amount of sugar and a unique blend of fats – **melted butter** and **vegetable oil**. This high sugar-to-flour ratio helps create that delicate, crisp crust on top. As the cookie bakes, the sugar on the surface dries out and cracks, creating the signature crinkles, while the fats ensure a rich, tender interior that spreads just right.
Dough Chilling is Critical: Don’t skip the **dough chilling** step! This isn’t just a suggestion; it’s vital for texture and preventing **overly flat cookies**. Chilling the dough solidifies the fats, which in turn prevents the cookies from spreading too rapidly in the oven. It also allows the flour to fully hydrate and the sugars to absorb moisture, resulting in a thicker, chewier cookie with a much better chance of developing those gorgeous crinkles.
Baking Temperature & Time: The specified **oven temperature** of 350°F (175°C) and **baking time** of 10-12 minutes are perfectly calibrated for **fudgy brownie cookies**. You want the edges to be set and lightly firm, but the centers should still look slightly underbaked and soft. This slight underbaking is what guarantees that coveted fudgy, gooey texture. Overbaking will lead to **cakey cookies** and diminish their chewiness.
Troubleshooting Common Issues: If your cookies turn out **overly cakey**, it could be due to **overbaking** or too much flour. If they are **overly flat**, often it’s a result of not chilling the dough sufficiently, an oven that isn’t hot enough, or using too much melted fat. Always ensure your **baking powder** is fresh for proper lift. Understanding these factors will help you nail the **brownie cookie texture** every time!
Pro Tips & Troubleshooting
Pro Tips
- Use Quality Ingredients: For truly exceptional flavor, invest in good quality **Dutch-processed cocoa powder** and your favorite **chocolate chips**. It makes a noticeable difference!
- Don’t Overmix: When adding dry ingredients, mix only until they are **just combined**. Overmixing develops gluten, which can lead to tough, dense cookies instead of light and chewy ones.
- Chill the Dough: I can’t stress this enough! **Dough chilling** for at least 30 minutes is non-negotiable for achieving the perfect spread, thickness, and that beautiful **crinkle top**.
- Don’t Overbake: For the ultimate **fudgy brownie cookies**, pull them out of the oven when the edges are set but the centers still look slightly underbaked. They will continue to cook on the hot baking sheet. Keep a close eye on your **baking time**.
- Flaky Sea Salt: A sprinkle of **flaky sea salt** on the warm cookies elevates the flavor profile, balancing the sweetness and enhancing the chocolate.
- Cooling Process: Let the cookies cool on the baking sheet for 5-10 minutes before transferring them to a **cooling rack**. This allows them to firm up properly and prevents them from breaking.
Common Mistakes to Avoid
Overbaking: This is the number one culprit for dry, **cakey cookies**. Aim for slightly underbaked centers to maintain that desirable fudginess.
Not Chilling the Dough: Skipping **dough chilling** will almost always result in flatter, wider cookies that lack the chewy thickness and prominent **crinkle top**.
Using Low-Quality Chocolate/Cocoa: The flavor of your chocolate is central to these cookies. Cheap ingredients can lead to a less rich and satisfying taste.
Overmixing the Batter: As discussed, this develops gluten, making your cookies tough rather than wonderfully chewy and fudgy.
Inaccurate Measurements: Baking is a science. Using too much or too little of key ingredients, especially flour or leavening agents, can significantly alter the **brownie cookie texture** and spread. Use a kitchen scale for best accuracy!
Serving & Storage
Serving Ideas
These **chocolate brownie cookies** are fantastic on their own, but here are some of my favorite ways to enjoy them:
- Serve them warm with a scoop of creamy vanilla bean ice cream for an indulgent dessert.
- Dust lightly with powdered sugar or an extra sprinkle of **flaky sea salt** for an elegant touch.
- They pair beautifully with a cold glass of milk, a hot cup of coffee, or a rich espresso.
- Use two cookies to create gourmet ice cream sandwiches with your favorite ice cream flavor in the middle.
- For special occasions, garnish with fresh raspberries or a dollop of whipped cream.
Storage and Make-Ahead
To keep your delicious creations fresh, here’s what you need to know:
Baked Cookies: Store freshly baked **chocolate brownie cookies** in an airtight container at room temperature for up to 3-4 days. They tend to maintain their fudgy texture quite well. You can also refrigerate them for up to a week, but let them come to room temperature before serving for the best texture. This answers the question: **how long do brownie cookies last?**
Freezing Baked Cookies: For longer storage, baked cookies can be frozen. Once completely cooled, place them in a single layer on a baking sheet to flash freeze for about 30 minutes. Then, transfer the frozen cookies to a freezer-safe airtight container or bag. They will keep for up to 3 months. Thaw at room temperature or warm briefly in the microwave.
Freezing Cookie Dough: This is a fantastic make-ahead option! To **freeze brownie cookie dough**, scoop individual portions onto a parchment-lined baking sheet. Flash freeze until firm (about 1-2 hours). Once frozen, transfer the dough balls to a freezer-safe airtight container or heavy-duty freezer bag. The dough can be stored for up to 3 months. When ready to bake, place frozen dough balls on a baking sheet and bake as directed, adding an extra 2-4 minutes to the **baking time**. This convenience makes fresh, warm cookies possible anytime!
Conclusion
There you have it – my tried-and-true recipe for the most decadent, **fudgy brownie cookies** you’ll ever bake. With their captivating **crinkle top**, incredibly **chewy texture**, and deep chocolate flavor, these cookies are a testament to how a few thoughtful twists can elevate a classic treat into something truly extraordinary. Whether you’re a seasoned baker or just starting out, I’m confident you’ll achieve perfect results with this recipe.
So, preheat your oven, gather your ingredients, and get ready to experience the pure joy of homemade chocolate bliss. Don’t be afraid to experiment with different **mix-ins** like nuts or white chocolate, or serve them up with a scoop of ice cream. I can’t wait for you to try them. Happy baking!
FAQ
Frequently Asked Questions about Brownie Cookies
Q: How long do brownie cookies last?A: Freshly baked brownie cookies will last 3-4 days at room temperature in an airtight container. If refrigerated, they can last up to a week, but I recommend letting them come to room temperature before enjoying for the best **brownie cookie texture**.
Q: Can I freeze brownie cookie dough?A: Absolutely! To **freeze brownie cookie dough**, scoop portions onto a parchment-lined tray, flash freeze until firm, then transfer to a freezer-safe bag or container for up to 3 months. Bake from frozen, adding a few extra minutes to the **baking time**.
Q: What makes brownie cookies fudgy?A: The fudginess in these **fudgy brownie cookies** comes from a few key factors: a high fat-to-flour ratio (specifically the **melted butter** and **vegetable oil** blend), a good amount of sugar, and most importantly, slightly underbaking them so the centers remain soft and gooey.
Q: Why did my brownie cookies go flat?A: Flat cookies are often due to warm dough, too much fat, or an oven that isn’t hot enough. Ensuring you thoroughly **chill the dough** for at least 30 minutes and that your **oven temperature** is accurate are crucial steps to prevent this common issue.
Q: Can I make these without espresso powder?A: Yes, **espresso powder** is optional. However, it acts as a **flavor enhancer** that deepens the chocolate notes without adding a coffee taste. Your cookies will still be delicious without it, but the chocolate flavor won’t be as intense.
Q: How do I get the shiny crust (crinkle top) on top?A: The **crinkle top** is achieved by a combination of factors: the high sugar content in the dough, adequately whisking the wet ingredients until glossy, and crucially, **dough chilling**. This solidifies the fats, creating a firm exterior that cracks beautifully as the cookie bakes.
Q: Can I use Dutch-processed cocoa?A: Yes, and I highly recommend it! **Dutch-processed cocoa powder** is preferred for this recipe as it gives a darker color and a mellower, richer chocolate flavor compared to natural cocoa.
Q: Can I add nuts or other mix-ins?A: Absolutely! Feel free to customize your **chocolate brownie cookies**. Chopped walnuts, pecans, white chocolate chips, or even a sprinkle of toffee bits would be delicious **mix-ins**. Add them along with the chocolate chips in step 6.
Fudgy Chocolate Brownie Cookies: The Ultimate Chewy Crinkle Top Recipe
Ingredients
Equipment
Method
- Preheat your oven to 350°F (175°C). Line two baking sheets with parchment paper. This step is crucial for preventing sticking and ensuring even baking.
- In a large mixing bowl, combine the melted butter, vegetable oil, and granulated sugar. Whisk these together until they are thoroughly combined and appear smooth.
- Add the large eggs to the sugar mixture one at a time, whisking vigorously after each addition. Continue whisking until the mixture becomes light in color, glossy, and noticeably thicker – this is key for the crinkle top! Stir in the vanilla extract until just combined.
- In a separate medium bowl, whisk together the Dutch-processed cocoa powder, all-purpose flour, baking powder, salt, and espresso powder (if using). Ensure all dry ingredients are well distributed.
- Gradually add the dry ingredient mixture to the wet ingredients. Mix on low speed or by hand, using a spatula, until the flour streaks have just disappeared. Be careful not to overmix the batter; overmixing can develop gluten, leading to tougher cookies instead of chewy ones.
- Gently fold in the semi-sweet chocolate chips until evenly distributed throughout the rich, dark dough.
- Cover the bowl tightly with plastic wrap and chill the dough in the refrigerator for at least 30 minutes, or up to 2 hours. This dough chilling step is essential for the best texture and appearance.
- Once chilled, scoop rounded tablespoons of dough onto your prepared baking sheets, leaving about 2 inches of space between each cookie to allow for proper spreading.
- Bake for 10-12 minutes. You're looking for cookies where the edges are set and appear slightly puffed, but the centers still look slightly soft and gooey. This slight underbake is the secret to truly fudgy brownie cookies.
- Remove the baking sheets from the oven and, if desired, immediately sprinkle the warm cookies with a pinch of flaky sea salt.
- Allow the cookies to cool on the baking sheets for 5-10 minutes. They will continue to set during this time. After this initial cooling, carefully transfer them to a cooling rack to cool completely.
Notes
Printable Recipe Card
Want just the essential recipe details without scrolling through the article? Get our printable recipe card with just the ingredients and instructions.