Skip to content
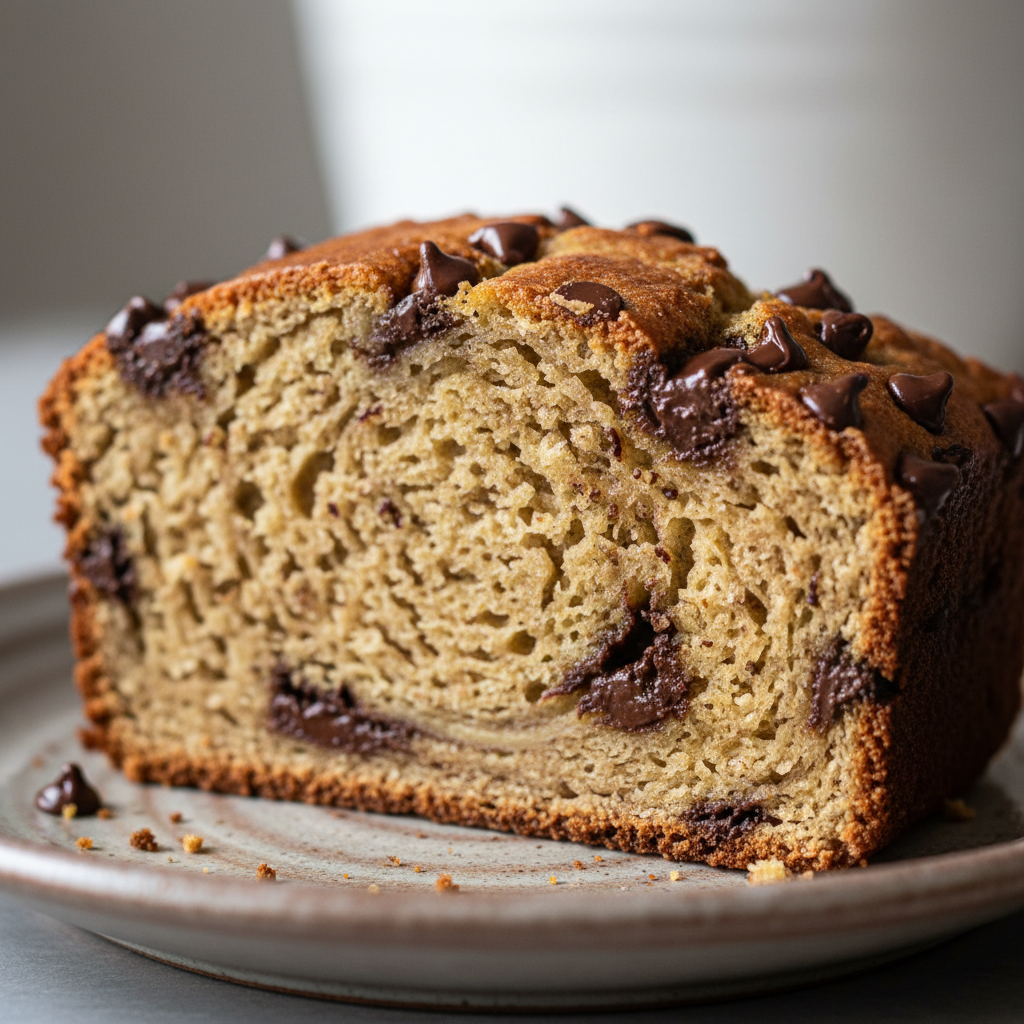
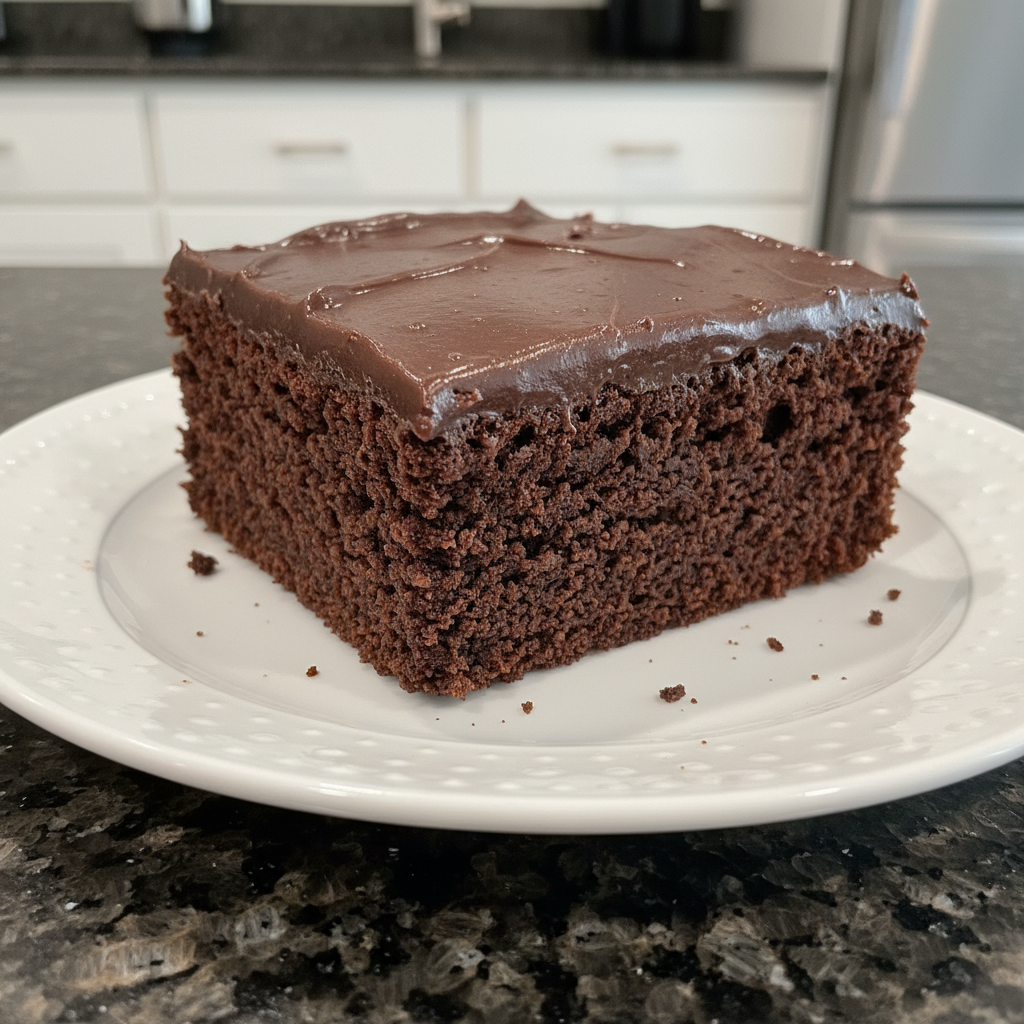
 Ah, the scent of warm chocolate wafting from the school cafeteria! For many of us, nothing evokes that childhood nostalgia quite like a classic, fudgy brownie. Those weren’t just any brownies; they were the legendary Lunch Lady Brownies, a sweet staple that made every school day a little brighter. Today, I’m bringing that beloved recipe right into your kitchen, but with my own professional chef’s twist. Get ready to bake the most incredibly moist, rich, and chewy homemade brownies you’ve ever tasted, elevated by a secret ingredient that takes them from beloved to absolutely unforgettable.
Why You’ll Love This Recipe
My kitchen philosophy is all about honoring tradition while gently nudging it towards perfection. This easy brownie recipe does just that, taking those nostalgic Lunch Lady Brownies and elevating them with a truly special technique: browned butter. And yes, we’re incorporating it into both the brownie batter and the luscious chocolate frosting!
- Elevated Flavor Profile: The magic of browned butter comes from the Maillard reaction. As the butter gently cooks, its milk solids caramelize, transforming its simple richness into a complex, nutty, and almost toffee-like aroma and flavor. This deepens the chocolate notes in our chocolate brownies, adding a sophisticated warmth that’s truly next-level.
- Nostalgic Comfort, Upgraded: You’ll still get that familiar, comforting taste of a classic school lunch dessert, but with an unexpected depth. It’s the taste of your childhood, all grown up and ready to impress.
- Impressive Yet Easy: Despite the fancy-sounding twist, this remains a relatively straightforward recipe. The extra step of browning butter adds immense flavor without adding significant complexity, making these brownies perfect for any occasion, from casual weeknight treats to show-stopping potlucks or holiday parties.
- Irresistible Texture: Prepare for brownies that are perfectly moist, rich chocolate wonders. They strike that ideal balance: cake-like yet dense, chewy, and gloriously fudgy, all crowned with a sweet, complementary frosting.
Ingredients Needed

Here’s what you’ll need to create these spectacular Lunch Lady Brownies with their browned butter secret. I’ve broken it down for clarity:
For the Brownies:
- 1 cup salted butter (melted)
- 1/2 cup unsweetened cocoa powder
- 2 cups all-purpose flour
- 2 cups granulated sugar
- 4 large eggs
- 4 teaspoons vanilla extract
For the Browned Butter Chocolate Frosting:
- 1/4 cup salted butter (softened)
- 1/4 cup 2% milk
- 1/4 cup unsweetened cocoa powder
- 3 cups powdered sugar
Ingredient Notes & Substitutions
A few expert notes to help you achieve the best possible results for your homemade brownies:
- Butter: I always recommend using real butter for its superior flavor and texture. If you’re using unsalted butter instead of the specified salted butter, simply add 1/4 teaspoon of fine salt to the brownie batter to balance the flavors.
- Cocoa Powder: For this recipe, natural unsweetened cocoa powder is generally recommended. Natural cocoa powder is acidic and reacts with baking soda (if present, which it isn’t in this recipe, relying on eggs for structure), but here it provides a bright, pure chocolate flavor. Dutch-processed cocoa powder, which is neutral, would yield a darker color and a milder, less acidic chocolate flavor, slightly altering the overall taste profile.
- Flour: All-purpose flour is the backbone of these brownies, providing structure through its gluten development. Accurate measurement is key here!
- Sugar: You’ll notice we use granulated sugar for the brownie batter and powdered sugar (also known as confectioners’ sugar) for the frosting. Using granulated sugar in the frosting would result in a grainy texture, so stick to powdered sugar for that smooth, velvety finish.
- Substitutions: For those with dietary considerations and swaps, you can explore options like a 1:1 gluten-free flour blend for a gluten-free version, or vegan butter and plant-based milk for a dairy-free alternative. Just be aware that these substitutions might slightly alter the classic texture and taste.

How to Make Lunch Lady Brownies
Let’s get baking! This recipe is straightforward, but those few extra steps for the browned butter make all the difference. Remember, I’m guiding you every step of the way to ensure your chocolate brownies are nothing short of spectacular.
Phase 1: Preparing Your Baking Dish and Browning Butter for Brownies
- First, preheat your oven to 350°F (175°C).
- Line a 9×13-inch baking dish completely with parchment paper, leaving an overhang on the longer sides. This creates “handles” for easy removal and guarantees clean cuts later. Lightly spray the parchment paper with non-stick spray. Set this prepared baking dish aside.
- Now for our secret weapon: the browned butter for the brownies! In a light-colored saucepan or skillet, melt the 1 cup of salted butter over medium heat. Continue to cook, stirring occasionally, until the butter begins to foam. Keep watching closely as the milk solids at the bottom of the pan turn golden, then amber, releasing a rich, nutty aroma. This is the Maillard reaction in action, creating that incredible depth of flavor. Remove it from the heat as soon as you see those beautiful amber flecks, then immediately pour it into a heat-safe bowl to stop the cooking. Let it cool slightly for about 5-10 minutes.
Phase 2: Crafting the Brownie Batter
- In the bowl of an electric stand-mixer fitted with the paddle attachment, add the slightly cooled browned butter and 1/2 cup of unsweetened cocoa powder. Blend until completely smooth and fragrant.
- Add the 2 cups of all-purpose flour and 2 cups of granulated sugar to the mixture. Beat them together until just combined.
- Next, incorporate the 4 large eggs, one at a time, followed by 4 teaspoons of vanilla extract. Mix just until everything is combined and no streaks of flour remain. Don’t over mix! Over-mixing can develop too much gluten, leading to dry, cake-like brownies. The batter will be quite thick, which is perfectly normal for a fudgy brownie.
Phase 3: Baking Your Brownies
- Pour the thick brownie batter into your prepared baking dish and spread it out evenly with an offset spatula or the back of a spoon.
- Bake for 25 to 30 minutes. You’ll know they’re done when a toothpick test inserted into the center comes out with moist crumbs, but not wet batter. Avoid over-baking, even by a few minutes, as this is the quickest way to dry out your fudgy brownies.
- Remove the brownies from the oven and let them stand in the pan for 15 minutes before frosting. You want the brownies to still be warm when you apply the frosting, as this helps it spread beautifully and melt slightly into the top layer, creating an even fudgier crust.
Phase 4: Making the Browned Butter Chocolate Frosting
- While the brownies are cooling, let’s make the second batch of browned butter for our incredible frosting! In a small, light-colored saucepan, melt the 1/4 cup of salted butter over medium heat. Just like before, cook, stirring, until it foams and the milk solids turn a rich amber color with a nutty aroma. Pour it into a separate heat-safe bowl and allow it to cool *completely* to room temperature. This is crucial for the frosting texture!
- Once the browned butter is cool and solidified slightly (it should still be soft but not liquid), beat it together with the 1/4 cup of 2% milk, 1/4 cup of unsweetened cocoa powder, and 3 cups of powdered sugar in your stand mixer. Beat until the frosting is perfectly smooth and spreadable. If the frosting is too thick, gradually add a tiny bit more milk (1 teaspoon at a time) until it reaches your desired consistency.
Phase 5: Frosting and Finishing
- Pour the smooth, rich chocolate frosting over the warm (but not hot!) brownies. Spread it out evenly with an offset spatula.
- Now comes the hardest part: patience! Let the brownies cool completely on a cooling rack before cutting and serving. This allows them to set properly, ensuring that iconic fudgy texture and clean slices.
Achieving Perfect Brownie Texture: Tips & Troubleshooting
Mastering brownie texture is all about understanding a few key principles. My goal is to help you bake moist brownies every single time, avoiding common pitfalls that lead to dryness or density.
Measuring Techniques for Success
Accurate measurement, especially for dry ingredients like all-purpose flour, is paramount. Too much flour is a leading cause of dry brownies. I always recommend using the “scoop and sweep” method: lightly spoon your flour into the measuring cup until it overflows, then use a straight edge (like the back of a knife) to level it off. Never pack flour into the cup. For ultimate consistency, measuring by weight is ideal if you have a kitchen scale, as it eliminates variations due to packing.
Troubleshooting Common Texture Issues
- Too Dry/Cakey Brownies: This is usually a result of over-mixing the batter or over-baking. Remember to mix just until the ingredients are combined. Once you see no more streaks of dry flour, stop! Also, keep a close eye on your baking time and trust the toothpick test. A toothpick with moist crumbs, not wet batter, indicates perfect doneness.
- Too Dense Brownies: If your brownies feel excessively heavy, it could be from packed flour, or sometimes an incorrect fat ratio. Ensuring accurate flour measurement with the “scoop and sweep” method helps tremendously. This recipe aims for a truly fudgy-chewy texture, dense in a delightful way, but not overly heavy or tough.
- Fudgy vs. Cakey: The balance of flour, fat, and eggs largely determines if a brownie leans fudgy or cakey. More fat and less flour tend to create fudgier results, while more flour and leavening (like baking powder/soda) lead to a cake-like crumb. This recipe is designed to deliver that quintessential fudgy-chewy texture without becoming truly cakey.
Cocoa Powder Impact
The type of unsweetened cocoa powder you choose can subtly influence both the flavor and final texture. Natural cocoa powder, used here, contributes to a lighter, redder hue and a sharper chocolate flavor. If you were to use Dutch-processed cocoa, you’d likely get a darker, browner brownie with a milder flavor and slightly different crumb structure due to its neutralized acidity. For these classic Lunch Lady Brownies, the natural cocoa powder is just right.
Pro Tips & Troubleshooting
Even the most experienced chefs have little tricks up their sleeves. Here are some of my favorite tips to make your Lunch Lady Brownies truly shine, along with common pitfalls to steer clear of.
Pro Tips
- For Clean Cuts: My secret weapon for perfectly neat brownie squares? A plastic knife! Once your brownies are completely cooled, use a plastic knife and a gentle sawing motion. Wipe the knife clean between each cut for the sharpest edges. This trick addresses the common question of “how you cut your brownies so perfectly?”
- Deepen the Chocolate Flavor: To intensify the rich chocolate notes in these chocolate brownies, I love adding 1 teaspoon of espresso powder to both the batter and the frosting. It won’t make them taste like coffee, but it significantly enhances the cocoa flavor through synergy.
- Perfect Frosting Consistency: If your chocolate frosting feels too thick, gradually add very small amounts (1/2 teaspoon at a time) of milk until it reaches a smooth, spreadable consistency. If it’s too thin, a tablespoon or two more of powdered sugar will thicken it right up.
- Don’t Rush Cooling: I know it’s hard to wait, but allowing the brownies to cool completely before cutting is essential. This sets the texture, prevents crumbling, and ensures beautiful, distinct layers between the brownie and the frosting.
- Embrace the Browned Butter: Remember our browned butter twist? The magic of the Maillard reaction ensures these aren’t just any brownies; the nutty, complex flavor of the browned butter truly enhances the entire experience.
Common Mistakes to Avoid
- Over-mixing the Batter: As I mentioned, over-mixing the batter can lead to dry, cake-like brownies because it develops too much gluten. Mix just until combined!
- Over-baking: This is a cardinal sin of brownie baking! Over-baking, even by a few minutes, can result in dry, cakey brownies. Trust the toothpick test for moist crumbs, not a clean toothpick.
- Using the Wrong Sugar for Frosting: Using granulated sugar instead of powdered sugar (confectioners’ sugar) for frosting will result in a grainy texture. Stick to powdered sugar for that smooth finish.
- Cutting Warm Brownies: Resist the urge! Cutting brownies before they are fully cooled will lead to messy, crumbling slices and a gooey, unappealing presentation. Patience is a virtue here.
Serving & Storage
Once you’ve baked these incredible moist brownies, here’s how to enjoy them to the fullest and keep them fresh for days.
Serving Ideas
These Lunch Lady Brownies are perfect on their own, a complete dessert in every bite. However, I love to serve them warm with a scoop of creamy vanilla ice cream, or simply alongside a cold glass of milk for that true nostalgic vibe. You can also dust them with a little extra powdered sugar if you’re skipping the frosting (though I highly recommend the browned butter frosting!), or add some festive sprinkles on top of the frosting for a party-ready look. A tiny sprinkle of flaky sea salt on top of the frosting can also wonderfully enhance the chocolate flavor.
Storage and Make-Ahead
Proper storage is key to maintaining the freshness and texture of your homemade brownies:
- Room Temperature: Frosted brownies can be stored at room temperature in an airtight container for 3-4 days. While the frosting contains milk, the high sugar content acts as a preservative, so refrigeration usually isn’t necessary unless your kitchen is exceptionally warm.
- Refrigeration: If your climate is very warm, or if you prefer a firmer brownie, you can refrigerate them. Just be aware that refrigeration can sometimes slightly alter the texture, making them a bit denser. Allow them to come closer to room temperature before serving for the best flavor.
- Freezer Storage: These brownies are excellent for freezer storage! Once completely cooled, cut the brownies into individual squares. You can freeze them frosted or unfrosted. Wrap each square tightly in plastic wrap, then place them in a freezer-safe bag or airtight container. They will stay fresh in the freezer for up to 3 months. To thaw, simply remove the desired number of brownies from the freezer and let them come to room temperature on the counter.
Adaptations for Special Occasions
These moist brownies are incredibly versatile! They are truly great for potlucks, holiday parties, or as a nostalgic school lunch-style treat. For larger gatherings, you can easily double the recipe and bake it in a larger sheet pan (adjusting baking time as needed, usually a bit longer). The browned butter twist makes them feel extra special without extra fuss.
Conclusion
And there you have it! My ultimate recipe for Lunch Lady Brownies, reimagined with a touch of culinary sophistication thanks to the browned butter. This isn’t just an easy brownie recipe; it’s a journey back to childhood with a delicious upgrade, delivering exceptional richness, moisture, and that utterly irresistible fudgy chew. Whether you’re a seasoned baker or just starting out, I assure you, you have everything you need to create these culinary delights.
So go ahead, preheat your oven, embrace the nutty aroma of browned butter, and bring a piece of sweet nostalgia to your table. Feel free to experiment with recipe variations like adding your favorite mix-ins, perhaps some chopped walnuts or extra chocolate chips, or even a dash of cinnamon for warmth. For another delightful baking project, consider our delicious banana cake. I can’t wait to hear how these become a new favorite in your home!
FAQ
What is the best way to store Lunch Lady Brownies, and can they be frozen?
Store frosted homemade brownies in an airtight container at room temperature for 3-4 days. Yes, they freeze beautifully! For freezer storage, cut cooled brownies into squares, wrap individually in plastic wrap, then place in a freezer-safe bag or container for up to 3 months. Thaw at room temperature before serving.
Do I need to add salt if I’m using unsalted butter?
Yes, if you’re using unsalted butter instead of the specified salted butter, I recommend adding 1/4 teaspoon of fine salt to the brownie batter to balance the flavors and enhance the chocolate.
How do I prevent my brownies from being dry or cakey?
To prevent dry brownies, avoid over-mixing the batter (mix just until combined) and especially avoid over-baking. Use the “scoop and sweep” method for measuring all-purpose flour to ensure you don’t add too much. A toothpick inserted in the center should come out with moist crumbs, not completely clean.
Can I adjust this recipe for different pan sizes (e.g., 8×8 or a sheet pan)?
Yes, you can adjust! For an 8×8 inch pan, you’d typically halve the recipe and bake for a similar time, keeping a close eye on doneness. For a larger sheet pan, you can double the recipe. Keep in mind that baking times and sometimes temperatures may need slight adjustments for different pan sizes and materials (e.g., glass vs. metal).
What variations or mix-ins can I add to Lunch Lady Brownies?
These chocolate brownies are wonderful with mix-ins! Popular choices include chopped walnuts, pecans, or extra chocolate chips (milk, dark, or white). You can also add 1 teaspoon of espresso powder for deeper chocolate flavor, a dash of cinnamon for warmth, or a splash of liquor like Kahlua for an adult twist.
How do I achieve perfectly smooth and spreadable chocolate frosting?
Ensure your browned butter for the frosting is completely cooled to room temperature before mixing. Sift your powdered sugar to prevent lumps. If the frosting is too thick, gradually add very small amounts (1/2 teaspoon at a time) of milk until it’s smooth and spreadable. Use an electric stand-mixer with a paddle attachment for the best results.
How do I make high-altitude baking adjustments for these brownies?
High-altitude baking can be tricky! For brownies, common adjustments include slightly increasing liquid (a tablespoon or two of milk), slightly decreasing sugar (1-2 tablespoons), and sometimes increasing oven temperature by about 25°F (15°C) and/or shortening baking time. Since this recipe doesn’t use chemical leavening, the main concerns are liquid evaporation and sugar concentration. Start by increasing liquid slightly and monitoring baking time closely. Every kitchen is different, so some experimentation might be needed.
Do I need to line my baking dish with parchment paper?
Absolutely, yes! Lining your baking dish with parchment paper (leaving an overhang) is highly recommended. It prevents sticking, makes it incredibly easy to lift the entire batch of brownies out of the pan, and helps achieve those coveted clean, sharp cuts.
Can I skip the frosting and still enjoy these brownies?
Yes, you can definitely skip the frosting! These brownies are incredibly rich and fudgy on their own, especially with the browned butter twist. If you prefer them unfrosted, they are still a delicious treat. You might consider dusting them with a little powdered sugar before serving for a touch of elegance.
Ultimate Lunch Lady Brownies with Browned Butter Twist
Ingredients
Equipment
Method
- First, preheat your oven to 350°F (175°C).
- Line a 9x13-inch baking dish completely with parchment paper, leaving an overhang on the longer sides. Lightly spray the parchment paper with non-stick spray. Set this prepared baking dish aside.
- In a light-colored saucepan or skillet, melt the 1 cup of salted butter over medium heat. Continue to cook, stirring occasionally, until the butter begins to foam. Watch closely as the milk solids at the bottom turn golden, then amber, releasing a rich, nutty aroma. Remove from heat immediately and pour into a heat-safe bowl to stop cooking. Let cool slightly for about 5-10 minutes.
- In the bowl of an electric stand-mixer fitted with the paddle attachment, add the slightly cooled browned butter and 1/2 cup of unsweetened cocoa powder. Blend until completely smooth and fragrant.
- Add the 2 cups of all-purpose flour and 2 cups of granulated sugar to the mixture. Beat them together until just combined.
- Next, incorporate the 4 large eggs, one at a time, followed by 4 teaspoons of vanilla extract. Mix just until everything is combined and no streaks of flour remain. Do not overmix; the batter will be quite thick.
- Pour the thick brownie batter into your prepared baking dish and spread it out evenly with an offset spatula or the back of a spoon.
- Bake for 25 to 30 minutes. A toothpick inserted into the center should come out with moist crumbs, but not wet batter. Avoid over-baking.
- Remove the brownies from the oven and let them stand in the pan for 15 minutes before frosting. The brownies should still be warm.
- While the brownies are cooling, make the second batch of browned butter for the frosting. In a small, light-colored saucepan, melt the 1/4 cup of salted butter over medium heat. Cook, stirring, until it foams and the milk solids turn a rich amber color with a nutty aroma. Pour into a separate heat-safe bowl and allow it to cool completely to room temperature.
- Once the browned butter is cool and slightly solidified, beat it together with the 1/4 cup of 2% milk, 1/4 cup of unsweetened cocoa powder, and 3 cups of powdered sugar in your stand mixer. Beat until the frosting is perfectly smooth and spreadable. If too thick, gradually add more milk (1 teaspoon at a time).
- Pour the smooth, rich chocolate frosting over the warm (but not hot!) brownies. Spread it out evenly with an offset spatula.
- Let the brownies cool completely on a cooling rack before cutting and serving. This allows them to set properly, ensuring that iconic fudgy texture and clean slices.
Notes
Printable Recipe Card
Want just the essential recipe details without scrolling through the article? Get our printable recipe card with just the ingredients and instructions.